


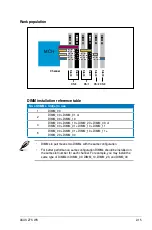


ASUS Z7S WS
2-13
4. Repeat steps 1 to 3 to install the other heatsink if you have installed a second
CPU, then connect the fan cable to the 4-pin connector labeled CPU1_FAN.
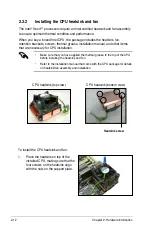
2. Use a Phillips screwdriver to tighten
the four heatsink screws in a
diagonal sequence.
DO NOT forget to connect the CPU fan cable! Hardware monitoring errors may
occur if you fail to plug this connector.
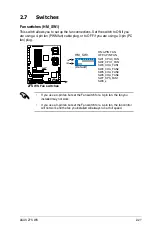
3. Connect the fan cable to the 4-pin connector labeled CPU0_FAN.
Z7S WS
®
Z7S WS CPU fan connectors
CPU0_FAN
CPU1_FAN
GND
FAN Power
FAN Speed
PWM Control
CPU0_FAN
GND
FAN Power
FAN Speed
PWM Control
CPU1_FAN
Содержание Z7S WS - Motherboard - SSI CEB
Страница 1: ...Motherboard Z7S WS ...
Страница 14: ...xiv ...
Страница 16: ...ASUS Z7S WS Chapter summary 1 1 1 Welcome 1 1 1 2 Package contents 1 1 1 3 Special features 1 2 ...
Страница 66: ...2 44 Chapter 2 Hardware information ...
Страница 67: ...3 Chapter 3 Powering up This chapter describes the power up sequence and ways of shutting down the system ...
Страница 68: ...ASUS Z7S WS Chapter summary 3 3 1 Starting up for the first time 3 1 3 2 Turning off the computer 3 2 ...
Страница 108: ...4 36 Chapter 4 BIOS setup ...
Страница 153: ...A Appendix CPU features The Appendix describes the CPU features and technologies that the motherboard supports ...
Страница 154: ...ASUS Z7S WS Chapter summary A A 1 Intel EM64T A 1 A 2 Enhanced Intel SpeedStep Technology EIST A 1 ...