


Chapter 2: Hardware Information
2-30
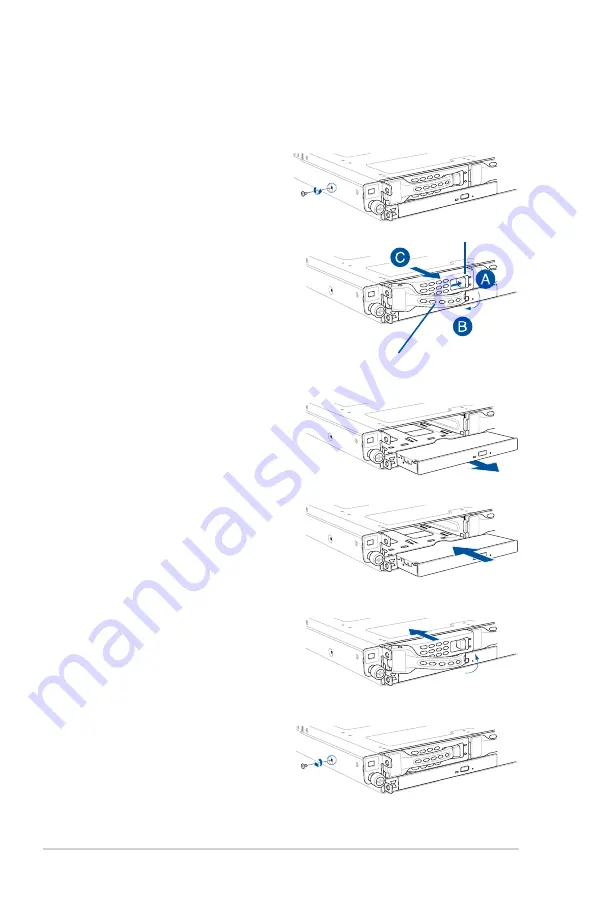
2.8.6
Replacing optical drive (optional)
This server system supports a slim-type optical disk drive.
To replace the optical disk drive:
1.
Remove the screw that secures the
optical drive. Set aside.
6.
Carefully insert the drive tray and push
it all the way to the depth of the bay
until just a small fraction of the tray
edge protrudes.
7.
Push the tray lever until it clicks, and
secures the drive tray in place. The
drive tray is correctly placed when its
front edge aligns with the bay edge.
8.
Secure the optical drive with the screw
that you removed in step 1.
5. Carefully insert the replacement
optical disk drive module into the drive
bay until it is securely seated in place.
4.
Pull the optical drive module.
3.
Hold the tray lever and pull the drive
tray out of the bay.
2.
Push the spring lock to the right (A) to
remove the SATA/SAS drive tray then
pull the tray lever outward (B).
The drive tray ejects slightly after you
pull out the lever (C).
Spring lock
Tray lever
Содержание RS300-E10 Series
Страница 1: ...1U Rackmount Server RS300 E10 PS4 RS300 E10 RS4 User Guide ...
Страница 10: ...x ...
Страница 39: ...2 19 ASUS RS300 E10 Series No Slot location Short Description 2 slot 6 PCIE6 PCI E x16 x16 Gen3 link ...
Страница 55: ...3 5 ASUS RS300 E10 Series 3 2 Rail kit dimensions 589mm 43 6mm 900mm 43 6mm ...
Страница 56: ...Chapter 3 Installation Options 3 6 ...
Страница 58: ...Chapter 4 Motherboard Information 4 2 4 1 Motherboard layout ...
Страница 80: ...Chapter 4 Motherboard Information 4 24 ...
Страница 126: ...5 46 Chapter 5 BIOS Setup ...
Страница 144: ...6 18 Chapter 6 RAID Configuration ...
Страница 151: ...ASUS RS300 E10 Series 7 7 5 Follow the onscreen instructions to complete the installation ...
Страница 152: ...7 8 Chapter 7 Driver Installation ...
Страница 153: ...Appendix This appendix includes additional information that you may refer to when configuring the motherboard Appendix ...
Страница 154: ...A 2 Appendix P11C C 4L SYS block diagram ...