Chapter 2: Hardware Information
2-2
4
3
2
1
2.1
Chassis cover
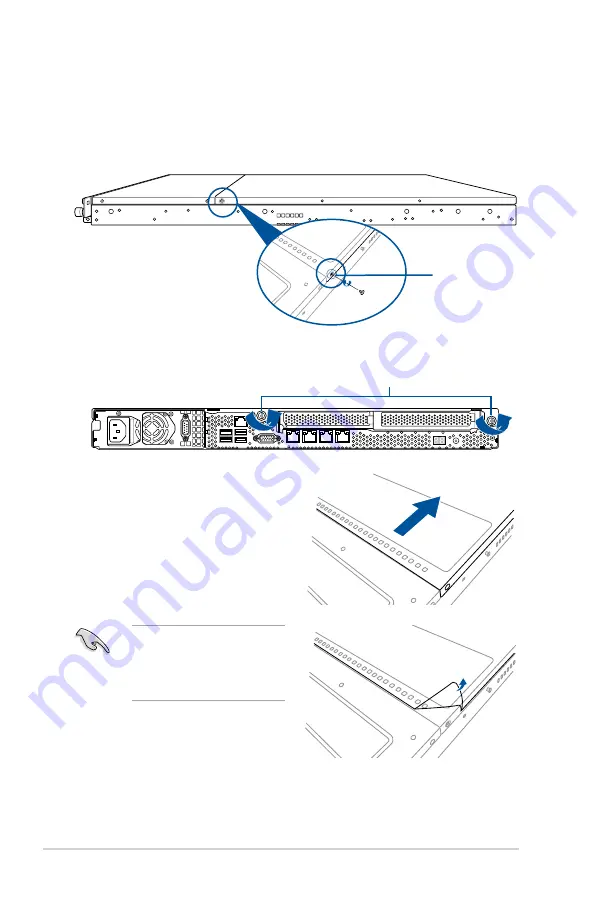
Removing the rear cover
1.
Locate and remove the front side screws.
3.
Firmly hold the cover and slide it toward
the rear panel for about half an inch
until it is disengaged from the chassis.
4.
Lift the cover from the chassis.
5.
To reattach the rear cover, reverse step
1 to 4.
2.
Loosen the two thumbscrews on the rear panel to release the rear cover from the
chassis.
Thumbscrews
A protection film is pre-attached to
the system cover before shipping.
Please remove the protection film
before turning on the system for
proper heat dissipation.
Front side screw
Содержание RS300-E10 Series
Страница 1: ...1U Rackmount Server RS300 E10 PS4 RS300 E10 RS4 User Guide ...
Страница 10: ...x ...
Страница 39: ...2 19 ASUS RS300 E10 Series No Slot location Short Description 2 slot 6 PCIE6 PCI E x16 x16 Gen3 link ...
Страница 55: ...3 5 ASUS RS300 E10 Series 3 2 Rail kit dimensions 589mm 43 6mm 900mm 43 6mm ...
Страница 56: ...Chapter 3 Installation Options 3 6 ...
Страница 58: ...Chapter 4 Motherboard Information 4 2 4 1 Motherboard layout ...
Страница 80: ...Chapter 4 Motherboard Information 4 24 ...
Страница 126: ...5 46 Chapter 5 BIOS Setup ...
Страница 144: ...6 18 Chapter 6 RAID Configuration ...
Страница 151: ...ASUS RS300 E10 Series 7 7 5 Follow the onscreen instructions to complete the installation ...
Страница 152: ...7 8 Chapter 7 Driver Installation ...
Страница 153: ...Appendix This appendix includes additional information that you may refer to when configuring the motherboard Appendix ...
Страница 154: ...A 2 Appendix P11C C 4L SYS block diagram ...


