


2 8
2 8
2 8
2 8
2 8
2.10
2.10
2.10
2.10
2.10 Serial A
Serial A
Serial A
Serial A
Serial ATTTTTA (SA
A (SA
A (SA
A (SA
A (SATTTTTA) / Serial A
A) / Serial A
A) / Serial A
A) / Serial A
A) / Serial ATTTTTAII (SA
AII (SA
AII (SA
AII (SA
AII (SATTTTTAII) Hard Disks
AII) Hard Disks
AII) Hard Disks
AII) Hard Disks
AII) Hard Disks
Installation
Installation
Installation
Installation
Installation
This motherboard adopts JMicron
®
JMB363 chipset that supports Serial ATAII
(SATAII) hard disks and RAID functions. It also adopts NVIDIA
®
nForce3 250 south
bridge chipset that supports Serial ATA (SATA) hard disks and RAID functions. You
may install SATA / SATAII hard disks on this motherboard for internal storage devices.
This section will guide you to install the SATA / SATAII hard disks.
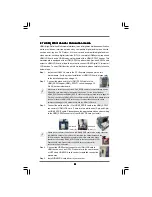
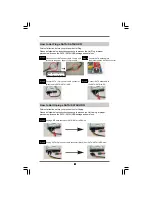
STEP 1: Install the SATA / SATAII hard disks into the drive bays of your chassis.
STEP 2: Connect the SATA power cable to the SATA / SATAII hard disk.
STEP 3: Connect one end of the SATA data cable to the motherboard’s SATA /
SATAII connector.
STEP 4: Connect the other end of the SATA data cable to the SATA / SATAII hard
disk.
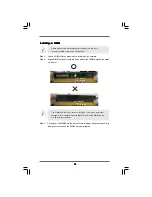
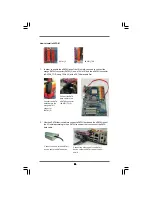
To create RAID with two HDDs, please insert the two HDDs simulta-
neously to either SATA connectors (black) or SATAII connectors (red and
orange). If you insert one HDD to SATA connector and the other HDD to
SATAII connector, you are not allowed to create RAID.


