3. QUICK START
This chapter provides the basics you’ll need to create your very first sounds with the
MiniBrute 2, so you can start enjoying its rich, full sounds immediately. In subsequent
chapters, we’ll get deeper into the sound design process so you can create more animated
and complex sounds.
3.1. Create your first sound: the “basic patch”
Once your MiniBrute 2 has been correctly connected to your sound system, set all the
controls to their minimum level: - counter-clockwise for the knobs - lowest position for sliders
- center position (12 o'clock) for controls with – and + (FM 1 and RM) - center position for all
three Tune controls - center position for the Master Volume knob
Switch on your MiniBrute 2, and as you
, set the following parameters to
the recommended values:
• Set the LFO 1 and LFO 2 Sync switches to the Free position
• Set the LFO 1 and LFO 2 Rate controls to the center position
• Set the VCO 2
and
switches to their "up" positions (Sine
wave and Fine)
• Set the FILTER section’s Mode knob to LP
• Set the AD ENVELOPE switches to the
and
positions
• Set the OSC MIXER section’s square wave slider to maximum
• Turn the FILTER section’s Cutoff knob fully clockwise
• Set the Control section’s
switch to Wheel
• Set the Control section’s
switch to LFO 1 Vib
• Set the Sync setting to Int
• Set the Modulation Wheel to minimum
♪
: No cables should be connected to the patch bay yet.
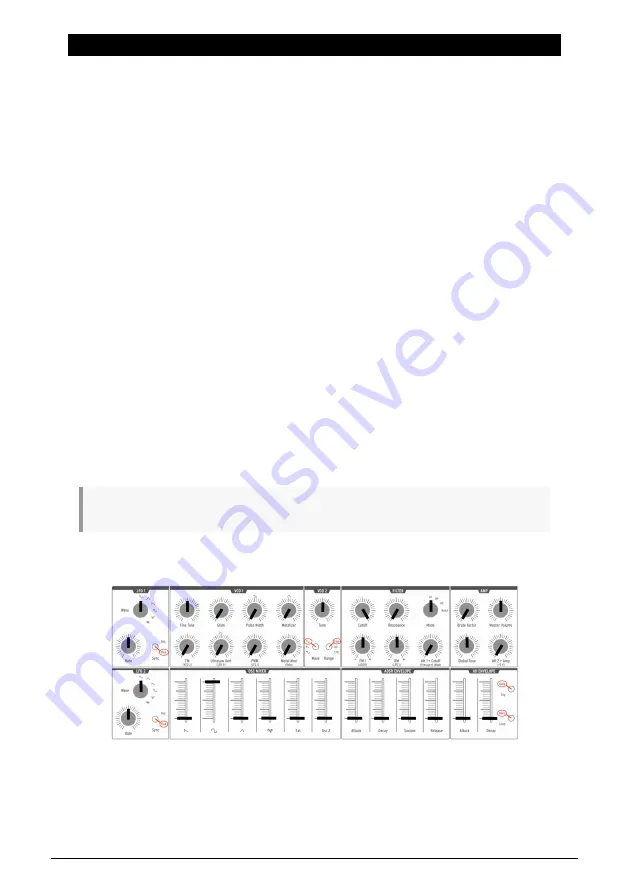
These settings give us a unified starting point for the following examples. Here’s a visual
representation of the patch:
Now, press a key; you should hear your very first MiniBrute 2 sound!
That's a fat square wave... but it sounds a bit static, doesn't it? We’ll improve this in the
chapter. But if you simply want to play the keyboard for a moment, you
can use the Down or Up
buttons to transpose the notes to the range you prefer.
The (basic) patch
Arturia - User Manual MiniBrute 2 - Quick start
10
Содержание minibrute 2 series
Страница 1: ...USER MANUAL...


