


Battery Installation
1. Open battery chamber cover.
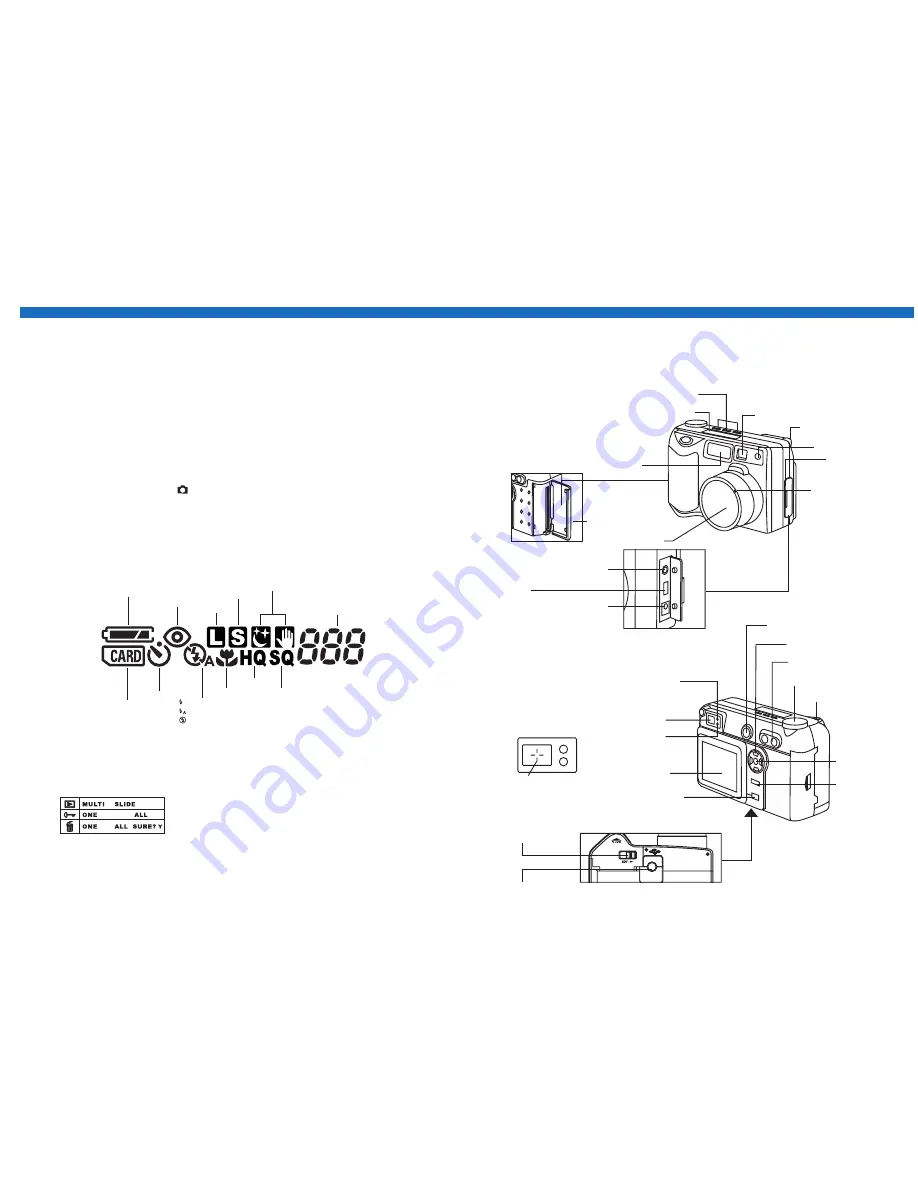
Flash
Lens
Flash sensor
Control panel
Viewfinder
Self-timer lamp (red)
Viewfinder focus dial
Connector
cover
Macro / self-timer / flash
AC adapter
connector
Video output
connector
Computer
connector
USB
card compartment
cover
NTSC
Viewfinder
Process lamp
shooting ready (green)
Online lamp
AF ready (orange)
LCD monitor
Display button
Menu button
Enter button
Shutter release button
Mode dial
Zoom lever
Navigation
Power button
Battery compartment open/close
lever(bottom)
Tripod mount (bottom)
Viewfinder
Autofocus mark
DC 3550 Quick Start Guide
2. Insert 4 batteries into the battery chamber. Be sure to use correct polarity as shown
on the battery chamber inside cover.
3. Close battery chamber cover.
Compact Flash Card Installation
1.Open the CF card slot.
2. Insert the CF card into the slot. Be sure that the CF card is in the upright position.
3. Close the CF card slot.
Powering Up
1.Turn the power on by sliding the POWER button following the arrows.
2.Turn the MODE dial to
.
DC3550 Nomenclature
3.You are ready to take photographs.
LCD modes
Standard quality
Red-eye reducing
Macro
Frame number
High quality
Large size
Standard size
CF card check
Battery check
Flash Fill-in
Flash auto
Flash off
Night scene & shake avoid
Self-timer
Taking Photos
1.Compose the image in the viewfinder or LCD Monitor Display.
2.Press the Shutter Button down halfway to lock the focus.
3.After the focus is locked continue pressing the Shutter Button to take the picture.
To find out more information on how to:
Use LCD Modes, see page 11-12 in the User's Manual.
Setting Picture Display
Press MENU button to set the display mode.
For more information on how to:
Use Multi Frames Mode, see page 20-21 in the User's Manual
Use Slide Modes, see page 20-21 in the User's Manual
Enlarging the picture display, see page 20 in the User's Manual
Содержание DC3550
Страница 1: ...Digital Camera DC3550 User s Manual 9 9 9 9 6 8 8 5 5 ...
Страница 2: ......
Страница 4: ......
Страница 10: ...Accessory Set up CARD CARD Figure 1 Figure 2 Figure 3 Figure 4 6 ...
Страница 32: ...28 Install way Follow on screen of your computer click START SETTING CONTROL PANEL add New Hardware ...
Страница 33: ...29 Note Screen display the driver file name automatically Then click Next ...
Страница 34: ...30 Note Select the driver Then click Next Search ...
Страница 35: ...31 Note Select locations of data source Then click Next ...
Страница 36: ...Digital Camera Zoom 32 Note Screen display to confirm the driver location Then click Next F ...
Страница 38: ...34 Note Screen display a removable Disk appear Then click it ...
Страница 39: ...35 Note A new file appear ...
Страница 40: ...36 Note Click the file ...
Страница 41: ...37 Note Click the file to playback picture ...
Страница 43: ...39 ...
Страница 44: ...40 Note The set up process automatically please wait ...
Страница 45: ...41 Note The software recommended that you exit all Windows programs If you ready click Next ...
Страница 46: ...42 Note Display the LICENSE AND WARRANTY information If you agree click Yes ...
Страница 47: ...43 Note Please select the image file type s that you wish associate then click Next ...
Страница 48: ...44 Note Choose the file destination location Browse the destination folder then click Next ...
Страница 49: ...45 Note select folder name Accessories or new then click Next ...
Страница 50: ...46 8 21 8 21 Note display Current setting automatically then click Next ...
Страница 51: ...47 Note display Online Registration automatically then click Continue ...
Страница 52: ...48 ...
Страница 54: ...50 Note Program way click Start Programs MGI PhotoSuite8 21SE MGI PhotoSuite8 21SE exe or click quick mark ...
Страница 55: ...51 ...
Страница 56: ...52 ...
Страница 57: ...53 ...
Страница 58: ...54 ...
Страница 59: ...55 21SE ...
Страница 61: ...57 ...
Страница 62: ...58 ...
Страница 63: ...59 Note The instruction of Location Installation Update then click Next ...
Страница 64: ...60 Note The software recommended that exit all Windows programs If ready click Next ...
Страница 65: ...61 Note Display the LICENSE AND WARRANTY information If you agree click Agree ...
Страница 66: ...62 Note Choose the file destination location Browse the folder then click Next ...
Страница 67: ...63 Note Please select the image file type s that you wish associate then click Next ...
Страница 68: ...64 Note Select folder name Accessories or new then click Next ...
Страница 69: ...65 Note Selection of Plugin then click Next ...
Страница 70: ...66 Note The set up process automatically please wait ...
Страница 71: ...67 Note The instruction of Setup Assistant then click Next ...
Страница 72: ...68 Note The MIME Setting then click Next ...
Страница 73: ...69 Note Select the file type assocition then click Next ...
Страница 75: ...71 ...
Страница 76: ...72 ...
Страница 77: ...73 ...
Страница 78: ...74 ...
Страница 79: ...75 ...
Страница 88: ...Play Forward Backward Last Frame First Frame Volume Mute TV Switch QUICKTIME5 MENU QUICK GUIDE ...
Страница 89: ......


