background image

12

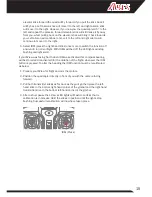
1. Ascend and descend. Gently push the throttle stick 

forward to ascend and backward to descend. 

(Mode 2 Transmitter Shown) 


2. Yaw. With the XView in a stable hover, gently move 

the rudder stick to the left to yaw (rotate) the quad 

in an anticlockwise direction. Move the rudder 

stick to the right to yaw the quad in a clockwise 

direction. 

(Mode 2 Transmitter Shown) 


3. Roll. With the XView in a stable hover, gently move 

the aileron stick to the left make the XView move 

sideways to the left. Move the aileron stick to the 

right to make the XView move sideways to the 

right. 

(Mode 2 Transmitter Shown) 


4. Pitch. With the XView in a stable hover, gently 

push the elevator stick forward to move the quad 

forward. Gently pull the elevator stick backward to 

move the quad backward. 

(Mode 2 Transmitter Shown)

Содержание AZSQ3300

Страница 1: ...of reach of children 3 years of age and younger MADE IN CHINA Ensure you have the latest version of the manual by visiting our website Distributed in the UK by J Perkins Distribution Ltd Lenham Kent U...

Страница 2: ...2 Specification Length 137 0mm Width 137 0mm Height 38 0mm Weight 42 0g Flight battery 1S 3 7V 300mAh LiPo Transmitter 2 4GHz with digital trim Charger 1S USB...

Страница 3: ...Orientation Mode 14 Flying the XView in FPV Mode 16 Controlling the XView with your Smartphone 16 Using the Optional Ares VR Headset 17 Gyro Recalibration 17 Propeller Identification 18 Replacement Pa...

Страница 4: ...ord your flight FCC Information This device complies with part 15 of the FCC rules Operation is subject to the following two conditions 1 This device may not cause harmful interference and 2 this devi...

Страница 5: ...s around your model as this will help to avoid collisions and or injury Never operate your model if the voltage of the batteries in the transmitter is too low Always operate your model in an open area...

Страница 6: ...ss and react immediately to any potential problems that may occur After flying discharging the battery you must allow it to cool to ambient room temperature before recharging To charge the LiPo batter...

Страница 7: ...s 1 x XView FPV quadcopter 1 x 1S 3 7V 300mAh LiPo 1 x 2 4GHz transmitter 1 x USB charger 1 x Spare propeller set 1 x Smartphone mount for transmitter Required to Complete 4 x AA Batteries for the tra...

Страница 8: ...Quadcopter Details Rear Front Camera Propeller A2 clockwise rotation Propeller B2 anti clockwise rotation Propeller A2 clockwise rotation Propeller B2 anti clockwise rotation Battery Hatch Landing Ski...

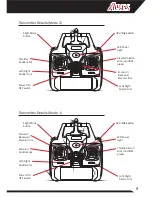
Страница 9: ...M press 360 Flip button Transmitter Details Mode 2 Transmitter Details Mode 1 Flight Mode button Forward Backward Elevator trim Elevator Rudder stick Left Right Rudder trim Power ON OFF switch Left Ri...

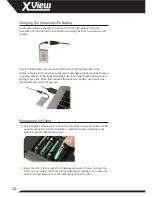
Страница 10: ...can be seen to be fully charged when the red LED light goes out When this happens the battery is ready to use and can be disconnected from the charge lead Preparation for Flight 1 Use a Phillips screw...

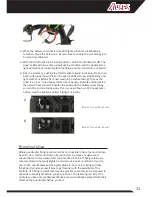
Страница 11: ...ttery cover facing you and the camera facing away If you ve never flown an R C quadcopter before read the section entitled Flying Your X View Flying Your XView Where quadcopter flying is concerned it...

Страница 12: ...to yaw the quad in a clockwise direction Mode 2 Transmitter Shown 3 Roll With the XView in a stable hover gently move the aileron stick to the left make the XView move sideways to the left Move the ai...

Страница 13: ...the XView displays a natural tendency to rotate anticlockwise use the rudder trim to correct this by pressing the right side of the button Mode 2 Transmitter Shown 2 Deviation in roll If the XView dis...

Страница 14: ...irection of the stick movement Once the quad has flipped the function will be cancelled so that normal flight can resume Be aware that additional flying space will be required when performing flips so...

Страница 15: ...will stop flashing and light solid If your XView was facing North when IOM was activated this compass bearing will be stored and reactivated for the duration of the flight whenever the IOM button is p...

Страница 16: ...spring clip smartphone holder over the transmitter aerial push it firmly into position then clip your smartphone into the holder Controlling the XView Camera with your Smartphone The WiFi_UFO smartpho...

Страница 17: ...os to re establish stable flight and correct any control malfunction following a crash for example you can do this in the following way 1 Prepare your Recon FPV for flight and arm the motors 2 Positio...

Страница 18: ...on numbers of the propellers can be found on the top side near the center root section of the blade Note that since the blades are a simple push fit on the motor shafts a gentle tug will easily remove...

Страница 19: ...kes in flight 1 One or more propeller blades are damaged or deformed 1 Replace the damaged deformed propellers The quadcopter is unstable in flight and difficult to trim 1 One or more propeller blades...

Страница 20: ...mity Declaration This device has been tested in accordance with the relevant harmonised European directives This product s design fulfils the protective aims of the European Community relating to the...

Страница 21: ...cost for inspection Provided the warranty conditions have been met within the warranty term period the components that are found to be defective incorrectly manufactured or assembled may be repaired o...

Страница 22: ...the defect The place of purchase retailer where you bought the product will then contact Model Engines Aust Pty Ltd for a Return Authority number and will return the item for warranty assessment to M...

Страница 23: ...174 Australia www modelengines com au Ph 03 8793 5555 warranties modelengines com au This warranty information relates to goods supplied on a wholesale basis by Model Engines Aust Pty Ltd to Australia...

Страница 24: ...www Ares RC com REV 001...

Отзывы: