3-5
3
Prowler XT/XTX
(Table of Contents)
Removing Engine/ Transmission............................. 3-5
Top-Side Components............................................. 3-8
Removing Top-Side Components ........................... 3-8
Servicing Top-Side Components........................... 3-12
Installing Top-Side Components ........................... 3-19
Right-Side Components ........................................ 3-24
Removing Right-Side Components....................... 3-24
Servicing Right-Side Components ........................ 3-26
Installing Right-Side Components......................... 3-28
Left-Side Components .......................................... 3-31
Removing Left-Side Components ......................... 3-31
Servicing Left-Side Components ......................... 3-34
Installing Left-Side Components ........................... 3-35
Center Crankcase Components............................ 3-38
Separating Crankcase Halves............................... 3-38
Disassembling Crankcase Half ............................. 3-38
Servicing Center Crankcase Components............ 3-40
Assembling Crankcase Half .................................. 3-45
Joining Crankcase Halves..................................... 3-47
Installing Engine/Transmission.............................. 3-48
Removing Engine/
Transmission
Many service procedures can be performed without
removing the engine/transmission from the frame.
Closely observe the note introducing each sub-section for
this important information.
Support the vehicle on a suitable lift or jack stands allow-
ing room to perform work from the underside.
NOTE: Locate the jack stands to allow removing of
the center belly panel.
1. Remove the seats and center console; then remove
the left-side and right-side seat-bases.
2. Remove the center belly panel; then drain the oil and
coolant.
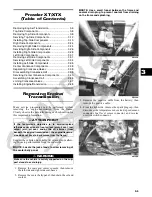
NOTE: Use a small funnel between the frame and
coolant drain plug to prevent coolant from draining
on the frame and splashing.
PR122A
PR156A
3. Remove the negative cable from the battery; then
remove the positive cable.
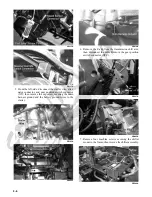
4. From the right-side, remove the spark plug cap; then
disconnect the temperature sensor lead, speed sensor
connector, fuel level sensor connector, and reverse
override switch connector.
PR130A
AT THIS POINT
If the technician’s objective is to service/replace
left-side cover oil seals, front output joint oil seal, rear
output joint oil seal, and/or the oil strainer (from
beneath the engine/transmission), the engine/transmis-
sion does not have to be removed from the frame.
! WARNING
Make sure the vehicle is solidly supported on the sup-
port stands to avoid injury.
Содержание 2013 Prowler XT
Страница 1: ...Prowler XT XTX XTZ ...
Страница 3: ......
Страница 5: ......
Страница 149: ...4 16 NOTES ...
Страница 211: ...7 8 NOTES ...
Страница 232: ...8 21 8 NOTES ...
Страница 233: ... Printed in U S A Trademarks of Arctic Cat Inc Thief River Falls MN 56701 p n 2259 530 ...


