APC-3X14 User Manual
46
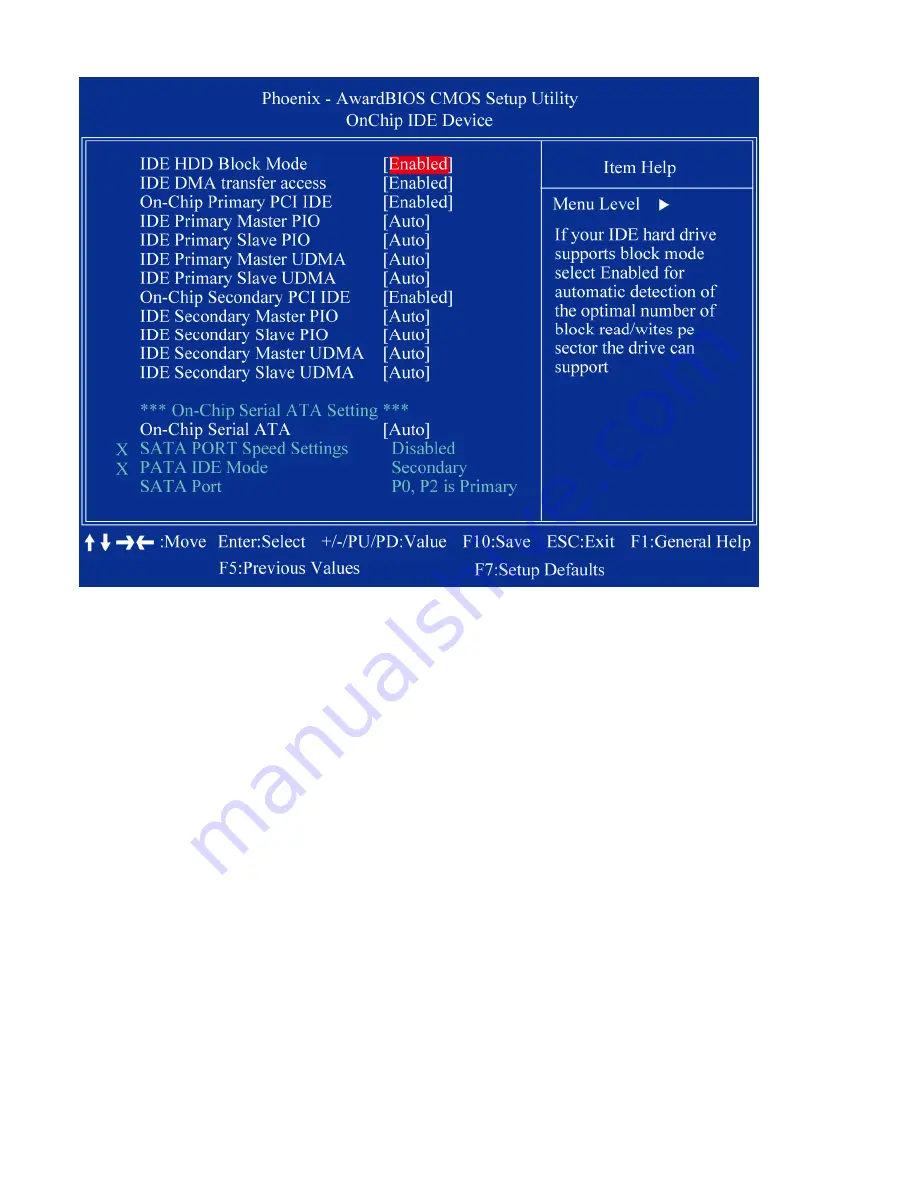
3.3.4.1 OnChip IDE Device
1
IDE HDD Block Mode
Block mode is also called block transfer, multiple commands, or multiple sector read/write. If your IDE
hard drive supports block mode (most new drives do), select Enabled for automatic detection of the
optimal number of block read/writes per sector the drive can support
1
IDE DMA transfer access
To Enable/Disable the IDE DMA transfer access
1
OnChip Primary PCI IDE
The integrated peripheral controller contains an IDE interface with support for two IDE channels. Select
Enabled to activate each channel separately
1
IDE Primary/Secondary Master/ Slave PIO
The four IDE PIO fields allow you to set a PIO mode (0-4) for each of the four IDE devices that the
onboard IDE interface supports. Modes 0 through 4 provide successively increased performance. In
Auto mode, the system automatically determines the best mode for each device.
1
IDE Primary/Secondary Master/ Slave UDMA
Ultra DMA/33 implementation is possible only if your IDE hard drive supports it and the operating
environment includes a DMA driver (Windows 95 OSR2 or a third-party IDE bus master driver). If you
hard drive and your system software both support Ultra DMA/33, select Auto to enable BIOS support
1
On-Chip Secondary PCI IDE
Enable the secondary IDE channel
Содержание APC-3514
Страница 7: ...APC 3X14 User Manual 7 Relative Humidity 10 90 40 non condensing Certificate CE FCC Class A ...
Страница 8: ...APC 3X14 User Manual 8 1 2 Dimensions Figure 1 1 Dimensions of the APC 3514 ...
Страница 9: ...APC 3X14 User Manual 9 Figure 1 2 Dimensions of the APC 3714 ...
Страница 10: ...APC 3X14 User Manual 10 Figure 1 3 Dimensions of the APC 3914 ...
Страница 15: ...APC 3X14 User Manual 15 Chapter 2 Hardware 2 1 Mainboard overview Figure 2 1 Mainboard Overview ...
Страница 29: ...APC 3X14 User Manual 29 11 LCD Inverter Connector 5 pin JBKL ...
Страница 31: ...APC 3X14 User Manual 31 1 Support 24bit x 2CH LVDS ...
Страница 45: ...APC 3X14 User Manual 45 3 3 4 Integrated Peripherals ...
Страница 64: ...APC 3X14 User Manual 64 ...
Страница 65: ...APC 3X14 User Manual 65 6 Click Finish The Setup process is now complete ...
Страница 67: ...APC 3X14 User Manual 67 ...
Страница 69: ...APC 3X14 User Manual 69 Step 6 Setup Progress ...
Страница 70: ...APC 3X14 User Manual 70 Setp 7 Click Finish The Setup process is now complete ...
Страница 72: ...APC 3X14 User Manual 72 ...
Страница 73: ...APC 3X14 User Manual 73 Step 7 Click Finish The Completing the Install Shield Wizard ...
Страница 75: ...APC 3X14 User Manual 75 Step 4 When the Welcome screen appears click Next to continue Step 5 Setup status ...
Страница 76: ...APC 3X14 User Manual 76 ...
Страница 77: ...APC 3X14 User Manual 77 Setp 6 Click Finish The Setup process is now complete ...
Страница 80: ...APC 3X14 User Manual 80 3 A License Agreement appears Click I accept and Next ...
Страница 81: ...APC 3X14 User Manual 81 4 Ready to Install the Program Click Install 5 Installing ...
Страница 82: ...APC 3X14 User Manual 82 6 The Install Shield Wizard Completed appears Click Finish ...
Страница 86: ...APC 3X14 User Manual 86 Select Device to calibrate then you can start to do Advanced Calibration ...
Страница 88: ...APC 3X14 User Manual 88 About This panel displays information about the PenMount controller and driver version ...
Страница 94: ...APC 3X14 User Manual 94 Appendix A Watch Dog Timer ...
Страница 95: ...APC 3X14 User Manual 95 Using the Watchdog Function ...
Страница 96: ...APC 3X14 User Manual 96 ...


