background image

Abatidores de temperatura

28

50LIB061

16-MANTENIMIENTO     

• 

Desconecte siempre el enchufe de alimentación 

ANTES

 de realizar cualquier operación de 

mantenimiento.

• 

¡No quite los dispositivos o resguardos de seguridad antes o durante la limpieza! 


El fabricante declina toda responsabilidad por accidentes, daños y perjuicios causados por el 
incumplimiento de esta obligación. 

• 

El interior de la cámara debe limpiarse al final de cada día de trabajo, para garantizar la higiene y 
la calidad de los productos alimenticios. 


Limpie con agua y detergente neutro no abrasivo. Enjuague con un chorro de agua o trapo/
esponja empapada en agua. 

• 

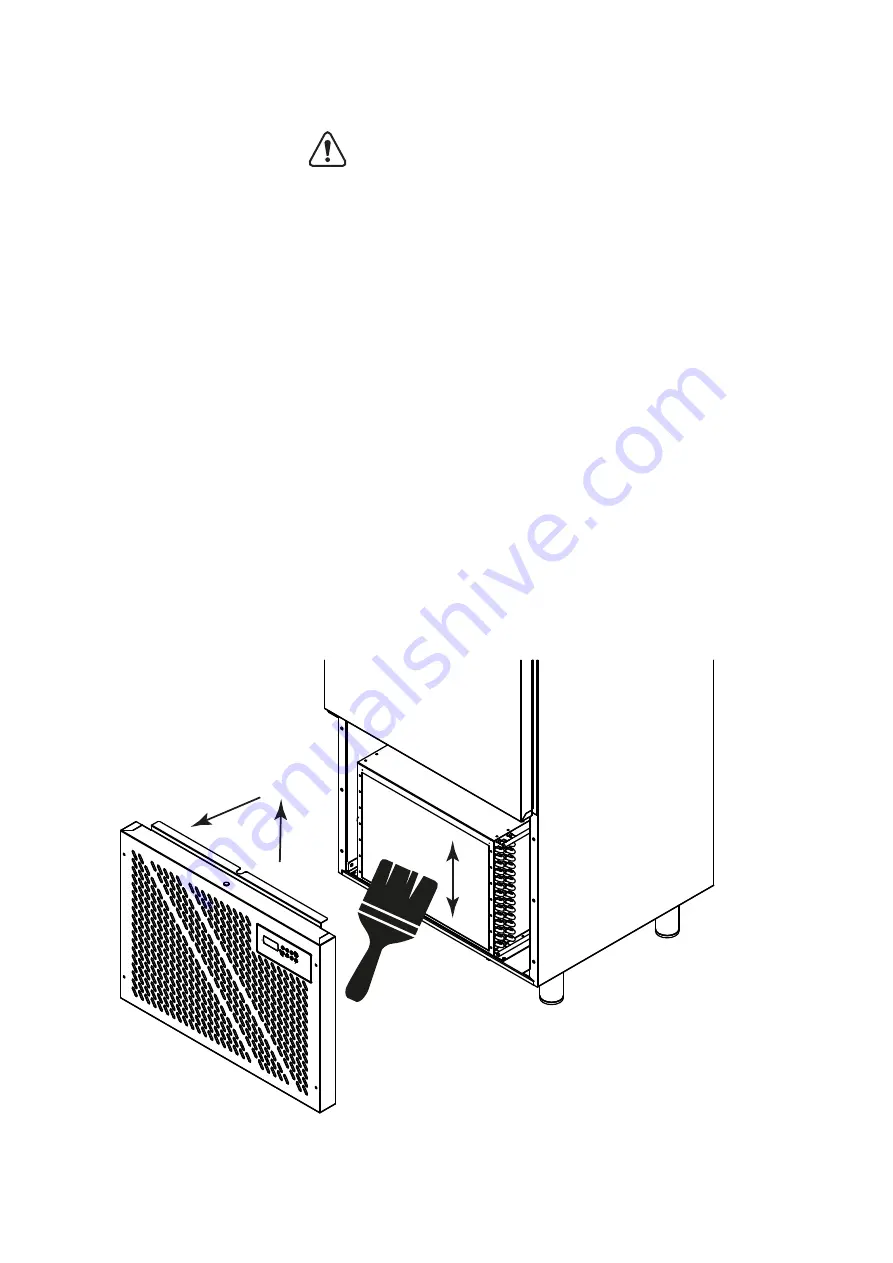
Para acceder al evaporador para la limpieza, utilice un destornillador Phillips para aflojar los 
tornillos de la parte frontal del panel de soporte del ventilador y así, abrirlo. 


Para limpiar el evaporador, puede utilizar un cepillo suave con un movimiento vertical a lo largo de 
la dirección de las aletas de aluminio. 

• 

Para mantener las prestaciones de la unidad, le recomendamos limpiar el condensador al menos 

mensualmente. 


Para quitar la rejilla de protección del condensador, afloje los cuatro tornillos delanteros y después, 
levente la rejilla y tírela. 


Para las unidades equipadas con un filtro en la parte delantera, extráigalo y aspire todo el 
polvo del filtro. Vacíe suavemente la parte delantera del condensador para eliminar el polvo y la 
suciedad. 


Si es necesario, puede utilizar un cepillo suave con un movimiento vertical a lo largo de la 
dirección de las aletas de aluminio. En caso de presencia de aceites en las aletas del condensador, 
utilice un cepillo suave empapado en alcohol.

Содержание ASH05K

Страница 1: ...Blast chillers User Manual 50LIB055 Rev 002 EN...

Страница 2: ...read it carefully before using the device and to conserve it properly for future reference For any further information or if some part of this instruction manual is not clear we remain entirely at you...

Страница 3: ...astes and recycle it responsibly to promote the recy cling of goods All end users should contact a blast chiller supplier or their local government office for more informa tion about the best way to d...

Страница 4: ...ERATION 13 9 1 BLAST CHILLING AND STORAGE 13 9 2 HARD BLAST CHILLING AND STORAGE 14 9 3 DEEP FREEZING AND STORAGE 15 9 4 SOFT DEEP FREEZING AND STORAGE 16 9 5 MANAGEMENT OF THE TEST REGARDING THE CORR...

Страница 5: ...e in bare feet Don t insert any item between the guards and the moving parts before carrying out cleaning or routine maintenance Physically disconnect the machine from the power supply network turn of...

Страница 6: ...et If the appliances are not leveled their operations and condensation outflow can be affected Do not place the unit in direct exposure to sunlight Do not place the unit in limited air exchange areas...

Страница 7: ...7 50LIB055 Blast Chillers 5 2 INSTALLATION OF CONDENSATION TRAY SUPPORTS Insert the racks on the unit base and pull toward the front side...

Страница 8: ...the manufacturer or by the technical assistance service 6 BLAST CHILLER FREEZER USE PRECAUTIONS In order to avoid burns when loading the machine with hot products use kitchen gloves During or at the e...

Страница 9: ...uct surface In order to obtain better results load the trays with product with a maximum thickness of 8 cm for blast chilling or 5 cm for blast freezing For difficult products characterized by a large...

Страница 10: ...IME if supported Operate as follows Make sure that the keyboard is not locked and that no procedure is in progress Hold the DOWN key for 1 s the display will show the first label available Press and r...

Страница 11: ...re Press and release the BLAST CHILLING key or do not operate for 15 s the display will show Pb1 again Do not operate for 60 s 8 5 DISPLAY OF THE TEMPERATURE DETECTED BY THE NEEDLE PROBE Operate as fo...

Страница 12: ...ht option Operate as follows Make sure that the keyboard is not locked and that no procedure is in progress Press and release the AUXILIARY key the AUX LED will switch on off 8 9 LOCKING UNLOCKING THE...

Страница 13: ...D will remain permanently on and the test to verify the correct insertion of the needle probe will be started If it has been decided to start the cycle with timed control the LED will remain permanent...

Страница 14: ...ss and release the HARD SOFT key the HARD LED will flash The display will show the work set point during blast chilling If it has been decided to start the cycle with timed control the display will sh...

Страница 15: ...ss and release the BLAST CHILLING DEEP FREEZING or the HARD SOFT key to restore the normal display press and release the same key again or do not operate for 15 s If the temperature detected by the ne...

Страница 16: ...ows the temperature detected in the chamber and the LED is on If the temperature detected by the needle probe does not reach 18 C within 240minutes deep freezing will not be completed successfully but...

Страница 17: ...ture detected by the needle probe and the LED is on To display the cabinet temperature press and release the BLAST CHILLING DEEP FREEZING or the HARD SOFT key to restore the normal display press and r...

Страница 18: ...START UP Every operating cycle can be preceded by pre cooling Operate as indicated to start pre cooling Make sure the device is in the on status Make sure no procedures are in progress Hold the BLAST...

Страница 19: ...ines in order to obtain a good performance from the unit and avoid alteration of the stored food Position the product in order to achieve an optimal air flow in the whole cell If possible avoid freque...

Страница 20: ...which the most recent event overwrites the oldest The following table illustrates the information relative to the HACCP alarms which the device can memorize Alarm Code Critical Value Date and time of...

Страница 21: ...e alarm occurred at 16 00 continue n30 the alarm occurred at 16 30 dur the display is about to show the duration of the alarm h01 the alarm had duration of 1 h continue n15 the alarm had duration of 1...

Страница 22: ...gress Hold the DOWN key down for 1 s the display will show the first label available Press and release the UP or DOWN key to select CH Press and release the BLAST CHILLING key the display will show th...

Страница 23: ...blast chilling or deep freezing will be in progress If flashing the verification test for the correct insertion of the needle probe will not have been completed successfully needle probe heating will...

Страница 24: ...least one new HACCP alarm C Degree Celsius LED If it is on the temperature unit of measurement will be the degree Celsius F Degree Fahrenheit LED If it is on the temperature unit of measurement will b...

Страница 25: ...conditions Main consequences buzzer activated HP High pressure alarm Solutions clean the condenser filter clean the condenser Main consequences buzzer activated PF Power cut alarm HACCP alarm check t...

Страница 26: ...ode will never be activated Pr2 Needle probe error Solutions the same as the cabinet probe error Pr1 code but relative to the needle probe ll information regarding HACCP alarms will not have been disp...

Страница 27: ...ssor to cool down Intervention of a technician Pressure switch intervention for high pressure HP Display Alarm Clean the condenser Intervention of a technician Compressor contactor broken Intervention...

Страница 28: ...ing use a Philips screwdriver to loosen the screws on the front of the fan holding panel open it In order to clean the evaporator a soft brush can be used with a vertical movement along the direction...

Страница 29: ...ONTACT Wash immediately with an eye wash solution or with clean water keeping the eyelids aside for at least 10 minutes Seek medical assistance 17 1 4 INGESTION Do not provoke vomiting If the injured...

Страница 30: ...Blast Chillers 30 50LIB055 NOTES...

Страница 31: ......

Страница 32: ...Abatidores de temperatura Manual del usuario 50LIB061 Rev 002 ES...

Страница 33: ...consiguiente que lo lea con atenci n antes de usar la m quina y que lo guarde con cuidado para consultas futuras Si necesita m s informaci n o si no ha entendido alguna parte del manual estamos a su d...

Страница 34: ...claje de los productos Todos los usuarios finales deben ponerse en contacto con un proveedor de abatidores de temperatu ra o con la oficina de gobierno local para obtener m s informaci n sobre la mejo...

Страница 35: ...O Y ALMACENAMIENTO 13 9 2 ENFRIAMIENTO R PIDO HARD FUERTE Y ALMACENAMIENTO 14 9 3 CONGELACI N R PIDA Y ALMACENAMIENTO 15 9 4 CONGELACI N R PIDA SOFT suave Y ALMACENAMIENTO 16 9 5 GESTI N DE LA PRUEBA...

Страница 36: ...descalzos No inserte ning n elemento entre los resguardos y las piezas m viles antes de llevar a cabo la limpieza o el mantenimiento de rutina Desconecte la m quina de la red de alimentaci n el ctric...

Страница 37: ...dad regulando los pies Si los dispositivos no est n nivelados tanto su funcionamiento como la salida de la condensaci n pueden sufrir problemas No exponga la unidad a los rayos directos del sol No col...

Страница 38: ...7 50LIB061 Abatidores de temperatura 5 2 INSTALACI N DE LOS PORTA BANDEJAS DE CONDENSACI N Inserte los soportes en la base de la unidad y tire hacia adelante 4 remaches de presi n desmontables...

Страница 39: ...l servicio de asistencia t cnica debe sustituirlo 6 PRECAUCIONES DE USO DEL ABATIDOR DE TEMPERATURA CONGELADOR Para evitar quemaduras cuando se realiza la carga de la m quina con productos calientes u...

Страница 40: ...superficie del producto Para obtener mejores resultados cargue las bandejas con el producto que tenga un espesor m ximo de 8 cm para el enfriamiento r pido o de 5 cm para la congelaci n Para los prod...

Страница 41: ...ACTUAL si es compatible Realice lo siguiente Aseg rese de que el teclado no est bloqueado y que ning n procedimiento est en curso Mantenga pulsada la tecla DOWN ABAJO durante 1 segundo en la pantalla...

Страница 42: ...a de la c mara Realice lo siguiente para salir del procedimiento Presione y suelte la tecla BLAST CHILLING ENFRIAMIENTO R PIDO o no realice ninguna acci n durante 15 segundos en la pantalla se visuali...

Страница 43: ...rese de que el teclado no est bloqueado y que ning n procedimiento est en curso Presione y suelte la tecla AUXILIARY AUXILIAR se encender apagar el LED AUX 8 9 BLOQUEO DESBLOQUEO DEL TECLADO Realice...

Страница 44: ...la tecla START STOP arranque parada el LED permanecer permanentemente encendido e iniciar la prueba para comprobar la correcta inserci n de la aguja de la sonda si se ha decidido iniciar el ciclo con...

Страница 45: ...iar el ciclo con control de la temperatura Presione y suelte la tecla HARD SOFT fuerte suave el LED HARD fuerte parpadear La pantalla mostrar el punto de ajuste de trabajo durante el enfriamiento r pi...

Страница 46: ...eratura detectada por la sonda de aguja alcanza los 3 C la m quina pasa autom ticamente al estado de almacenamiento del mismo modo que ha sido ilustrado anteriormente Para mostrar la temperatura de la...

Страница 47: ...etada correctamente el equipo pasar autom ticamente al estado de almacenamiento y el timbre se activar durante 5 segundos Presione y suelte la tecla para silenciar el timbre Durante el almacenamiento...

Страница 48: ...lla muestra la temperatura detectada por la sonda de aguja y el LED est encendido Para mostrar la temperatura del armario presione y suelte la tecla BLAST CHILLING ENFRIAMIENTO R PIDO DEEP FREEZING CO...

Страница 49: ...a sido indicado para iniciar el pre enfriamiento Aseg rese de que el dispositivo se encuentra en el estado on Aseg rese de que no existen procedimientos en curso Mantenga pulsada la tecla BLAST CHILLI...

Страница 50: ...directrices para obtener un buen rendimiento de la unidad y evitar la alteraci n de los alimentos almacenados Posicione el producto de forma que se obtenga un flujo de aire ptimo en toda la celda Si e...

Страница 51: ...ciente sobrescribir aquel m s antiguo En la siguiente tabla se muestra la informaci n relativa a las alarmas HACCP que puede memorizar el dispositivo Alarma C digo Valor cr tico Fecha y hora del event...

Страница 52: ...continuar n30 la alarma se produjo a las 16 30 horas dur la pantalla est por mostrar la duraci n de la alarma h01 la duraci n tuvo una duraci n de 1 hora continuar n15 la alarmo dur 1 hora y 15 minuto...

Страница 53: ...ndo en la pantalla aparecer la primera etiqueta disponible Presione y suelte la tecla UP ARRIBA o DOWN ABAJO para seleccionar CH Presione y suelte la tecla BLAST CHILLING ENFRIAMIENTO R PIDO en la pan...

Страница 54: ...almacenamiento o un ciclo de congelaci n r pida con temperatura controlada y de almacenamiento se pondr en marcha el enfriamiento r pido con temperatura controlada o la congelaci n r pida Si parpadea...

Страница 55: ...armas HACCP Si parpadea el dispositivo memorizar por lo menos una nueva alarma HACCP C LED de grados cent grados Si est encendido la unidad de la temperatura de medici n ser n los grados Celsius F LED...

Страница 56: ...ecuencias principales timbre activado HP Alarma de alta presi n Soluciones limpie el filtro del condensador limpie el condensador Consecuencias principales timbre activado PF Alarma de corte de energ...

Страница 57: ...e activar jam s Pr2 Error en la sonda de aguja Soluciones al igual que el error de la sonda del armario c digo Pr1 pero relativa a la sonda de aguja No se mostrar la informaci n sobre las alarmas HACC...

Страница 58: ...re que se enfr e el compresor Intervenci n de un t cnico Intervenci n del interruptor de presi n de alta presi n Alarma pantalla HP Limpie el condensador Intervenci n de un t cnico Contacto del compre...

Страница 59: ...a aflojar los tornillos de la parte frontal del panel de soporte del ventilador y as abrirlo Para limpiar el evaporador puede utilizar un cepillo suave con un movimiento vertical a lo largo de la dire...

Страница 60: ...e asistencia m dica 17 1 3 CONTACTO CON LOS OJOS L vese inmediatamente con una soluci n de lavado ocular o con agua limpia manteniendo los p rpados abiertos durante al menos 10 minutos Busque asistenc...

Страница 61: ...Abatidores de temperatura 30 50LIB061 NOTAS...

Страница 62: ......

Страница 63: ...Schnellk hler Bedienungsanleitung 50LIB064 Rev 002 DE...

Страница 64: ...em Grund empfehlen wir Ihnen es aufmerksam zu lesen bevor Sie Ihr Ger t in Betrieb nehmen und es dann zum weiteren Nachlesen sorgf ltig aufzubewahren Sollten Sie weitere Informationen ben tigen oder T...

Страница 65: ...gen und dem Recycling zuf hren Alle Endanwender werden gebeten sich an einen Hersteller von Schnellk hlern oder die Beh rde vor Ort zu wenden um weitere Informationen dar ber zu erhalten wie das Ger t...

Страница 66: ...ALTONS 12 9 BETRIEB 13 9 1 SCHNELLK HLEN UND LAGERN 13 9 2 SCHOCK SCHNELLK HLEN UND LAGERN 14 9 3 EINFRIEREN UND LAGERN 15 9 4 SCHONENDES EINFRIEREN UND LAGERN 16 9 5 UMGANG MIT DEM TEST ZUR BERPR FUN...

Страница 67: ...nicht mit nassen oder feuchten H nden oder F en ber hren Das Ger t nicht barfu bedienen Keine Gegenst nde zwischen die Schutzabdeckungen schieben und keine Teile bewegen bevor das Ger t gereinigt oder...

Страница 68: ...Betrieb und der Kondenswasserabfluss beeintr chtigt werden Das Ger t nicht an einer Stelle aufstellen an der es der direkten Sonneneinstrahlung ausgesetzt werden Das Ger t nicht an einer Stelle aufste...

Страница 69: ...7 50LIB064 Schnellk hler 5 2 MONTAGE DER HALTERUNGEN F R DIE KONDENSWASSERBLECHE Die Schienen auf den Ger teboden setzen und nach vorn ziehen 4x entfernbare Spreiznieten...

Страница 70: ...chselt werden 6 VORSICHTSMASSNAHMEN F R DIE VERWENDUNG DES SCHNELLK HLERS SCHOCKFROSTERS Um beim Beladen des Ger tes mit hei en Produkten Verbrennungen zu vermeiden K chenhandschuhe anziehen W hrend d...

Страница 71: ...malen Luftstrom um die Produktoberfl che zu gew hrleisten F r bessere Ergebnisse beim Schnellk hlen Produkte mit einer Dicke von maximal 8 cm oder beim Schnellk hlen mit 5 cm auf die Bleche legen Bei...

Страница 72: ...8 2 EINSTELLUNG DES DATUMS UND DER UHRZEIT sofern unterst tzt Vorgehensweise berpr fen ob das Tastenfeld evtl gesperrt ist oder bereits ein Programm l uft Die MINUS Taste 1 s lang gedr ckt halten Auf...

Страница 73: ...die SCHNELLK HLEN Taste dr cken oder 15 s lang keine Taste dr cken Auf dem Display wird dann wieder Pb1 angezeigt 60 s lang keine Taste dr cken 8 5 ANZEIGE DER MIT DEM KERNTEMPERATURF HLER GEMESSENEN...

Страница 74: ...ung Vorgehensweise berpr fen ob das Tastenfeld evtl gesperrt ist oder bereits ein Programm l uft Kurz auf die AUX Taste dr cken Die AUX LED schaltet sich ein bzw aus 8 9 SPERREN UND ENTSPERREN DES TAS...

Страница 75: ...et und es wird der Test zur berpr fung der richtigen Position des Kerntemperaturf hlers gestartet Wenn sich f r das zeitgesteuerte Programm entschieden wurde leuchtet die LED best ndig weiter und das...

Страница 76: ...dr cken um das Programm temperaturgesteuert zu starten Kurz auf die SCHOCK SOFT Taste dr cken Die HARD LED blinkt nun Das Display zeigt nun den Sollwert f r die Schnellk hlung an Wenn entschieden wur...

Страница 77: ...igen Wenn die von dem Kerntemperaturf hler gemessene Temperatur 3 C erreicht schaltet das Ger t wie zuvor beschrieben automatisch auf Lagerung um Um die Temperatur im Schrankinneren anzuzeigen kurz au...

Страница 78: ...ignalton Kurz auf eine Taste dr cken um den Signalton stummzuschalten W hrend der Lagerung zeigt das Display die Temperatur innerhalb des Schranks an und die LED leuchtet Wenn die von dem Kerntemperat...

Страница 79: ...tet Um die Temperatur im Schrankinneren anzuzeigen kurz auf die SCHNELLK HLEN EINFRIEREN oder die SCHOCK SOFT Taste dr cken Um zur normalen Displayanzeige zur ckzukehren die gleiche Taste nochmals dr...

Страница 80: ...ert gestartet 9 6 EINRICHTEN DER VORK HLUNG Jedes Betriebsprogramm kann mit Vork hlen eingeleitet werden Einschalten der Vork hlung berpr fen ob sich das Ger t im ON EIN Zustand befindet berpr fen ob...

Страница 81: ...er gelagerten Nahrungsmittel zu verhindern m ssen einige wichtige Richtlinien beachtet werden Das Produkt so in den Schrank stellen dass ein optimaler Luftstrom gew hrleistet ist Wenn m glich sollte v...

Страница 82: ...ann der neueste Alarm den ltesten berschreibt In der nachstehenden Tabelle sind die HACCP Alarme beschrieben die das Ger t speichern kann Alarm Code Kritischer Wert Datum und Uhrzeit Dauer Alarm wenn...

Страница 83: ...011 aufgetreten h16 Der Alarm ist um 16 00 aufgetreten weiter n30 Der Alarm ist um 16 30 aufgetreten dur Das Display zeigt als n chstes die Dauer des Alarm an h01 Der Alarm hat 1 h gedauert weiter n15...

Страница 84: ...e 1 s lang gedr ckt halten Auf dem Display wird der erste Men punkt angezeigt Kurz auf die PLUS oder die MINUS Taste dr cken um CH einzustellen Kurz auf die SCHNELLK HLEN Taste dr cken Das Display zei...

Страница 85: ...es Schnellk hlen oder Einfrieren ist im Gang Blinken Der Test zur berpr fung ob der Kerntemperaturf hler richtig positioniert ist wurde nicht erfolgreich angeschlossen Die Erw rmung des Kerntemperatur...

Страница 86: ...larm gespeichert C Grad Celsius LED Dauerleuchten F r die Temperatur sind Grad Celsius als Ma einheit eingestellt F Grad Fahrenheit LED Dauerleuchten F r die Temperatur sind Grad Fahrenheit als Ma ein...

Страница 87: ...ert HP Hochdruck Alarm L sungen Den Filter des Verfl ssigers reinigen Den Verfl ssiger reinigen Wichtigste Konsequenzen Der Signalton ist aktiviert PF Stromausfall Alarm HACCP Alarm berpr fen ob das G...

Страница 88: ...mperaturf hler Fehler L sungen Die gleichen wie auch bei einem Schrankf hler Fehler Code Pr1 jedoch auf den bezogen Die Informationen f r die HACCP Alarme werden nicht angezeigt L sungen Wenn die St r...

Страница 89: ...einigen und warten bis sich der Kompressor abgek hlt hat Eingriff eines Technikers Der Hochdruck Druckw chter hat ausgel st HP Alarm Den Verfl ssiger reinigen Eingriff eines Technikers Schaltsch tz de...

Страница 90: ...orderseite der Abdeckung an der das Gebl se montiert ist l sen um es zu ffnen Zum Reinigen des Verdampfers kann eine weiche B rste verwendet werden Diese vertikal entlang der Aluminiumlamellen bewegen...

Страница 91: ...17 1 3 AUGENKONTAKT Die Augen sofort mindestens 10 Minuten lang mit einer Augensp ll sung oder sauberem Wasser aussp len dabei die Augenlieder ffnen Einen Arzt bzw eine rztin aufsuchen 17 1 4 VERSCHLU...

Страница 92: ...Schnellk hler 30 50LIB064 ANMERKUNGEN...

Страница 93: ......

Страница 94: ...Cellules de refroidissement rapide Manuel de l utilisateur 50LIB070 Rev 002 FR...

Страница 95: ...t avant l usage et de le conserver soigneusement pour vous y r f rer l avenir Si vous souhaitez recevoir plus d informations ou si vous ne comprenez pas certaines parties du manuel nous nous tenons vo...

Страница 96: ...mani re responsable afin de promouvoir le recyclage des produits Les utilisateurs finaux sont tenus de contacter un fournisseur de cellules de refroidissement rapide ou leur municipalit afin de s inf...

Страница 97: ...DISSEMENT RAPIDE ET CONSERVATION 13 9 2 REFROIDISSEMENT RAPIDE FORT ET CONSERVATION 14 9 3 SURG LATION RAPIDE ET CONSERVATION 15 9 4 SURG LATION RAPIDE DOUCE ET CONSERVATION 16 9 5 GESTION DU TEST CON...

Страница 98: ...s protecteurs et les parties mobiles avant le nettoyage ou la maintenance de routine D connecter physiquement la machine du r seau de distribution lectrique d sactiver l interrupteur principal et d br...

Страница 99: ...l niveau au moyen des pieds r glables Si les appareils ne sont pas mis niveau leur fonctionnement et l vacuation de la condensation peuvent en tre affect s Ne pas exposer l appareil la lumi re directe...

Страница 100: ...50LIB070 Cellules de refroidissement rapide 5 2 INSTALLATION DES SUPPORTS DE PLATEAU DE CONDENSATION Introduire les tag res sur la base de l appareil et tirer vers l avant 4x rivets poussoirs amovible...

Страница 101: ...lac par le fabricant ou le service d assistance technique 6 PR CAUTIONS D UTILISATION DE LA CELLULE DE REFROIDISSEMENT RAPIDE SURG LATION Porter des gants de cuisine afin d viter de se br ler pendant...

Страница 102: ...e Pour obtenir les meilleurs r sultats possibles charger le produit sur les plateaux avec une paisseur maximale de 8 cm pour le refroidissement rapide ou 5 cm pour la surg lation rapide Pour les produ...

Страница 103: ...IGURATION DE LA DATE ET DE L HEURE R ELLES le cas ch ant Proc der de la mani re suivante S assurer que le clavier n est pas verrouill et qu aucune proc dure n est en cours Tenir la touche MOINS appuy...

Страница 104: ...re de la chambre Proc der de la mani re suivante pour quitter la proc dure Appuyer et rel cher la touche de REFROIDISSEMENT RAPIDE ou ne pas intervenir pendant 15 s l cran affichera Pb1 nouveau Ne pas...

Страница 105: ...e S assurer que le clavier n est pas verrouill et qu aucune proc dure n est en cours Appuyer et rel cher la touche AUXILIAIRE la LED AUX s allume s teint 8 9 VERROUILLAGE D VERROUILLAGE DU CLAVIER Pro...

Страница 106: ...modifier la valeur du point de consigne Appuyer et rel cher la touche START STOP MARCHE ARR T la LED reste constamment allum e et le test de v rification de la bonne insertion de la sonde aiguille d m...

Страница 107: ...D s teint appuyer et rel cher la touche de REFROIDISSEMENT RAPIDE nouveau pour d marrer le cycle avec contr le de la temp rature Appuyer et rel cher la touche FORT DOUX la LED HARD FORT se met clignot...

Страница 108: ...endant 15 s Lorsque la temp rature d tect e par la sonde aiguille atteint 3 C l appareil passe automatiquement la conservation de la m me mani re que celle expos e pr c demment Pour afficher la temp r...

Страница 109: ...de s est achev e avec succ s l appareil passe alors automatiquement la conservation et l avertisseur reste activ pendant 5 secondes Appuyer et rel cher une touche pour faire taire l avertisseur Pendan...

Страница 110: ...Pendant la surg lation rapide douce l cran affiche la temp rature d tect e par la sonde aiguille et la LED est allum e Pour afficher la temp rature de l armoire appuyer et rel cher la touche de REFRO...

Страница 111: ...er le pr refroidissement S assurer que l appareil est en tat on S assurer qu aucune proc dure n est en cours Tenir la touche de REFROIDISSEMENT RAPIDE appuy e pendant 1 s la LED et se met clignoter Pr...

Страница 112: ...Il est important de suivre certaines instructions pour obtenir une bonne performance de l appareil et viter que la nourriture conserv e ne s alt re Placer le produit de mani re obtenir une circulation...

Страница 113: ...i l v nement le plus r cent remplace le plus ancien Le tableau ci dessous explique les informations relatives aux alarmes HACCP que l appareil peut m moriser Alarme Code Valeur critique Date et heure...

Страница 114: ...e le 26 mars 2011 h16 L alarme est survenue 16h00 continuer n30 L alarme est survenue 16h30 dur L cran est sur le point d afficher la dur e de l alarme h01 L alarme a dur 1 h continuer n15 L alarme a...

Страница 115: ...ir la touche MOINS appuy e pendant 1 s l cran affiche la premi re tiquette disponible Appuyer et rel cher la touche PLUS ou MOINS pour s lectionner CH Appuyer et rel cher la touche de REFROIDISSEMENT...

Страница 116: ...onservation ou un cycle de surg lation rapide temp rature contr l e et de conservation ont t s lectionn s le refroidissement rapide ou la surg lation rapide temp rature contr l e sont en cours Si elle...

Страница 117: ...nt les alarmes HACCP n ont pas t affich es Si elle clignote L appareil a m moris au moins une nouvelle alarme HACCP C LED des degr s Celsius Si elle est allum e l unit de mesure de la temp rature est...

Страница 118: ...s quences principales avertisseur activ HP Alarme de haute pression Solutions nettoyer le filtre du condenseur nettoyer le condenseur Cons quences principales avertisseur activ PF Alarme pour coupure...

Страница 119: ...tiv e Pr2 Erreur de la sonde aiguille Solutions les m mes que celles en r ponse l erreur de la sonde de l armoire code Pr1 mais relatives la sonde aiguille Toutes les informations concernant les alarm...

Страница 120: ...que le compresseur refroidisse Intervention d un technicien Intervention du pressostat pour haute pression Alarme HP l cran Nettoyer le condenseur Intervention d un technicien Contacteur du compresse...

Страница 121: ...evis Philips afin de desserrer les vis l avant du panneau supportant le ventilateur puis l ouvrir Pour nettoyer l vaporateur utiliser une brosse poils doux avec un mouvement vertical dans le sens de l...

Страница 122: ...1 3 CONTACT AVEC LES YEUX Laver imm diatement avec une solution de lavage oculaire ou de l eau claire en cartant bien les paupi res pendant au moins 10 minutes Obtenir une assistance m dicale 17 1 4 I...

Страница 123: ...Cellules de refroidissement rapide 30 50LIB070 NOTES...

Страница 124: ......

Страница 125: ...Abbattitore di temperatura Manuale utente 50LIB097 Rev 002 IT...

Страница 126: ...le suggeriamo di leggere questo manuale con attenzione prima di utilizzare l apparecchiatura e di conservarlo per un futuro riferimento Per qualsiasi altra informazione o se alcune parti di questo man...

Страница 127: ...nella maniera corretta al fine di migliorare la raccolta differenziata Tutti gli utenti finali dovrebbero contattare un fornitore di abbattitori o le autorit locali per conoscere il modo migliore per...

Страница 128: ...ARE IL CICALINO 12 9 FUNZIONAMENTO 13 9 1 ABBATTIMENTO E CONSERVAZIONE 13 9 2 ABBATTIMENTO HARD E CONSERVAZIONE 14 9 3 SURGELAZIONE E CONSERVAZIONE 15 9 4 SURGELAZIONE SOFT E CONSERVAZIONE 16 9 5 TEST...

Страница 129: ...chio con le mani o i piedi umidi o bagnati Non utilizzare l apparecchio a piedi scalzi Non inserire alcun oggetto attraverso le protezioni o parti mobili prima di eseguire le operazioni di pulizia Pri...

Страница 130: ...erificarsi dei problemi di funzionamento Non installare l apparecchio sotto l esposizione diretta dei raggi solari Non installare l apparecchio in un area con scarso ricambio d aria Non installare l a...

Страница 131: ...50LIB097 Abbattitore di temperatura 5 2 INSTALLARE SUPPORTI VASSOIO RACCOGLI CONDENSA Inserire le guide nelle ferritoie del basamento e tirarle verso la parte frontale 4x Rivetti ad incastro removibil...

Страница 132: ...icato 6 PRECAUZIONI D USO DELL ABBATTITORE Al fine di evitare scottature quando si carica nell abbattitore teglie di prodotto caldo utilizzare guanti protettivi da cucina Aprire lentamente la porta du...

Страница 133: ...dotto nelle teglie favorisce una migliore distribuzione del flusso dell aria sulla superficie dello stesso Al fine di ottenere un risultato migliore caricare le teglie con pezzature spesse al massimo...

Страница 134: ...tato on il display visualizza la temperatura della cella 8 2 IMPOSTARE LA DATA E L ORA solo per modelli con funzione HACCP Operare come segue Assicurarsi che la tastiera non sia bloccata e che non sia...

Страница 135: ...lla procedura Premere e rilasciare il tasto ABBATTIMENTO o non operare per 15sec il display visualizzer nuovamente il valore Pb1 Non operare per 60sec 8 5 VISUALIZZARE LA TEMPERATURA RILEVATA DALLA SO...

Страница 136: ...me segue Assicurarsi che la tastiera non sia bloccata e che non sia in corso alcuna procedura Premere e rilasciare il tasto AUX il LED AUX si accender spegner 8 9 BLOCCO SBLOCCO DELLA TASTIERA Operare...

Страница 137: ...modificare il setpoint di tempo o temperatura Premere e rilasciare il tasto START STOP il LED rimane acceso e verr avviato il test per verificare il corretto inserimento della sonda spillone se invec...

Страница 138: ...ENTO per tornare al ciclo controllato a temperatura Premere e rilasciare il tasto HARD SOFT il LED HARD lampegger Il display mostrer il setpoint di temperatura da raggiungere con l abbattimento Se si...

Страница 139: ...temperatura sonda spillone diviso i due fasi Surgelazione Conservazione Alla conclusione di ogni fase l abbattitore passa alla successiva in maniera automatica Per avviare il ciclo operare come segue...

Страница 140: ...automaticamente in conservazione come precedentemente spiegato 9 4 SURGELAZIONE SOFT E CONSERVAZIONE Il ciclo di surgelazione soft e conservazione a temperatura sonda spillone diviso in tre fasi Fase...

Страница 141: ...cceso Per visualizzare la temperatura della sonda cella premere e rilasciare il tasto SURGELAZIONE per ripristinare la normale visualizzazione del display premere nuovamente il tasto SURGELAZIONE o ev...

Страница 142: ...stato on Assicurarsi che la tastiera non sia bloccata e che non sia in corso alcuna procedura Premere il pulsante ABBATTIMENTO per almeno 1sec il LED lampegger Per fermare un ciclo di pre raffreddame...

Страница 143: ...ere i risultati migliori e per evitare di alterare il cibo stoccato nell abbattitore Posizionare il prodotto in modo da favorire il miglior flusso d aria possibile in tutta la cella Se possibile evita...

Страница 144: ...per ognuno dei 3 allarmi HACCP raggiunto tale limite il nuovo allarme sovrascrive il pi vecchio La tabella seguente riassume le informazioni relative agli allarmi HACCP che possono essere memorizzati...

Страница 145: ...no 26 Marzo 2011 h16 L allarme avvenuto alle ore 16 continua n30 L allarme avvenuto al minuto 30 16 30 dur Il display sta per visualizzare la durata dell allarme h01 L allarme durato 1 ora continua n1...

Страница 146: ...sto GI per almeno 1sec Il display mostrer la prima etichetta disponibile Premere e rilasciare i tasti SU o GI per selezionare il valore CH Premere e rilasciare il tasto ABBATTIMENTO il display mostrer...

Страница 147: ...azione a temperatura in corso un ciclo di abbattimento o surgelazione controllato a temperatura Se il LED lampeggia Il test per la verifica del corretto inserimento della sonda spillone non stato comp...

Страница 148: ...ti gli allarmi HACCP non sono state completamente visualizzate Se il LED lampeggia L abbattitore ha memorizzato almeno un allarme HACCP C LED gradi Celsius Se il LED acceso L unit di misura della temp...

Страница 149: ...Attivazione cicalino HP Allarme alta pressione Soluzione Pulire il filtro condensatore se previsto Disconnettere l alimentazione elettrica e pulire il condensatore Principali conseguenze Attivazione c...

Страница 150: ...Allarme sonda spillone Soluzione Sono applicabili le stesso soluzioni dell allarme sonda cella codice Pr1 ma relative alla sonda spillone Principali conseguenze Se l allarme interviene durante lo stan...

Страница 151: ...correttamente Pulire il condensatore e attendere che il compressore si raffreddi Far intervenire un tecnico autorizzato Intervento del pressostato di massima viene visualizzato HP Pulire il condensato...

Страница 152: ...i danneggiare l apparecchio o le ventole o il loro cavo Per pulire l evaporatore utilizzare un pennello a setole morbide eseguendo dei movimenti verticali seguendo la direzione delle lamelle Non utili...

Страница 153: ...formazione di vescicole chiedere immediata assistenza medica 17 1 3 CONTATTO CON GLI OCCHI Lavare immediatamente e abbondantemente con una soluzione per lavaggio oculare o con acqua pulita tenendo le...

Страница 154: ...Abbattitore di temperatura 30 50LIB097 NOTE...

Страница 155: ......

Страница 156: ...50LIB067 Rev 002 RU...

Страница 157: ...2 50LIB067...

Страница 158: ...3 50LIB067 ISO 23953 2 1 16 C 80 2 22 C 65 3 25 C 60 4 30 C 55 5 40 C 40 6 27 C 70 5 20 530x325 600x400 455x655 10 20 530x325 600x400 455x655 15 20 530x325 600x400 455x655...

Страница 159: ...11 8 6 11 8 7 12 8 8 12 8 9 12 8 10 12 9 13 9 1 13 9 2 14 9 3 15 9 4 16 9 5 18 9 6 18 9 7 18 9 8 18 10 19 10 1 19 10 2 19 10 3 19 11 HACCP 20 11 1 HACCP 21 11 2 HACCP 21 12 22 13 23 14 25 15 27 16 28...

Страница 160: ...5 50LIB067 1 2 3...

Страница 161: ...6 50LIB067 4 5 98 37 2006 95 2004 108 CE 5 1...

Страница 162: ...7 50LIB067 5 2 4...

Страница 163: ...8 50LIB067 5 3 6 6 1 7...

Страница 164: ...9 50LIB067 8 5 100 C 8 Auxiliary...

Страница 165: ...10 50LIB067 off stand by on run stand by on run 8 1 1 off stand by on 8 2 1 rtc BLAST CHILLING yy 15 BLAST CHILLING nn 15 BLAST CHILLING dd 15 BLAST CHILLING hh 15 24 BLAST CHILLING nn 15...

Страница 166: ...11 50LIB067 BLAST CHILLING 15 rtc 60 8 3 RUN 8 4 1 Pb1 BLAST CHILLING BLAST CHILLING 15 Pb1 60 8 5 1 Pb2 BLAST CHILLING BLAST CHILLING 15 Pb2 60 8 6 1 Pb3 BLAST CHILLING BLAST CHILLING 15 Pb3 60...

Страница 167: ...12 50LIB067 8 7 4 2 C 8 8 AUXILIARY AUX 8 9 START STOP 1 Loc 1 START STOP 1 UnL 1 8 10...

Страница 168: ...13 50LIB067 9 hard chilling 9 1 on BLAST CHILLING BLAST CHILLING 15 START STOP 65 C 4 START STOP BLAST CHILLING DEEP FREEZING HARD SOFT 15 3 C 90 5...

Страница 169: ...14 50LIB067 3 C 90 BLAST CHILLING 15 3 C 9 2 on BLAST CHILLING BLAST CHILLING HARD SOFT HARD 15 START STOP HARD 65 C 4 START STOP...

Страница 170: ...5 50LIB067 BLAST CHILLING DEEP FREEZING HARD SOFT 15 15 C BLAST CHILLING 15 3 C 90 5 3 C 90 BLAST CHILLING 15 3 C BLAST CHILLING DEEP FREEZING HARD SOFT 15 3 C 90 5 9 3 on HARD HARD 15 START STOP HARD...

Страница 171: ...16 50LIB067 65 C 4 START STOP BLAST CHILLING DEEP FREEZING HARD SOFT 15 18 C 240 5 18 C 240 15 9 4 on HARD HARD...

Страница 172: ...17 50LIB067 HARD SOFT HARD 15 START STOP 65 C 4 START STOP BLAST CHILLING DEEP FREEZING HARD SOFT 15 3 C 15 18 C 240 5 18 C 240 15...

Страница 173: ...18 50LIB067 9 5 5 C 3 5 10 1 C 6 8 8 2 1 9 6 on BLAST CHILLING 1 BLAST CHILLING 1 5 C 1 9 7 on AUXILIARY 1 AUX 5 9 8 on AUXILIARY 1 AUX 40 C 1...

Страница 174: ...19 50LIB067 10 10 1 10 2 10 3 60 80 2...

Страница 175: ...20 50LIB067 11 HACCP HACCP 9 3 HACCP HACCP tiME 1 99 59 AH 1 99 59 PF 1 99 59...

Страница 176: ...LS BLAST CHILLING 1 HACCP 3 BLAST CHILLING HACCP Inf 8 0 8 0 C 8 F StA y11 2011 n03 d26 26 2011 h16 16 00 n30 16 30 dur h01 1 n15 1 15 AH3 1 START STOP 60 11 2 HACCP 1 rLS BLAST CHILLING 0 15 149 BLAS...

Страница 177: ...22 50LIB067 12 1 CH BLAST CHILLING BLAST CHILLING 15 Pb2 60...

Страница 178: ...23 50LIB067 13 HARD 5 C 5 C...

Страница 179: ...24 50LIB067 AUX Auxiliary HACCP HACCP HACCP HACCP C F min On stand by...

Страница 180: ...25 50LIB067 14 HACCP AL AH HACCP Id HP PF HACCP COH CSd...

Страница 181: ...26 50LIB067 Pr1 AL A Pr2 Pr1 HACCP Pr3 Pr1 rtc HACCP...

Страница 182: ...27 50LIB067 15 5 10 15 HP Display Alarm...

Страница 183: ...28 50LIB067 16...

Страница 184: ...29 50LIB067 17 R404 R452 17 1 17 1 1 17 1 2 17 1 3 10 17 1 4 200 300 17 2 17 2 1 17 2 2 17 2 3...

Страница 185: ...30 50LIB067...

Страница 186: ......

Отзывы: