background image

Page 23 of 36 


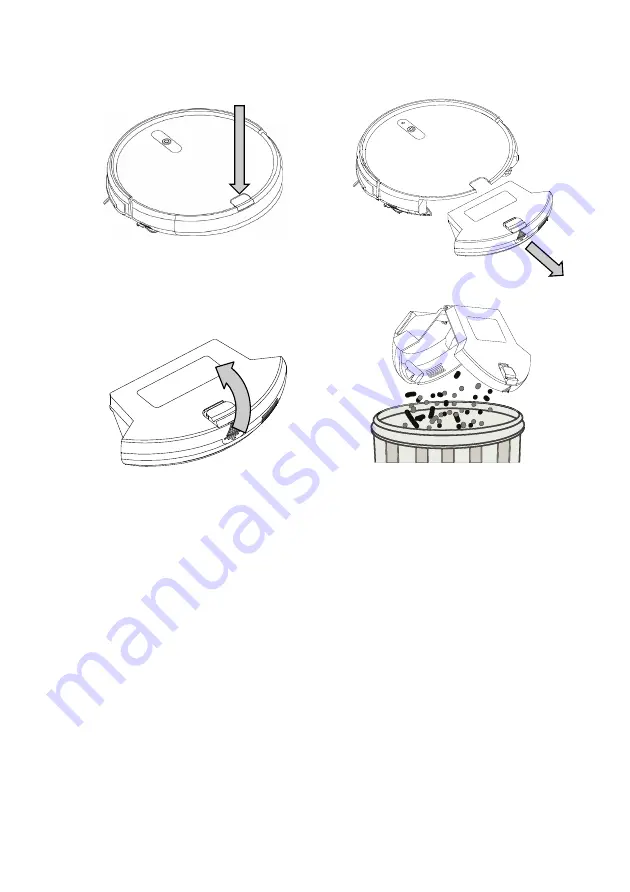
  Remove the dust canister from the Robot by pressing the release button 

down while at the same time pulling the dust canister straight out. 

  Pry open the dust canister lid and swing open, then empty into the bin. 


13.2  Cleaning / Replacing Filters 

Important Note

  –  the Filters must be cleaned regularly for best suction 

performance and to prevent over-heating and damage to your Robot cleaner. 


Cleaning is best done at the same time when emptying the Dust Canister 

after you have finish cleaning for the day. 


NOTE

: Never use the Robot cleaner with wet or damp filters or without 

ALL


filters fitted. 


Using wet or damp filters will damage the filters, may cause serious damage 

to the Robot cleaner and will void your warranty. 


Note

: The removable white filter should be replaced every 3 - 6 months and 

cleaned weekly if used regularly. 


Содержание MT-600

Страница 1: ... appliance are subject to change without prior notice If any Accessories should fail during use please call 1300 105 888 Australia or 09 8870 447 New Zealand for an immediate replacement This will save you from returning the product to the store If we can assist you in any other way please feel free to contact us ...

Страница 2: ...Page 2 of 36 ...

Страница 3: ...20 11 1 Start Pause Sleep 20 11 2 Manually Finishing a Cleaning Session 21 12 Advanced Cleaning 21 13 User Maintenance 22 13 1 Cleaning the Dust Canister 22 13 2 Cleaning Replacing Filters 23 13 3 Cleaning Robot Body and Accessories 25 13 4 Cleaning Replacing the Robot Spinning Brushes 25 13 5 Cleaning the Roller Brush 26 13 6 Cleaning the Robot Sensors 27 13 7 Cleaning the Wheels 28 13 8 Cleaning...

Страница 4: ...moking or burning objects etc DO NOT pick up flammable or combustible materials i e lighter fluid petrol kerosene etc or use in the presence of explosive liquids or vapour DO NOT pick up toxic material i e chlorine bleach ammonia drain cleaner etc DO NOT vacuum Toner for laser printer copy machines etc as there is a risk of fire and explosion DO NOT vacuum plaster dust cement dust etc as the filte...

Страница 5: ...ly for optimal operation of the Robot DO clean the filter regularly for optimal operation of the Robot DO keep hair loose clothing fingers feet and body parts away from openings or moving parts such as the wheels and spinning brushes DO disconnect the Charger from the power supply when not in use for extended periods DO NOT use the Robot cleaner to pick up large objects hard or sharp objects such ...

Страница 6: ...ls or spinning brushes Take care that your clothing or other items do not touch the wheels or spinning brushes as damage may occur WARNING Only use the Battery Charger which was supplied with this appliance Model No ZD12D260050AU 100 240V 50 60Hz 0 5A Output 26 0V 500mA Battery Pack Specification Type Li ion 18650 14 8Vd c 2200mAh Consumers are cautioned against using and or purchasing counterfeit...

Страница 7: ...to the food chain damaging your health and well being Please contact your local council or regional authority for more information on collection reuse and recycling programmes If this appliance is used by a third party DO supply the instruction manual with it No liability can be accepted for any damage caused by non compliance with these instructions or any other improper use or mishandling of app...

Страница 8: ... in to a used battery collection point Remove the battery from the remote control and from the appliance prior to recycling Ensure the battery in the appliance is not being charged when removing Separated disposal of packaging materials cares for the environment Moisture and Cleaning This product is not waterproof Do not immerse the unit in water or let it come in contact with water If water penet...

Страница 9: ...ge without prior notice 1 Bumper Sensor Window 7 Battery Charger ZD12D260050AU 2 Start Pause Button 8 Side Brushes x 4 3 Dust Canister release button 9 Cleaning Brush with Hair Cutter 4 Dust Canister 10 Filter 5 Instruction Manual 11 Remote Control 6 Charging Dock 3 11 10 8 6 4 9 7 1 5 2 Instruction manual ...

Страница 10: ... 36 4 1 Robot Bottom View 12 Side Brushes 16 Front Castor Wheel 13 Charging Contacts 17 Roller Brush 14 Sensors 18 Battery Compartment 15 Left Drive Wheel 19 Right Drive Wheel 14 15 12 17 13 12 13 16 19 18 14 14 ...

Страница 11: ... Charging Dock 20 On Off Switch 21 Direct Charging Port 22 Brush Hair Cutter Storage Recess 25 Positive Charging Terminal 23 Power Indicator Light 26 Negative Charging Terminal 24 Battery Charger Jack 27 IR Sensor Window 20 25 26 27 24 23 21 22 ...

Страница 12: ...ansporting the Robot When picking up the Robot first ensure the On Off Switch located on the side of the Robot is in the 0 Off Position 28 Vacuum Motor Assembly 30 Dust Canister Latch Release Button 29 Dust Flap 31 Air Debris Filter 31 28 30 29 ...

Страница 13: ...ords clothing rugs curtains blinds blind cords phone charging cables pet water feeding bowls string thread shoes laces etc Do not use on rugs or the like which have tassels or frayed edges as it will get tangled and may cause damage to the Robot and or the rug For the robot to vacuum under furniture there needs to be a minimum of 8cm clearance If using near a drop off such as at the top of stairs ...

Страница 14: ...is off Turn off the power by flipping the power switch on the side of the robot to O Gently pick up the robot and lay it with its wheels facing up Position the side brushes with the square holes pointed down and the brush bristles angled up Align the square hole on the underside of the side brush over the square post located inside the hollow circle Push down hard until it clicks in place It does ...

Страница 15: ...side of the charging dock Locate an electrical outlet on the wall close to the ground and plug in the Battery Charger An indicator light on the side of the charging dock will illuminate indicating Power is supplied Tidy the excess battery Charger cable as the cable must not be on the floor or obstructing the charging dock front window as it will result in the robot being unable to find the chargin...

Страница 16: ...utton on top of the Robot will illuminate a different colour as follows o Red light blinking indicates that the battery needs to be charged o Blue light blinking indicates the battery is charging o When the Blue light is off this means charging is completed Important Before the first cleaning session please charge continuously for at least 8 hours After the first cleaning session allow the robot t...

Страница 17: ...d by connecting the Battery Charger plug directly into to the DC recharging port on the side of the robot The average charging time between cleanings is approximately 5 hours If the robot is not used on a regular basis recharge the robot at least once a month to maintain the battery 8 Controls 8 1 Robot Top Control Button This Button is used to Start and to Pause the Robot Press this button while ...

Страница 18: ... the remote control Home Press for the robot to stop cleaning and return to the charging dock Start Stop When the robot has been woken up wait 5 seconds then press start the Start Stop button When the robot is in use press to stop Note The following manual steering will not function if already cleaning Stop cleaning first Forward Press and the robot will move a short distance in a forward directio...

Страница 19: ...l need to install 2 AAA alkaline batteries NOTE Do not dispose of batteries in the rubbish bin Contact your local authority for instruction on proper disposal and collection points To install replace the batteries in the remote control turn the remote control over so that the back is facing you Slide the back cover off to access the battery compartment Install replace with new batteries ensuring t...

Страница 20: ...s best suited for short pile carpet 0 5cm or less wooden floors tiled floors linoleum floors sealed cork tiled floors etc Please note that the Robot does not deep clean carpet The Robot will sweep and pick up debris on the surface and just a few millimetres below if on carpet To deep clean carpet use a more substantial professional vacuum cleaner 11 Using the Robot Cleaner 11 1 Start Pause Sleep S...

Страница 21: ...ll begin to manoeuvre back to the charging dock If you wish to end the cleaning process early press the button on top of the Robot or the START STOP button on the remote control to Pause the cleaning To return the Robot to the charging dock to recharge press the Home button on the remote control and the Robot will begin to find the charging dock Note You may manually drive the robot back to near t...

Страница 22: ...floor by following the perimeter of the room Press the button on the remote control Spot Robot will begin cleaning in a spiral pattern leading to a one meter diameter circle for two to three minutes Recommended for deep cleaning in smaller areas covered in debris Press the button on the remote control 13 User Maintenance 13 1 Cleaning the Dust Canister The Dust canister will need emptying and clea...

Страница 23: ...st suction performance and to prevent over heating and damage to your Robot cleaner Cleaning is best done at the same time when emptying the Dust Canister after you have finish cleaning for the day NOTE Never use the Robot cleaner with wet or damp filters or without ALL filters fitted Using wet or damp filters will damage the filters may cause serious damage to the Robot cleaner and will void your...

Страница 24: ...lter and white filter DO NOT wash the white filter mesh filter or the dust canister or get them wet Use a dry clean cloth to wipe over the dust canister Tap the white filter on the side of the rubbish bin to dislodge the dirt and dust and give it a brush to remove the small particles or use a normal vacuum cleaner with a hose attachment to suck the dirt and dust out Refit the filter or replace wit...

Страница 25: ...sher 13 4 Cleaning Replacing the Robot Spinning Brushes Before each use check the brushes for damage wear and tear or whether they have foreign objects stuck in them The side brushes should only be replaced if they are damaged Ensure the Robot is switched off The switch on the side of the Robot must be in the O Off Position Remove the Dust Canister Turn the Robot upside down to access the brushes ...

Страница 26: ...e down to access the Roller Brush Unclip the two tabs on the back of the Roller Brush Surround and swing open then pull out Remove the roller brush from robot by grasping the left side of the brush and lift up then slide out to the right Use the pick end of the small brush located in the top of the charging dock to help cut away any debris on the brush strips NOTE To avoid build up of hair and deb...

Страница 27: ...Lower the left side of the roller brush into the semi circle slot on the left side of the brush recess Refit the Roller Brush Surround and push down until it clips in place 13 6 Cleaning the Robot Sensors The Robot has three sensors located on the underneath as shown Keep these sensors clean by wiping with a dry cloth or brush them using the cleaning brush supplied ...

Страница 28: ... front castor wheel become tangled with debris hair etc clean away before continuing use 13 8 Cleaning the Charging Contacts Robot Charging Stand The electrical charging contacts on the Robot and the Charging Stand must be kept clean to ensure proper charging To clean switch off and unplug the Battery Charger from the wall outlet Using a dry cloth wipe the contacts until they are clean and shiny ...

Страница 29: ...e Beeps Three times Please check whether dust canister is fitted correctly to vacuum cleaner Ground sensor error Red light flashing Two Beeps Three times Clean the ground sensors The Robots wheels may be off the ground Pick up and move to a flat area and start again Robot trapped Red light flashing Three Beeps Three times Please move Robot to an open space Low battery power Cannot Drive any longer...

Страница 30: ... clean and the robot is fully charged Also check that the Rotary floor brush is free to rotate and that there are no blockages If all looks okay you can try to switch the robot to the higher TURBO mode For debris which is difficult to collect try to clean the area with Spot Cleaning Mode Q What if the robot wont charge A Ensure the battery charger is plugged into the wall socket and switched on En...

Страница 31: ...control has an effective control distance of approximately 5 meters Please make sure that the remote control is pointed directly at the Robot t Replace the remote control batteries with new ones Please make sure the Robot s power switch is turned on and has sufficient battery power to complete the operation Ensure the front window on the Robot and the front window on the charging dock are clean an...

Страница 32: ...re there is power to the charging dock at all times The charging Dock may have been moved Ensure the Charging Dock is secure against a wall and facing outward with a 2 meter Radius clear environment around it There may be obstacles preventing the Robot from reaching the charging dock Remove all obstacles within a 2 meter radius Robot gets Stuck The robot may get stuck occasionally i e in a corner ...

Страница 33: ... Static Electricity discharge that happens mostly when the Robot vacuums a synthetic fibre carpet or other synthetic surfaces It can also be more prevalent in dry and cool environments Although the feeling of the Static Electricity can be unpleasant for the user it is not dangerous and is not a fault of the Robot cleaner If this static discharge is a problem for the user the user could try wearing...

Страница 34: ... Lithium ion 2200mAh 9 Dust canister capacity 500ml 16 2 Technical Specification for the Charging Dock No Item Parameter 1 Input voltage current DC26V 0 5A 2 Operating temperature range 10 C 45 C 3 Operating humidity range 85 RH 16 3 Technical Specification for the Remote Control No Item Parameter 1 Battery 2 x AAA 2 Remote control method Infrared 3 Emitting and receiving distance 5M 4 Operating t...

Страница 35: ... and contact our Customer Service Centre 1800 124 125 Australia or 0800 945 995 New Zealand or alternatively via Customer Help at Kmart com au for any difficulties with your product Warranty claims and claims for expense incurred in returning this product can be addressed to our Customer Service Centre at 690 Springvale Rd Mulgrave Vic 3170 Our goods come with guarantees that cannot be excluded un...

Страница 36: ...Page 36 of 36 ...

Отзывы: