UG-1135
Rev. 0 | Page 16 of 45
5.
Add two
DSP Readback
blocks to the project and set their
numeric format as follows:
a.
From the
Basic DSP
>
DSP Function
folder, click
DSP
Readback
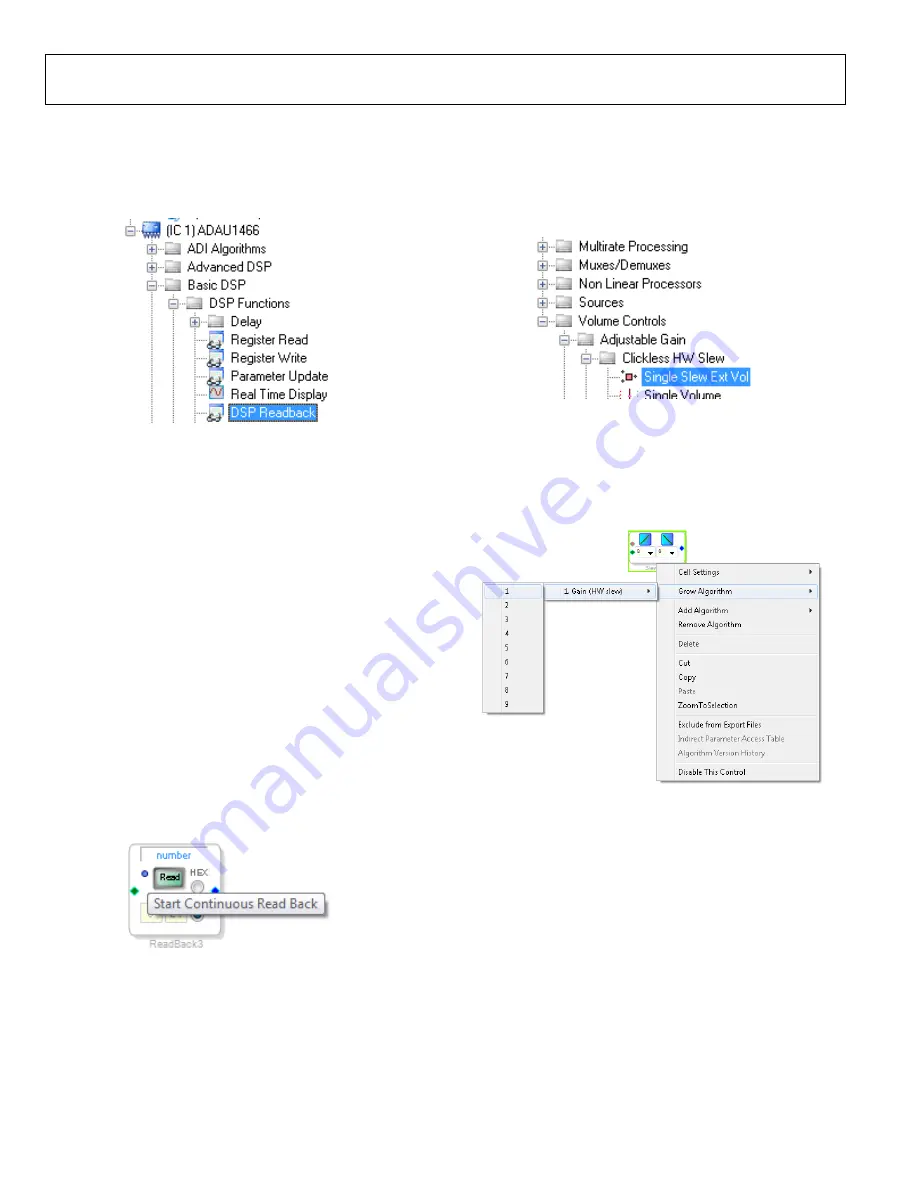
(see Figure 54) and drag it into the project
space to the right of the toolbox.
15
789-
156
Figure 54. DSP Readback Block Selection
b.
Repeat the previous step to add another
DSP
Readback
block.
c.
The
DSP Readback
block uses the
interface to
read the value of a signal from the memory of the DSP
core as the algorithm is executing. The block passes the
signal through from its input to its output unchanged.
i.
Press the
Read
button to fetch the instantaneous
value of the signal passing through the block. It is
also possible to set the block to poll the value
repeatedly. This feature is useful for debugging,
but it increases the amount of processing, USB
communication, and screen refreshes performed
by
substantially. Avoid setting a
large number of
DSP Readback
blocks to read
continuously because this action can cause the
PC to run slowly. Note that this action does not
affect the real-time processing on the
core.
ii.
On each of the two
DSP Readback
blocks, click
on the blue dot to the left of the
Read
button to
read both blocks continuously (see Figure 55).
15789-
157
Figure 55. Activating Continuous Read Back
iii.
For one of the DSP readback blocks, change the
numeric format used to decode and display of the
value of the signal to 32.0 by typing 32 in the left
format box then pressing the
TAB
uses a numeric format of 8.24 for audio signals.
6.
Add an
Single Slew Ext Volume
block to the project space
as follows:
a.
From the
Volume Controls
>
Adjustable Gain
>
Clickless HW Slew
folder, click
Single Slew Ext Vol
(see Figure 56) and drag it into the project space to the
right of the toolbox.
15
789
-1
58
Figure 56.
Single Slew Ext Vol
Block Selection
b.
By default, the
Single Slew Ext Vol
block has one audio
signal input. To add another channel, right click in the
empty white space of the
Single Slew Ext Vol
block, and
select
1 > 1. Gain (HW slew) > Grow Algorithm
from
the dropdown menu that appears (see Figure 57).
15
78
9
-15
9
Figure 57. Growing the
Single Slew Ext Vol
Block to Two Channels
7.
Wire the blocks together as shown in Figure 58. Note that
the position of blocks in the diagram does not matter.
8.
Click the
Link/Compile/Download
button (see Figure 28)
or press F7 to compile the signal flow and download it to the
hardware. The audio signal passes from the S/PDIF receiver
through the ASRCs into the DSP and the EQ filter, and
then out on the S/PDIF transmitter. To change the settings
of the EQ filter, click the blue icon at top of the block. Drag
the control slider in
to change the filter gain
in real-time while the project is running.
Содержание EVAL-ADAU1466Z
Страница 37: ...EVAL ADAU1466Z User Guide UG 1135 Rev 0 Page 37 of 45 15789 087 Figure 96 EVAL ADAU1466Z Layout Top Assembly ...
Страница 38: ...UG 1135 EVAL ADAU1466Z User Guide Rev 0 Page 38 of 45 15789 088 Figure 97 EVAL ADAU1466Z Layout Top Copper ...
Страница 39: ...EVAL ADAU1466Z User Guide UG 1135 Rev 0 Page 39 of 45 15789 089 Figure 98 EVAL ADAU1466Z Layout Ground Plane ...
Страница 40: ...UG 1135 EVAL ADAU1466Z User Guide Rev 0 Page 40 of 45 15789 090 Figure 99 EVAL ADAU1466Z Layout Power Plane ...
Страница 41: ...EVAL ADAU1466Z User Guide UG 1135 Rev 0 Page 41 of 45 15789 091 Figure 100 EVAL ADAU1466Z Layout Bottom Copper ...


