background image


3

B. SPECIFICATIONS OF CONCRETE 

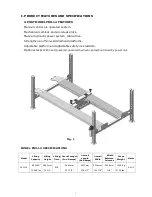
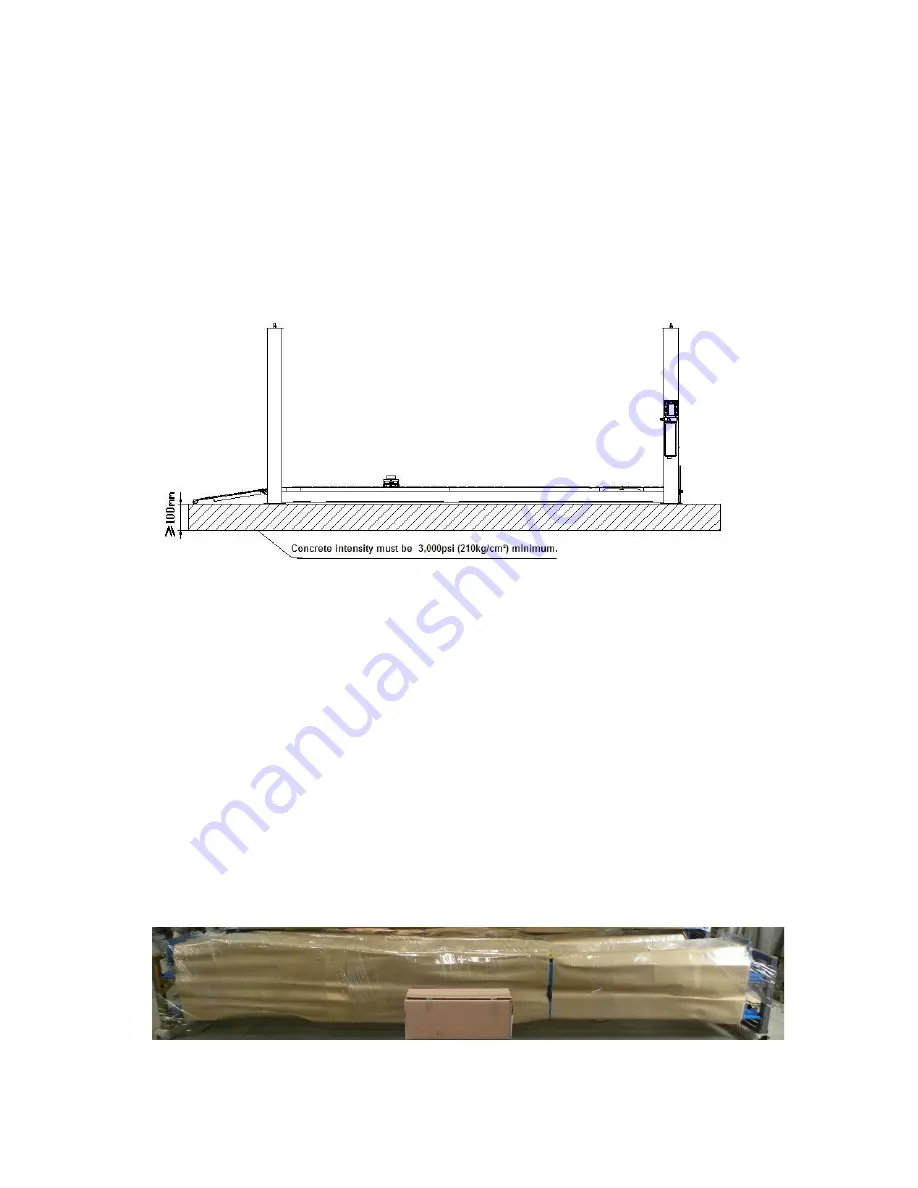
(See Fig. 3)   


Specifications of concrete must be adhered to the specification as following.     
Failure to do so may result in lift and/or vehicle falling. 

1. Concrete must be thickness 100 mm minimum and without reinforcing steel bars

and must be dried completely before the installation. 

2.  Concrete  must  be  in  good  condition  and  must  be  of  test  strength  3,000  psi 

(210kg/cm²) minimum.   

3. Floors must be level and no cracks.   


C. AIR SUPPLY

Air pressure requirement: 0.5Mpa~0.8Mpa, Air line size 

8

×¢

6 and 

6

×¢

4. 

D. POWER SUPPLY


  The electrical source must be 3KW minimum. The source cable size must be 2.5mm² 

and in good condition of contacting with floor. 


III. STEPS OF INSTALLATION 

A. Location of installation 

Check  and  insure  the  installation  location  (concrete,  layout,  space  size  etc.)  is 
suitable for lift installation.   

B. Check the parts before assembly 

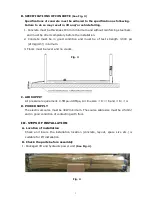
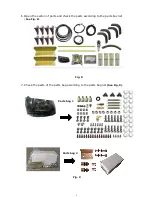
1. Packaged lift and hydraulic power unit 

(See Fig. 4)


Fig. 3


Fig. 4


Содержание PRO-14

Страница 1: ...FOUR POST LIFT PRO 14...

Страница 2: ......

Страница 3: ...CONTENTS Product Features and Specifications 1 Installation Requirement 2 Steps of Installation 3 Exploded View 23 Test Run 26 Operation Instruction 27 Maintenance 27 Trouble Shooting 28 Parts List 29...

Страница 4: ......

Страница 5: ...e platform and adjustable safety lock ladders Optional Jack With hand pump Air operated hydraulic pump Controlled by power unit MODEL PRO 14 SPECIFICATIONS Model Lifting Capacity Lifting Height Liftin...

Страница 6: ...OLS REQUIRED Rotary Hammer Drill 19 Hammer Level Bar English Spanner 12 Ratchet Spanner With Socket 28 Wrench set Carpenter s Chalk Screw Sets Tape Measure 7 5m Pliers Socket Head Wrench 3 5 6 Lock Wr...

Страница 7: ...of test strength 3 000 psi 210kg cm minimum 3 Floors must be level and no cracks C AIR SUPPLY Air pressure requirement 0 5Mpa 0 8Mpa Air line size 8 6 and 6 4 D POWER SUPPLY The electrical source mus...

Страница 8: ...screws of the upper package stand take off the offside platform take out the parts inside the powerside platform than remove the package stand 5 Move aside the parts and check the parts according to...

Страница 9: ...6 Open the carton of parts and check the parts according to the parts box list See Fig 8 7 Check the parts of the parts bag according to the parts bag list See Fig 9 Fig 8 Fig 9 Parts bag 1 Parts bag...

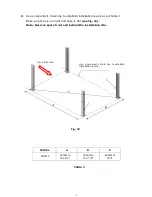
Страница 10: ...able 1 Make sure the size is right and base is flat see Fig 10 Note Reserve space front and behind the installation site Table 1 MODEL A B C PRO 14 5500mm 216 1 2 3324mm 130 7 8 6426mm 253 Use a carpe...

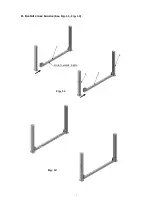
Страница 11: ...7 D Install cross beams See Fig 11 Fig 12 Fig 11 Hole towards inside 1 3 2 3 Fig 12...

Страница 12: ...ver and unscrew the four upper nuts of the Safety Ladders and then adjust the four lower nuts to be at the same position Withdraw the Slack cable safety lock of the Cross beam to insert the Safety Lad...

Страница 13: ...t should be the same for four safety ladders Safety ladder pass through the hole of the top plate then tighten the two nuts Fig 17 Lifting Both Cross Beams to the same height it is recommended to abou...

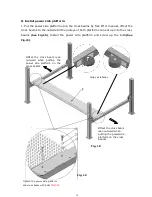
Страница 14: ...et up into the cross beams See Fig 18 Install the power side platform and screw up the bolts See Fig 19 Fig 18 Pulley installation Fig 19 Offset the cross beam lean outward when putting the power side...

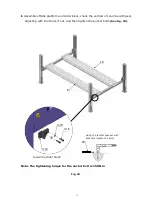
Страница 15: ...f columns with level adjusting with the shims if not and then tighten the anchor bolts See Fig 20 Note The tightening torque for the anchor bolt is 150N m Fig 20 Using the ratchet spanner with socket...

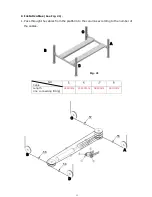
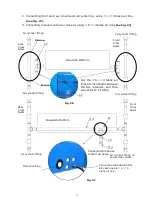
Страница 16: ...See Fig 21 1 Pass through the cables from the platform to the columns according to the number of the cables NO Cable 1 2 3 4 Length inc connecting fitting 4120mm 11123mm 5840mm 9410mm Fig 21 A C D B...

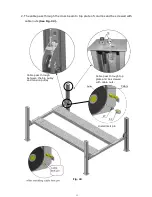
Страница 17: ...beam to top plate of columns and be screwed with cable nuts See Fig 22 Cable pass through between the big pulley and tension pulley Cable pass through top plate and be screwed with cable nuts Fig 22 7...

Страница 18: ...14 3 Illustration for platform cables See Fig 23 cable cable cable cable cable cable Fig 23 19 cable cable cable cable cable cable cable cable Hex Bolt M10 150 Limit slider...

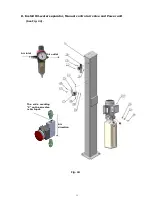
Страница 19: ...15 K Install Oil water separator Manual control air valve and Power unit See Fig 24 Fig 24 Air outlet Air inlet Air direction The side marking P on the air valve is Air Input...

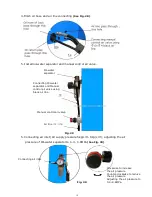
Страница 20: ...cylinder inlet port must swing upward to avoid the oil hose and oil return pipe scratched by cable M Install air line system 1 Cut the 6 4 black air lines of cross beams between the two retainers and...

Страница 21: ...ylinder fitting Powerside Platform Cut the 6 4 black air lines of cross beams between the two retainers and then connect with T Fitting Rear Cross Beam Front Cross Beam Retainer Retainer 68 Air cylind...

Страница 22: ...ing the air pressure of Oil water separator to 0 4 0 6MPa See Fig 30 Fig 30 Clockwise to increase the air pressure Counter clockwise to reduce the air pressure Adjusting the air pressure to 0 4 0 6MPa...

Страница 23: ...g 380V three phase motors Single phase motor See Fig 31 1 Connecting the two power supply lines fire wire L and zero wire N to terminals of AC contactor marked L1 L2 respectively 2 Connecting the two...

Страница 24: ...e wires L1 L2 L3 connected with terminals of AC contactor marked L1 L2 L3 respectively b Terminals 4 of control button is connected with terminals of AC contactor marked L1 terminals of 3 of contorl b...

Страница 25: ...21 O Install spring and safety cover of cross beam See Fig 34 Fig 34 3 3 3 8 40 3 2 Fig 33...

Страница 26: ...mp Tire stop plate Platform locking plates See Fig 35 Install Drive in ramp Install Tire stop plate The lock plates are used to prevent the turning slipping of offside platform Using Hex bolt M8 20 fo...

Страница 27: ...23 IV EXPLODED VIEW Model PRO 14 Fig 36...

Страница 28: ...24 3 73 74 CROSS BEAM CYLINDERS Fig 37 Fig 38...

Страница 29: ...25 MANUAL POWER UNIT Fig 39 220V 50HZ 1 phase 380V 50HZ 3 phase...

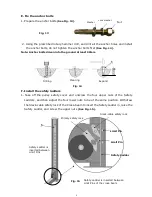
Страница 30: ...Manual power unit 380V 50HZ Three phase See Fig 41 Fig 40 Fig 41 Relief valve Check valve Release valve Oil Outlet Oil return port Handle of Release valve Throttle valve Release valve Handle of Releas...

Страница 31: ...times meanwhile do the synchronous adjustment till the four Safety Devices can lock and release at the same time 5 Adjust the clearance between the post and the plastic slider of Cross beam to about 2...

Страница 32: ...ed press the release valve handle by the other hand then the lift starts being lowered automatically 3 Drive away the vehicle when the lift is lowered to the lowest position 4 Turn off the power VII M...

Страница 33: ...mage 5 Low oil level 1 Reverse two power wire 2 Repair or replace 3 Repair or replace 4 Repair or replace 5 Fill tank Lift does not stay up 1 Release valve out of work 2 Relief valve or check valve le...

Страница 34: ...olt 4 20 420145 Oil water Separator 1 21 420146 Straight Fitting for Air Line 1 22 209009 Cup Head Bolt 4 23 420076 900 Fitting for Air Line 1 24 420159 Straight Fitting For Air Line 1 25 420160 Fixin...

Страница 35: ...60067 No Cable 1 58 460068 No Cable 1 Parts For Hydraulic System 59 420166 900 Fitting 1 60 420243 Straight Fitting For Cylinder 1 61 460060 Oil Hose 1 62 420120 Extended Straight Fitting with Nut 1 6...

Страница 36: ...20042 Slider 16 3 15 209033 Washer 40 3 16 420043 Socket Bolt 32 3 17 420175 Slack cable safety lock left right 2 ea 3 18 420171 Pin 8 3 19 420172 Pin Bush For Slack cable Safety Lock 8 3 20 206019 Sn...

Страница 37: ...055 AC connector 1 19 81400088 Run capacitor 1 20 81400130 Start capacitor 1 21 420148 Cup Head Bolt with washer 6 22 81400208 Cover of Motor Terminal Box 1 23 10420070 Push button 1 24 81400296 Nut 1...

Страница 38: ...1400440 Motor 1 18 10420070 Push button 1 19 81400348 AC connector 1 20 81400286 Cover of Motor Terminal Box 1 21 420148 Cup Head Bolt with washer 4 22 81400296 Nut 1 23 81400459 Throttle valve body 1...

Страница 39: ......

Страница 40: ...AMGO HYDRAULIC CORPORATION Tel 803 505 6410 Fax 803 505 6410 1931 Jo Rogers Blvd Manning South Carolina USA...

Отзывы: