Chapter Seven : Managing the Storage Appliance
105
When “
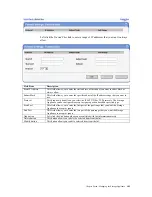
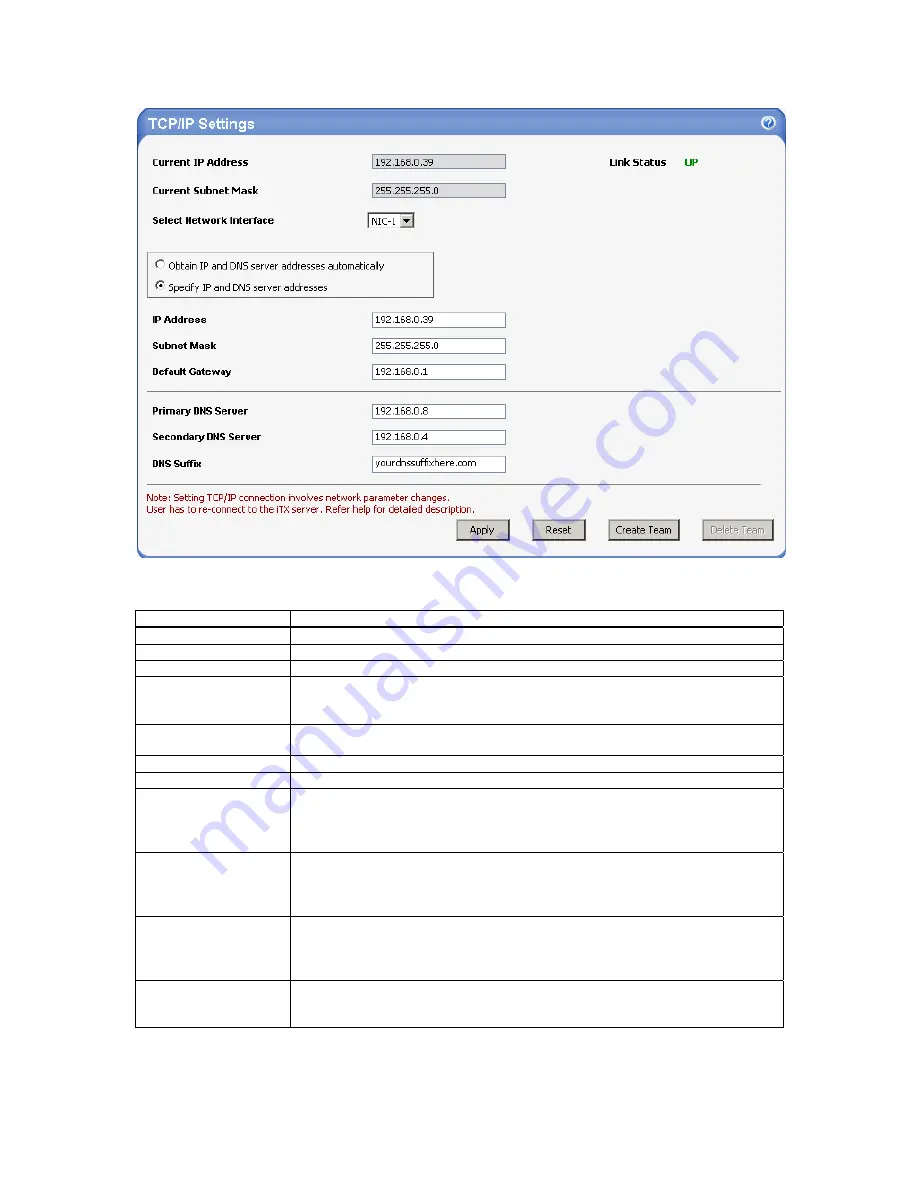
Specify IP Address and DNS Server Addresses
” is selected the following is true:
Field/Item Description
Current IP Address
This field displays the current IP address of the selected Network Interface.
Current Subnet Mask
This field displays the current Subnet Mask of the selected Network Interface.
Select Network Interface
This dropdown menu allows you to select the NIC to configure (if applicable).
Obtain IP and DNS
Server Addresses
Automatically
By default the TCP/IP setting is set to obtain an IP Address and DNS server address
from a DHCP server.
Specify IP Address and
DNS Server Addresses
To specify an IP Address, Subnet Mask, Gateway, and DNS information, left click the
‘
Specify an IP address and DNS server address
’ option.
IP Address
Type the static IP address you want the network interface card to use.
Subnet Mask
Type the subnet mask you want the network interface card to use.
Default Gateway
Type the IP address of the gateway you want the network interface card to use. Press
the <ENTER> key to continue. This field must have an entry and cannot be left blank.
If you do not have a gateway installed on your network, enter
0.0.0.0
for the value
of this field.
Primary DNS Server
Type the IP address of your network’s primary DNS that you want the network
interface card to use. Press the <ENTER> key to continue. This field must have an
entry and cannot be left blank. If you do not have a primary DNS installed on your
network, enter
0.0.0.0
for the value of this field.
Secondary DNS Server
Type the IP address of your network’s secondary DNS that you want the network
interface card to use. Press the <ENTER> key to continue. This field must have an
entry and cannot be left blank. If you do not have a secondary DNS installed on your
network, enter
0.0.0.0
for the value of this field.
DNS Suffix
Type your network’s Primary DNS Suffix into this field.
Note:
Your DNS Suffix must start with a letter, not a number.
Содержание ManageTrends 2.7
Страница 18: ...StorTrends 1300 User s Guide StorTrends iTX version 2 7 xviii...
Страница 24: ...StorTrends 1300 User s Guide StorTrends iTX version 2 7 6...
Страница 33: ...Chapter Two Chassis Set Up 15 Accessing the Inside of the System...
Страница 45: ...Chapter Two Chassis Set Up 27 Do not close the window or click anywhere else until the operation completes...
Страница 59: ...Chapter Two Chassis Set Up 41 Step Seven All Done No Errors STOP YOU SHOULD NOW BE UP AND RUNNING...
Страница 60: ...StorTrends 1300 User s Guide StorTrends iTX version 2 7 42...
Страница 64: ...StorTrends 1300 User s Guide StorTrends iTX version 2 7 46...
Страница 70: ...StorTrends 1300 User s Guide StorTrends iTX version 2 7 52...
Страница 100: ...StorTrends 1300 User s Guide StorTrends iTX version 2 7 82...
Страница 106: ...StorTrends 1300 User s Guide StorTrends iTX version 2 7 88 Control Panel...
Страница 236: ...StorTrends 1300 User s Guide StorTrends iTX version 2 7 218...
Страница 256: ...StorTrends 1300 User s Guide StorTrends iTX version 2 7 238...
Страница 277: ...Appendix E Replication Overview 259 Snap Assisted Replication Navigating with ManageTrends...
Страница 281: ...Appendix E Replication Overview 263 Replication SAR view Primary Box SAR view Secondary Box...
Страница 285: ...Appendix E Replication Overview 267 After Failover Operation in Secondary Box...
Страница 300: ...StorTrends 1300 User s Guide StorTrends iTX version 2 7 282...
Страница 308: ...StorTrends 1300 User s Guide StorTrends iTX version 2 7 290...
Страница 320: ...StorTrends 1300 User s Guide StorTrends iTX version 2 7 302 StorTrends Continuous Data Protection architecture...
Страница 330: ...StorTrends 1300 User s Guide StorTrends iTX version 2 7 312...
Страница 356: ...StorTrends 1300 User s Guide StorTrends iTX version 2 7 338...

