Page 13
200 Series 36V
15312
14.
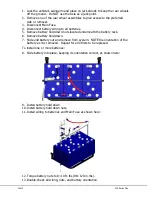
Connect Main Fuse.
15.
Turn ON the key and check that throttle functions properly.
16.
Reinstall wheel assembly.
17.
Raise vehicle slightly and remove jack stands and lower vehicle.
Charging
The included onboard NOCO Genius charger is a complete charger and
maintainer package. It charges and maintains each battery individually.
Charging starts soon after the charger is plugged in. A slight spark when first
plugged in is normal.
For the first minute after the charger is plugged in, a series of checks is
performed to ensure it is safe to charge the batteries. After a minute or so,
charging begins at up to 10A per battery. From this point on, the charger
constantly monitors the battery state of charge to determine which of the 7
charging steps are most appropriate.
A red light indicates the battery is being charged. Green indicates the charger is
in the final stage of charge and is at least 90% charged. Over the next 2 hours
or so, the battery is “topped-off”. It is okay to use the vehicle once the
chargers indicators are all green. Overall, this process can take up to 12 hours.
The charger is able to detect a battery is connected all the way down to 2V. If
the battery voltage is below 2V, the charger will flash Red/Green. In this case,
another source can be used to “jump” the battery so charging can begin. With
the charger plugged in, connect another external source, such as a 12V “dumb”
charger or a separate 12V battery to the terminals of the low voltage battery for
a moment, until the charge indicator changes from flashing Red/Green to solid
Red. Remove the external source as soon as the light is solid Red.
Flashing Red/Green lights also indicates an open battery circuit between the
charger and respective battery. Check for a broken connection/wire.
Lastly, flashing Red/Green can indicate charging cannot be completed on the
respective battery. If at any point during the charge cycle a problem is detected
with the battery, charging will stop and the lights will flash Red/Green. This
includes if charging cannot complete in a 1 hour period.
If left plugged in, as a maintenance charger, the charger will check the state of
charge on the batteries every 24 hours. If detected that the battery voltage has
dropped around 20% or more, charging will start over at the finishing stages of
charge. It is recommended that the charger remain plugged in as long as the
vehicle is not in use, including winter months or in storage.
Battery Indicator
Located in the dash is a battery discharge meter. This is driven by the 12V
battery which drives the entire 12V electrical system. If a problem is suspected
with the batteries not attached to this meter, the charger should indicate this
during the charge cycle by flashing Red/Green at any point along the charge
Содержание 36V 200 Series
Страница 1: ...15312 Service Manual 200 Series 36V...
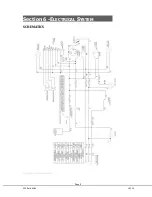
Страница 12: ...Page 9 200 Series 36V 15312 Section 6 ELECTRICAL SYSTEM SCHEMATICS Figure 1 Vehicle Schematic...
Страница 13: ...15312 200 Series 36V Figure 2 Motor Controller Schematic...
Страница 18: ...Page 15 200 Series 36V 15312 Section 8 BRAKES BRAKE SYSTEM REPLACEMENT...


