Altusen ALTUSEN CC2000 Скачать руководство пользователя страница 131

Chapter 6. Device Management

117

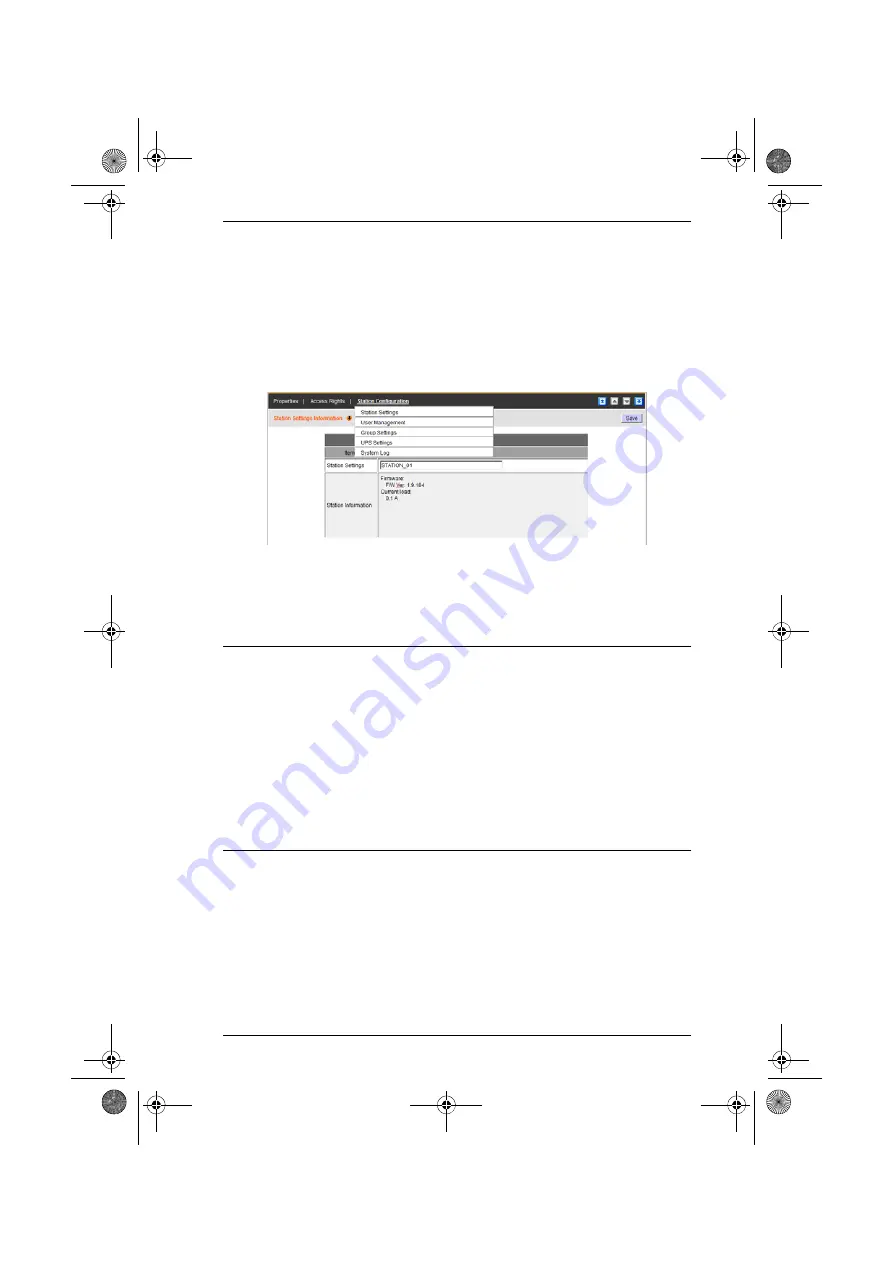
Station Configuration (For Power Devices)

Since Power devices can be daisy chained, the chained stations are nested 
under the Power device’s entry in the Sidebar. The 

Properties

 and 

Access 

Rights

 pages for this Panel Menu item have already been discussed, starting on 

page 113.

This Panel Menu item is similar to the one for Power device configuration 
discussed on page 115, except it has different secondary pages:

The secondary pages correspond to the administration functions described in 
the device’s User Manual. For configuring the settings, refer to the manual’s 

Administration

 chapter to obtain the necessary information. When you have 

finished making your configuration settings, click 

Save

.

Note:

1. The Station Configuration Panel Menu does not appear if the device 

is offline, or if the device is on a port nested under another device.

2. The changes you make to the User Management settings affects the 

Power device’s internal authentication operations. It does not affect 
the authentication procedures of the CC2000.

3. If the link between the CC2000 and the device should be broken for 

some reason, station configuration changes made on these pages will 
not be transmitted to the device. When this happens, you can log in to 
the device directly to make the changes. See

CC2000 Options

page 84 for details.

cc2k.book  Page 117  Tuesday, December 21, 2010  4:00 PM

Содержание ALTUSEN CC2000

Страница 1: ...CC2000 Control Center Over the NET User Manual www aten com cc2k book Page i Tuesday December 21 2010 4 00 PM ...

Страница 2: ...ful interference when the equipment is operated in a commercial environment This equipment generates uses and can radiate radio frequency energy and if not installed and used in accordance with the instruction manual may cause harmful interference to radio communications Operation of this equipment in a residential area is likely to cause harmful interference in which case the user will be require...

Страница 3: ...nufacturer its distributor or its dealer assumes the entire cost of all necessary servicing repair and any incidental or consequential damages resulting from any defect in the software The manufacturer of this system is not responsible for any radio and or TV interference caused by unauthorized modifications to this device It is the responsibility of the user to correct such interference The manuf...

Страница 4: ... any damage to the switch or to any other devices on the CC2000 installation Features may have been added to the CC2000 since this manual was printed Please visit our website to download the most up to date version of the manual Copyright 2008 ATEN International Co Ltd Manual Part No PAPE 0304 AX2G F W Version V2 0 193 Manual Date 2010 12 21 ALTUSEN and the ALTUSEN logo are registered trademarks o...

Страница 5: ...tures 4 Requirements 5 Server Requirements 5 Client Requirements 6 Hardware Requirements 6 Operating Systems 6 Browsers 7 Device Requirements 7 Licenses 8 Nodes 8 Slaves 8 Chapter 2 CC2000 Server Installation Overview 9 CC1000 Considerations 9 Upgrading the CC1000 9 Uninstalling the CC1000 9 Windows Version Installation 10 Before You Begin 10 Starting the Installation 10 Post installation Check 15...

Страница 6: ... 27 Overview 27 Selecting List Items 28 Preferences 29 Color Scheme 29 Web Options 30 Password 31 Chapter 4 Port Access Overview 33 Table Headings 34 Action Buttons 35 Filter 35 Launch Multiviewer 35 The Sidebar 36 Sidebar Characterisitcs 36 Sidebar Filter 37 Port Operation 38 CC Viewer 38 Web Access 39 Power ON OFF 40 SSH Telnet Session 40 Port Access Views 41 Port View 41 Target View 41 Device V...

Страница 7: ... Users to Groups 60 Removing Users from Groups 61 Access Rights 62 Types 62 User Types 63 Members 63 Type Information 63 System Types 64 Custom Types 65 Authentication Services 66 CC2000 Authentication 67 External Authentication Servers 68 Adding an External Authentication Server 68 Service Information 69 Deleting an External Authentication Server 71 Group Authorization 72 Chapter 6 Device Managem...

Страница 8: ... User Group List 108 Modifying a User s or Group s Rights 109 Deleting a User s or Group s Access Rights 109 Action Buttons 109 Device Configuration For KVM Devices 110 Port Configuration For Cat5e KVM Devices 111 Power Devices Stations and Outlets 113 Properties 113 Properties Page Action Buttons 113 Access Rights Power Devices Stations and Outlets 114 Adding Users or Groups to the Device Station...

Страница 9: ... 131 Menu Structure 132 CC Network 133 CC Servers 133 Sessions 134 Security 135 Login Policy 135 Lockout Policy 135 Monitor 136 This Server 137 Server Information 137 Action Buttons 139 Promote Role Slave to Master 139 Register 140 Server Settings 141 SMTP 141 NTP 143 Syslog 144 Dial In 145 Dial Out 146 Master Settings 149 VMWare Settings 150 Security 151 IP Filtering 151 MAC Filtering 152 Single ...

Страница 10: ...178 Sessions 179 Chapter 8 Logs Overview 181 CC Logs 181 Logs 181 CC Log Options 183 Notification Settings 184 Adding and Configuring Notification Users 185 Modifying Notification Configurations 186 Deleting Notification Configurations 186 Testing Event Notifications 186 Export Logs 186 Import Logs 188 Advanced Search 189 Device Logs 190 Device Log Search 191 Device Log Options 192 Session History...

Страница 11: ...de 218 Starting the Upgrade 218 Upgrade Succeeded 221 Key License Upgrade 222 Overview 222 Online Upgrade 223 Upgrade Succeeded 227 Offline Upgrade 228 Preliminary Steps 228 Performing the Upgrade 229 Offline Upgrade Failure 234 Order Expiration 235 Appendix D External Authentication Services Overview 237 Approved Services 237 LDAP LDAPS OpenLDAP Setting Example 237 Active Directory Settings Examp...

Страница 12: ... browser and describes how to work with the CC2000 s browser GUI interface Chapter 4 Port Access shows how to access and control the devices that will be managed over the CC2000 network Chapter 5 User Management describes how to add modify and delete user accounts create user groups and assign users to them specify device access rights for users and groups and specify the user authentication metho...

Страница 13: ...ontact an ALTUSEN Authorized Reseller Visit ALTUSEN on the Web for a list of locations and telephone numbers Monospaced Indicates text that you should key in Indicates keys you should press For example Enter means to press the Enter key If keys need to be chorded they appear together in the same bracket with a plus sign between them Ctrl Alt 1 Numbered lists represent procedures with sequential st...

Страница 14: ...CC2000 User Manual xiv This Page Intentionally Left Blank cc2k book Page xiv Tuesday December 21 2010 4 00 PM ...

Страница 15: ... factors including automated database backup of Master Slaves and devices and real time database updating Redundancy ensures smooth uninterrupted access management of all your devices Should any of the CC2000 servers go down the CC2000 management system keeps functioning since the redundant slave unit takes over to provide the required services until the downed unit comes back up By consolidating ...

Страница 16: ...CC2000 User Manual 2 Deployment Example Master Slave Slave Slave Slave Slave Slave Slave Slave Devices cc2k book Page 2 Tuesday December 21 2010 4 00 PM ...

Страница 17: ...twork from anywhere at anytime Built in Redundancy Automated database backup of Master Slaves and devices and real time database updating Automated database backup of Master Slaves and devices and real time database updating Backup and restore of device configuration and account information Comprehensive reporting capabilities logging and auditing of system events for the CC2000 and managed device...

Страница 18: ...assword protection SAS 70 compliance for configurable amount of failed login attempts and user ID lock out parameters Devices can identify themselves by Name MAC address or IP in the browser the IP of KN SN PN devices can be hidden from people passing by IP and Mac filtering Local and remote access logged and authenticated Private CA support Server Management Features BIOS level support Flexible e...

Страница 19: ...e free space Ethernet At least 1 Ethernet adapter 100Mbps or higher Giga LAN recommended Operating System Requirements Windows 2000 XP 2000 Server Server 2003 Server 2008 or Windows Vista with Java Runtime Environment JRE 6 Update 11 or higher with the latest service package for each installed Linux with Java Runtime Environment JRE 6 Update 11 or higher Red Hat Enterprise Linux V 4 Novell SUSE En...

Страница 20: ...or the first viewer after logging in from the browser and 100MB for each additional viewer that is opened thereafter Operating Systems Supported operating systems for client workstations that connect to the CC2000 are shown in the table below Supported operating systems for users that log into the CC2000 include Windows 2000 and higher and those capable of running the Java Runtime Environment JRE ...

Страница 21: ...ding the firmware see Upgrade Selected Appliance Firmware page 166 Note 1 Devices must be configured to communicate on the same port that you configure for the CC2000 s Device Port see Device port page 13 2 For a list of supported devices see CC2000 Capable ALTUSEN ATEN IP Products page 199 Browser Version IE 6 and higher Chrome 8 0 and higher Firefox Windows 3 5 and higher Linux 3 0 and higher Sa...

Страница 22: ...single node and only requires a single license Ports on ATEN ALTUSEN NET devices when not part of an aggregate device must be unlocked see Locking Unlocking Ports page 99 in order to be used Each unlocked port counts as one node Generic devices routers switches etc are not counted Direct Web Access devices are not counted Group Devices do not count as nodes They are made up of unlocked physical po...

Страница 23: ...C1000 key firmware to the CC2000 key firmware see Key Firmware Upgrade page 218 After performing the upgrade the license key changes to the CC2000 license method Note If you decide to go back to the CC1000 license method you must upgrade the key with CC1000 key firmware V1 2 111 at which time your CC1000 key license with the original number of users will be restored Uninstalling the CC1000 If you ...

Страница 24: ...version from the Java web site http java com After the JRE has been installed on your system you are ready to install the CC2000 program Starting the Installation To install CC2000 on a Windows system do the following 1 Put the software CD that came with your package into the computer s CD or DVD drive 2 Go to the folder where CC2000Setup_Win exe is located and execute it A screen similar to the o...

Страница 25: ...lick Next to continue 5 The following dialog box appears 6 Key in the CC2000 s software serial number the serial number can be found on the CD case then click Next to continue Note We recommend that you save your software serial number in a safe place in case you need to use it for reinstallation cc2k book Page 11 Tuesday December 21 2010 4 00 PM ...

Страница 26: ... location that you want then click Next to continue 8 In the Choose Shortcut Folder dialog box click one of the radio buttons to specify where you would like to create product icons then click Next to continue 9 In the Configuration dialog box that comes up fill in the fields according to the information provided in the table below cc2k book Page 12 Tuesday December 21 2010 4 00 PM ...

Страница 27: ...ver on the system can use its own port setting for ease of management we recommend that all CC2000 servers use the same port setting Device port The port that the CC2000 server uses to communicate with the devices ALTUSEN ATEN IP products on the installation The default is 8000 Each CC2000 can have a separate Device port number but in order to communicate with the devices connected on its network ...

Страница 28: ...are being copied to the installation folder Once the files have been copied click Continue to move on 12 The Pre Installation Summary screen appears If you wish to change anything click Previous to go back If the information is correct click Install 13 When the installation utility brings up a screen informing you that the installation has completed successfully click Done to exit the installer cc...

Страница 29: ...ry bootup To check that the CC2000 has started navigate through the following folders Control Panel Administrative Tools Services Look down the list to the CC2000 entry If the CC2000 is running it will appear in the services list You should see a screen similar to the one below The entry for the Status field should say Started If it does not right click anywhere on the CC2000 entry line and select...

Страница 30: ... the previous point regarding downloading and installing Java Make sure your PATH and JAVA_HOME environment variables point to the new version in your root bash_profile file For example JAVA_HOME usr java jre1 6 0_0 b11 PATH JAVA_HOME bin PATH BASH_ENV HOME bashrc USERNAME root export JAVA_HOME PATH BASH_ENV USERNAME Even after you install an appropriate Java version and set the new PATH and JAVA_...

Страница 31: ...lling After making sure that the appropriate version of the JRE has been installed do the following 1 Put the software CD that came with your package into the computer s CD or DVD drive 2 Go to the folder where CC2000Setup_Linux bin is located and run it Note 1 You must run the installation program as the root user 2 Make sure that the installation file has executable permissions 3 For some versio...

Страница 32: ...The CC2000 software comes with a default demo license that allows the server to be a master server with no slaves and 16 nodes all of which must be on the same network as the server For anything beyond this minimum you will need a license key that allows slave servers and additional nodes Once the software is installed on the server the next step is to specify whether the server will be a master o...

Страница 33: ...elf from the location that the CC2000 was installed at the default folder is C CC2000 Uninstalling from a Linux System To uninstall the CC2000 from a Linux system as root execute the following command install path Uninstall_CC2000 Uninstall_CC2000 Where install path represents the path and directory that you specified for the CC2000 s location when you installed the program Note The removal progra...

Страница 34: ...l across all of the CC2000 units If a problem should occur after the upgrade you can use the backup created with them to restore the database to its latest working level We recommend you take the following backup steps on each CC2000 unit before you begin 1 Replicate the database of each of the slaves use Run Now for the schedule setting See Replicate Database page 174 2 After replication complete...

Страница 35: ...nt specify the IP addresses of the preferred and alternate CC2000s on the device s ANMS settings page see Device Configuration For KVM Devices page 110 Now should the device fail to connect with the preferred CC2000 server due to network failure CC2000 failure etc the device will connect with the alternate CC2000 Once it connects with the alternate CC2000 the device will thereafter seek the altern...

Страница 36: ...CC2000 User Manual 22 This Page Intentionally Left Blank cc2k book Page 22 Tuesday December 21 2010 4 00 PM ...

Страница 37: ...000 in the browser s URL location bar Note If the system administrator has configured the HTTP or HTTPS port setting as something other than the CC2000 defaults you must include http or https before the IP address and specify the port number along with the IP address For example http 192 168 1 20 8082 Where 8082 is the http port number and a colon is inserted between it and the IP address 2 If any...

Страница 38: ...devices configure the system etc The Username for this account is administrator the password is password For security purposes we strongly recommend you change this to something unique See Managing User Accounts page 54 for details The CC Interface After you have successfully logged in the CC web page appears The CC web page components are described in the table on the next page cc2k book Page 24 ...

Страница 39: ...he Sidebar provides a tree view listing of items that relate to the various tab bar and menu bar selections Clicking an item in the Sidebar brings up a page with the details that are relevant to it 4 About About provides information regarding the current version of the CC2000 5 Logout Click this button to log out of your CC2000 session 6 Welcome Message If this function is enabled see Preferences ...

Страница 40: ...If an item s icon contains a question mark it indicates there is a mismatch between the device s information and the information for it stored in the CC2000 s database See Update page 105 for information on resolving the problem Button Action Moves to the item in the tree that is one level out and one step up from the current selection its parent item In the diagram below If the focus were on Outl...

Страница 41: ...ne its icon is gray Note User s can configure the way devices and ports display in the Sidebar tree view See User Preferences page 47 for details Interactive Display Panel Overview The Interactive Display Panel also referred to as the main panel is your main work area The screens that appear reflect your menu choices and Sidebar item selection The reason it is called an interactive display panel i...

Страница 42: ...nu category into smaller related groupings If there are secondary Panel Menu pages hovering over the Panel Menu title causes a popup menu to appear Click on the menu item to go to the desired secondary page The items that appear in the Panel Menu bar are determined by the user s type and the authorization options that were selected when the user s account was created 2 Panel Menu Title Bar Describ...

Страница 43: ...Tab Bar The Interactive Display Panel opens to the default page Color Scheme The Panel Menu bar shows the available categories Color Scheme Web Options and Password Color Scheme To change the color scheme click on one of the available choices The display immediately changes to reflect your choice cc2k book Page 29 Tuesday December 21 2010 4 00 PM ...

Страница 44: ...uage the CC2000 defaults to English Click the Use radio button to drop down a list of supported languages and have the CC2000 s pages display in the language you select Note The language selected here if different from the browser s setting will only take effect after login The login page will follow the sequence described in the note for Use Browser Settings For Login Page You can choose to have ...

Страница 45: ...y change to what you specify here see Adding User Accounts page 50 2 The Screen Name will not display unless you choose to Show the Welcome Message To disable mouse over hints from appearing click to put a check mark in the Disable hints checkbox When you have made your choices click Save Password If you wish to change your password do the following 1 Check Change Password This enables the passwor...

Страница 46: ...CC2000 User Manual 32 This Page Intentionally Left Blank cc2k book Page 32 Tuesday December 21 2010 4 00 PM ...

Страница 47: ...ganizational views of those items as shown in the screenshot below Click the view on the Menu Bar that you want to see the items organized by From there you can operate the items as described in the sections that follow Note If no access rights have been assigned to a user the Port Access tab and page do not display even for System Administrators cc2k book Page 33 Tuesday December 21 2010 4 00 PM ...

Страница 48: ...er outlets indicates the port s Power Management Configuration See Port Settings page 119 for details This item is blank for Target device ports Status For KVM ports indicates whether the port is online or offline For Serial ports indicates whether the port is online or offline For Power outlets indicates whether the outlet port s power socket is On or Off Note This category does not apply to Blad...

Страница 49: ...their names display in the list For example if TD is your string only items with names containing TD such as TD AGG 01 display To clear the filter and bring back the complete list erase the contents of the input box and click Filter again Launch Multiviewer If you want to launch viewers for more than one port at the same time click to put a check in the checkbox in front of the names of the ports ...

Страница 50: ...lick the in front of a device to expand the tree and see the ports outlets nested underneath it Click the to collapse the tree and hide the nested ports outlets Switches and ports that are online have their monitor screen icons in Green the monitor screens are Gray for devices and ports that are offline Clicking an item in the tree brings up its Status and Operation page Double clicking an active ...

Страница 51: ...ter options selected all of the devices ports and outlets that are accessible to the user are listed in the Sidebar Drop down the list box to see all of the available choices and select one of them instead of All Only the items that match your selection display in the tree Online If you enable Online by putting a check in the checkbox only items that are online display in the tree Search If you ke...

Страница 52: ...ectly to the device running on the selected port It is just like what you would see if you logged into the device directly and then selected that port on the device s GUI A window with that device s port session opens on your desktop For example TD AGG 01 in our screenshot on page 41 is an aggregate device that contains ports from a KN2124v KVM switch a PN0108 PDU and an SN0108 serial device When ...

Страница 53: ... screenshot then click the port you want to access The viewer window of each port has a hidden Control Panel To switch to a different port on the device bring up the port list and click the desired port When you have finished with your session open the Control Panel and select the Exit icon Web Access Clicking Web Access opens a browser session for the device on your desktop just as if you had ope...

Страница 54: ...e is OFF click OFF to turn the power to the outlet off Note The change doesn t show in the table until you leave the page and come back to it SSH Telnet Session Choose to open an SSH or Telnet session to the selected port You get an SSH or Telnet viewer window just as if you had logged into the serial device SN0108 for example with your browser and had chosen Telnet on the Main Web page cc2k book ...

Страница 55: ...s To only see a particular port click on it in the Sidebar Target View Target devices include Aggregate Devices Blade Chassis and individual blades and Virtual Machines The Target page default view has All selected at the top of the Sidebar and the Status and Operation page displayed in the Interactive Display panel To only see the ports for a particular device click on the device in the Sidebar c...

Страница 56: ...ticular device click on the device in the Sidebar Department View Department view displays all of the departments that have been created under the CC2000 management system and the ports that have been assigned to each To only see the ports belonging to a particular department click on the department in the Sidebar cc2k book Page 42 Tuesday December 21 2010 4 00 PM ...

Страница 57: ...only see the ports belonging to a particular location click on the location in the Sidebar Type View Type View displays all of the device types that have been created under the CC2000 management system and the ports that have been assigned to each To only see the ports belonging to a particular device type click on the type in the Sidebar cc2k book Page 43 Tuesday December 21 2010 4 00 PM ...

Страница 58: ...eature is especially handy on large crowded installations When you select Favorites on the menu bar the default page comes up listing all of the devices and ports that have been deployed under the CC2000 management system Note Filter and Launch Multiviewer work the way they do on the other View pages Adding a Favorite To create a Favorite and populate it with ports do the following 1 Drop down the...

Страница 59: ... the user are listed in the Sidebar and display in the main panel If any Favorites have been created you can drop down the list box and select the one you want to view When you select a Favorites only the items that you have chosen for it display in the Sidebar and main panel Online If you enable Online by putting a check in the checkbox only the ports whose attached devices are online appear in t...

Страница 60: ...at the top right of the panel A page comes up showing all of the ports available to the user with the ports that are currently included in the Favorite having a check in their checkboxes 3 Check any ports you want to include in the Favorite uncheck any ports you want to remove from the Favorite 4 click Save cc2k book Page 46 Tuesday December 21 2010 4 00 PM ...

Страница 61: ...n you click to expand the tree If you choose Hide physical devices or ports that are included in group devices physical ports that are included in group devices will not display under their originating devices when you click to expand the tree View Settings If you select Allow aggregate or group devices to expand in Device view ports nested under aggregate or group devices also appear in the tree ...

Страница 62: ... to a port or outlet click the arrowhead in front of the device s name to show them Key the alias into the Alias field that corresponds to the device port or outlet When you return to an organizational view page the alias appears in the Sidebar instead of the device or port name Note The alias only appears for the particular user that creates it Other users see the original name or an alias that t...

Страница 63: ... performed via the CC2000 internal or via an external authentication server When you click the User Management tab the CC2000 opens to the default Accounts page which looks similar to the screen below All users and groups are listed in the Sidebar and in a table in the Interactive Display Panel To access any user or group simply click on the name in either location Note The User Management page is...

Страница 64: ...ccounts The default Accounts page looks similar to the one below Adding User Accounts To add a user do the following 1 Select Users in the Sidebar 2 Click Add at the top right of the main panel The Add User Account Information page appears cc2k book Page 50 Tuesday December 21 2010 4 00 PM ...

Страница 65: ...bout User Types Authentication server For authentication by the CC2000 leave the selection as is For authentication by an external authentication service drop down the list to select the one you wish to use Note Before you can make this selection an external authen tication server must first be added See External Authentica tion Servers page 68 for details User base RDN If the authentication serve...

Страница 66: ...of each of the fields is given in the table below Field Description Password Enabling Use password as default sets password as the user s password If you do not enable Use password as default enter the user s password in the Password field A maximum of the equivalent of 16 English alphanumeric characters is allowed The minimum number of characters is based on the CC2000 s account policy settings s...

Страница 67: ...in the Sidebar Restrictions Disable account temporarily cancels a user s account without deleting it so that the account can easily be reinstated at a future time If User cannot change password is enabled the user can t change his own password Otherwise the user can use the Preferences tab to change his own password See Password page 31 for details If User must change password at next login is ena...

Страница 68: ...atus and Personal Information that were in the Adding a User Account procedure see page 50 They are used to modify a user s account such as changing the user s password To modify the information on these pages you can either move through them sequentially by clicking the arrow icons or you can go directly to a page by hovering over the menu and selecting the page from the popup menu that appears G...

Страница 69: ...anel to bring up the user s Access Rights page If no devices have been assigned to the user the page that comes up looks like the one shown below Adding Device Access To add devices that the user can access do the following 1 Click Add at the top right of the panel A screen with a list of all the devices on the installation appears 2 Check the devices ports and outlets that you want the user to be...

Страница 70: ...on the device and view the screen but cannot per form any operations on it No access KVM The user has no access to the device or specified ports on the device The device or the specified ports will not show up in the Port Access Sidebar or List Allowed The user is allowed to configure the power status of the device or specified ports on the device Denied The user is not allowed to configure the po...

Страница 71: ... the box in front of the device you want to remove then click Delete Managing Devices You can bring up the Management page of any device port or outlet by clicking on it in the Device Name or Port Name list Deleting User Accounts To delete a user account do the following 1 Select Users in the Sidebar 2 In the Interactive Display panel click to put a check in front of the user whose account you wis...

Страница 72: ...ck in front of the user whose account you wish to unlock 3 After you have made your selection click Unlock at the right of the panel 4 In the confirmation popup that appears click OK Note 1 You can unlock more than one user by checking as many names as you require You can unlock all locked accounts by checking the box at the top of the column 2 If all users including the System Administrator get l...

Страница 73: ...access to specific devices while restricting other users from accessing them Creating Groups To add a group do the following 1 Select Groups from the User Management menu bar The Group List page appears 2 Click Add at the top right of the main panel The Group Information page appears 3 Key in a Name and a Description optional for the group Note 1 The Name can be the equivalent of from 2 32 English...

Страница 74: ...formation page appears 3 Select the user you wish to add to the group from the Available list then click Add to move the user from the Available list to the Selected list 4 Repeat step 3 for any other users you wish to add to the group Note A shortcut for adding multiple users is to select the ones you want in the Available column using Ctrl Click or Shift Click before clicking Add to move all the...

Страница 75: ...from the group from the Selected list then click Remove to move the user from the Selected list to the Available list 4 Repeat step 3 for any other users you wish to remove from the group Note A shortcut for removing multiple users is to select the ones you want in the Selected column using Ctrl Click or Shift Click before clicking Remove to move all the selected ones at once 5 When you have finis...

Страница 76: ...ails Types There are two major categories of user types System and Custom By default the CC2000 supports six user types These are referred to as System user types because they are built in to the system The roles assigned to members of these user types are fixed and cannot be changed The Custom user type category by contrast provides you with the convenience and flexibility of assigning various co...

Страница 77: ...ser you would like to add then click OK To change the user s type check the box in front of the user s name then click Change at the top right of the main panel In the page that comes up select the new type for the user then click OK Type Information When you are in the Members page you can click Type Information to see a description of that user type as well as the roles that are assigned to it N...

Страница 78: ...nistrator s type can be changed 2 With regard to the Auditor type The Auditor type can access all tabs and pages but is restricted to View Only rights Under the Log tab the Auditor type can export and print logs in addition to viewing them but cannot change any settings Under the Preferences tab the Auditor type can change his her Color Scheme Web Options and Password settings Assigned Roles Super...

Страница 79: ...click Custom Types The User Type List appears showing all the Custom user types that have been configured 3 Click Add at the top right of the panel In the page that comes up key in a name and description for the new type then check the roles you want the new user type to perform Note 1 The Name can be the equivalent of from 2 32 English alphanumeric characters but cannot contain the following 2 Th...

Страница 80: ...nt you can select the external authentication server from the list of authentication servers see Adding User Accounts page 50 Note For LDAP LDAPS and Active Directory there is an additional authentication method in which the user attempting to log in does not have an account on the CC2000 In this case the CC2000 checks the external server to see if it contains an account with the username and pass...

Страница 81: ...length can be the equivalent of from 0 16 English alphanumeric characters The default is 6 charac ters A setting of 0 means that no password is required Since this leaves your installation in a highly insecure state we strongly recommend against a setting of 0 Password expiration For security purposes you can force users to renew their passwords at specific time intervals To do so enable Password ...

Страница 82: ...ice page that appears drop down the Server type list to select the service you want to add give it a name and description then click Next at the top right of the panel 3 The page that comes up next depends on the service you have chosen Follow along with the Wizard s pages keying in the information required for the external authentication server you selected When you have finished click Save Note ...

Страница 83: ...button to use LDAPS LDAP User Schema Get the information for these fields from the LDAP administrator For example settings see LDAP LDAPS OpenLDAP Setting Example page 237 Browsing Method When adding or modifying user accounts see Adding User Accounts page 50 you can click the Browse button to browse all users in User RDN to choose the Login name Select Browse with user credentials to allow the us...

Страница 84: ... the Active Directory Heading Information Connection Settings Get the information for these fields from the service admin istrator The default for RADIUS is 1812 the default for TACACS is 49 but check with the service administrator to see if it may be something else For example settings see RADIUS Settings Example page 240 and TACACS Settings Example page 242 Authentication Settings Get the inform...

Страница 85: ...st 2 In the Interactive Display panel click to put a check in front of the external authentication server you wish to delete Note 1 You can delete more than one server by checking as many names as you require 2 You can delete all deleteable servers by checking the box at the top of the column 3 If a user account has been created on the CC2000 that uses an external authentication server the server ...

Страница 86: ...l list The server s Properties page comes up 2 Select Group Authorization on the Panel Menu bar The Group Authorization page appears Note 1 The screenshot shows a page that appears if an LDAP service was chosen The LDAP Group Related Schema settings fields do not appear if Active Directory was selected 2 For the LDAP Group Related Schema settings get the information for these fields from the LDAP ...

Страница 87: ...in the Basic Information and Session Timeout information Note This page is similar to the adding user account page see Adding User Accounts page 50 for settings details 6 In the Sidebar or the main panel select the group you just added 7 Select Access Rights on the Panel Menu bar then click Add A list of available devices appears See Access Rights page 55 for information on how to assign access ri...

Страница 88: ...CC2000 User Manual 74 This Page Intentionally Left Blank cc2k book Page 74 Tuesday December 21 2010 4 00 PM ...

Страница 89: ...milar to the screen below All devices and device folders that have been configured for use on the CC2000 server and have been added into its database are listed in the Sidebar and in a table in the Interactive Display Panel To access any device item simply click on it in either location Note The Device Management page is for System Administrators and Device Administrators Other user types can omit...

Страница 90: ...l the available devices including all of the ones connected to its Slaves This gives the same result as dropping down its Add device list 3 Devices that already have been added to the CC2000 management system do not show in the list of available devices 3 Next from the Master CC2000 unit the devices recognized in step 2 must be added to the CC2000 s management system see page 81 for details 4 Fina...

Страница 91: ...vices 78 Tools 100 Device Sync 102 Sidebar Device Tree Properties KVM 103 Access Rights KVM 106 Device Configuration KVM 110 Port Configuration KVM 111 Properties Power 113 Access Rights Power 114 Station Configuration Power 117 Outlet Configuration Power 119 Properties Serial 122 Access Rights Serial 122 Device Configuration Serial 124 Port Configuration Serial 125 Departments Locations Types 127...

Страница 92: ...wn list is only active on Master units since devices can only be added into the CC2000 management system from Master units For Slave units clicking the Show Available Devices button lists the devices connected to them that can be recognized The device types and an explanation of their purposes are given in the following table Type Purpose Device Select this type to add ATEN ALTUSEN NET devices int...

Страница 93: ...ssis Virtualization Select this to add a VMware virtual machine Generic Device Third party generic devices routers switches etc can consist of any device that contains an Ethernet interface and can be accessed by its URL or IP Address via HTTP HTTPS or Telnet SSH Since these devices have no provision for CC management they cannot be authenticated through the CC2000 and are not part of the CC2000 s...

Страница 94: ...The sections that follow describe the procedures involved for setting up each of the devices Folder Device folders provide another method in addition to Departments and Locations of organizing related devices into useful categories Putting all PN0108s into one folder for example Doing so makes it easy to configure and maintain similar types of objects Note 1 Folders are containers for devices and ...

Страница 95: ...dures described below Note 1 The only way that devices can be placed inside of folders is to add them after the folder you want to place them in has been selected 2 Folders can be nested Simply go through the adding a folder procedure after selecting the parent folder in the Sidebar Adding Devices This item actually refers to adding ATEN ALTUSEN NET devices into the CC2000 management system see pa...

Страница 96: ...ce page comes up listing all the online devices that can be added To add a device do the following 1 Click to put a check in the checkbox in front of the device you wish to add 2 Click Next The Configure Device Properties page come up cc2k book Page 82 Tuesday December 21 2010 4 00 PM ...

Страница 97: ...ast for example and assign devices to them If you wish to assign this device to a location drop down the list of locations you have previously created see Departments Locations and Types page 127 and click on the one you want the device to belong to Type For organizational purposes you can specify the type of device that this is If you wish to do so drop down the list of types you have previously ...

Страница 98: ...ll be able to log into the device using its own authentication system 2 If the checkbox is unchecked it means that other authentication is enabled and users can log into the device using its own authentication system Enable device log information to be sent to the CC2000 If this feature is enabled the CC2000 acts as the device s log server receiving and storing the device s tick event information ...

Страница 99: ...evice page 79 for an explanation of aggregate devices To add an Aggregate Device do the following 1 Provide a name to identify the aggregate device in the Name field 2 Optional Provide a further description of the aggregate device in the Description field 3 Optional Drop down the Department Location and or Type list s and click on the one s you want the aggregate device to belong to 4 Optional Pro...

Страница 100: ...egate device only has one network interface select Primary then move on to configure the remaining fields If it has more than one network interface after you finish configuring the Primary one come back to choose the additional ones and configure each of them in turn Name For convenience each of the network interfaces can be given a name Server Select the CC2000 unit that the Aggregate Device serv...

Страница 101: ...lds in this section are inactive They are only enabled if one of the blade chassis types are selected they are provided to support single sign on for those types Login name Password Login name field Password field Fill in these fields according to the Aggregate Device server s authentication and authorization procedures SSH Telnet Session IP address Login name Password SSH port To access the Aggre...

Страница 102: ...ggregate Devices if power outlets have been added to the device 2 The Properties Connectivity and Access Rights Panel Menus bring up pages that offer the same fields as the ones encountered when the Aggregate Device was created You can use them to change any of the device s settings information 2 Click Add at the top right of the panel The Add Ports page appears listing all available ports that ca...

Страница 103: ...lade Chassis When you select Blade Chassis as an item to be added the Add Group Device page comes up 1 Fill in the fields according to the information provided in the table below Field Information Model Drop down the list to select the model type you are adding If it is not one of the three specifically mentioned types select Generic with iKVM if the chassis supports this function or Generic witho...

Страница 104: ...he CC2000 unit that the Aggregate Device server is connected under Field Information Device Information Name Provide a name to identify the device Description If you wish to provide extra information to describe the device enter it here This field is optional Department For organizational purposes you can establish department categories R D for example and assign devices to them see Departments Lo...

Страница 105: ...ties page comes up 6 For each blade you can specify its Department Location and Type and provide a brief Description 7 When you have finished with this page click Save The Add Ports page comes up 8 Check any ports the blade chassis connects to then click Save cc2k book Page 91 Tuesday December 21 2010 4 00 PM ...

Страница 106: ...irtual machine s IP address and the access port used to connect to it via browser The default port is 443 Click Test Connection to confirm that the IP and port settings have been correctly detected Username Password Key in a username and password that will be required to access the virtual machine via browser Timeout The amount of time to wait for a connection request to complete before cancelling...

Страница 107: ...ng an Aggregate Device Fill in the fields according to the information provided in the table starting on page 86 then click Next The Server and Virtual Machine Properties page comes up 5 Drop down the lists to select Department Location and Type then click Save Adding a Generic Device When you select Generic Device as an item to be added the Add Generic Device page comes up Note See Generic Device...

Страница 108: ...assign devices to them see Departments Locations and Types page 127 If you wish to assign this device to a location drop down the list of locations you have previously created and click on the one you want the device to belong to Type Drop down the list to select the type of device it is Contact Information The name and telephone number of the device administrator These fields are optional Network...

Страница 109: ...evice 3 Put a check in the box if front of the user or group name then click the arrow at the right of the Access column to drop down a list of access rights choices 4 Put a check in front of the rights you want the user or group to have then click Save at the top right of the panel You return to the Device List page The Generic Device now appears in the list and in the Sidebar Note The items that...

Страница 110: ... made part of a Group Device it retains the locked unlocked status of the original physical port If you lock or unlock any of these ports all the ports including the original physical port change to the new locked unlocked status Modifying Devices To modify a device s settings do the following 1 Select Devices either in the Sidebar if it is available or on the main menu bar the orange bar 2 Select...

Страница 111: ...her valid devices or ports Examples 1 On a CC2000 managed Cat5e KVM switch if there are Adapter Cables connected to ports 4 and 6 and you remove the adapter from port 4 the CC2000 will assume that the device connected to port 4 is off line 2 If on the CC2000 managed Cat5e KVM switch you unplug the adapter cable from port 6 and plug it into port 4 the cable s Adapter ID will not match the device in...

Страница 112: ...p put a check in front of the outlet you want to be the redundant one then click Save 3 When you return to the Redundant Power page put a check in the Enable redundant power checkbox and set the Power on delay and Power off delay parameters according to the information given in the table below 4 click Save at the top right of the panel Power on delay Sets the amount of time the PNXXXX waits after ...

Страница 113: ...r installation that are in excess of the amount licensed If the total number of device nodes on the installation exceeds the number you have been licensed for you can choose which device nodes to exclude by selecting them and clicking Lock You can utilize them when necessary by locking different ones to create room and then unlocking them Note Ports are automatically unlocked when they are added t...

Страница 114: ...will not work UDP uses port 18768 make sure that the network settings for computers that the CC2000 is installed on have this port open 2 For heightened security once the broadcast is done and the information has been sent to the device the device will not accept UDP broadcasts from any other CC2000 3 If you change CC2000s you must use the ANMS settings page to specify the IP Address and port numb...

Страница 115: ...nt information only the device configuration settings or both 5 Click the checkbox in front of the name of the device you want to restore then click Restore When the restoration is complete a message appears informing you of the result Restore device configuration This feature is used to restore a device s configuration and or account information to one saved on a previously backed up configuratio...

Страница 116: ...the Panel Menu bar the following page comes up This page lets you configure automatic syncing of names between the CC2000 and the installed devices Check the boxes for the features you want to enable then click Save cc2k book Page 102 Tuesday December 21 2010 4 00 PM ...

Страница 117: ... explanation of the Panel Menus and their settings is provided in the sections below Note Access rights can be configured on an individual port by port basis Giving a user access and configuration rights to a device does not necessarily mean giving the user rights to every port on the device KVM Devices and Ports Selecting a KVM device such as the IP8000 or KN4132 or one of its ports brings up a p...

Страница 118: ...eated see Departments Locations and Types page 127 and click on the one you want the port to belong to Location For organizational purposes you can establish location categories West Coast for example and assign ports to them If you wish to assign this port to a location drop down the list of locations you have previously created see Departments Locations and Types page 127 and click on the one yo...

Страница 119: ...es on the installation exceeds the number you have been licensed for you can choose which device nodes to exclude by locking them Click this button to lock all of the device s ports See Locking Unlocking Ports page 99 for more information Unlock All If any of the device s ports have been locked click this button to unlock all of them Save If you make any changes on the Properties page click Save t...

Страница 120: ...iguration rights for the users or groups Allowed The user or group can configure the device s settings Denied The user or group cannot configure the device s settings 4 Set the access rights for the users or groups Administrator When accessing the device the user or group has administrator privileges on it according to the device s authorization policy User When accessing the device the user or gr...

Страница 121: ...n click Close 3 click Save at the top right of the panel Deleting a User s or Group s Rights To remove a user s or group s rights to the device do the following 1 Click to put a check in the checkbox in front of the names of the users or groups that you want to remove 2 Click Delete at the top right of the panel Action Buttons In addition to Add Delete and Save there is an Update All button at the...

Страница 122: ...user or group cannot configure the port s settings Note This setting is only available with ports on Cat5e KVM switches 4 Set the access rights for the users or groups Full access and USB The user can view the remote screen and can perform operations on the remote system from his keyboard and monitor The user has rights to use the virtual media function Note This setting is only available on KN212...

Страница 123: ...then click Close 3 click Save at the top right of the panel Deleting a User s or Group s Access Rights To remove a user s or group s access rights to a port do the following 1 Click to put a check in the checkbox in front of the names of the users or groups that you want to remove 2 Click Delete at the top right of the panel Action Buttons In addition to Add Delete and Save there is an Update All ...

Страница 124: ...be transmitted to the device To make device configuration changes you can log in to the device directly see CC2000 Options page 84 for details This Panel Menu item contains several secondary pages To modify the information on these pages you can either move through them sequentially by clicking the arrow icons and at the left of the main panel in the gray bar or you can go directly to a page by ho...

Страница 125: ...mization settings page there is an entry called Port timeout This field sets a time threshold for users on ports whose Access Mode has been set to Occupy see Mode page 112 This corresponds to the Access Mode setting on the original device If there is no activity from the user occupying the port for the amount of time set here the user is timed out and the port is released The first user to send ke...

Страница 126: ...the connected port is using Language Specifies the OS language being used by the computer on the connected port Mode This corresponds to the Access Mode setting on the original device Share Occupy Exclusive It defines how the port is to be accessed when multiple users have logged on Exclusive The first user to switch to the port has exclusive control over the port No other users can view the port ...

Страница 127: ...ccessed with a single sign on through the CC2000 it isn t necessary to daisy chain them to achieve management through a single IP address They therefore can be deployed independently rather than being daisy chained 3 The CC2000 doesn t support the PN0108 directly Since PN0108s are not capable of Internet access they are only supported when daisy chained to PN9108s Properties The settings found on ...

Страница 128: ...See page 106 for details 4 Set the access rights for the users or groups See page 106 for details 5 When you have finished making your access rights settings click Save The new users and groups are added to the device station or outlet User Group list Modifying a User s or Group s Rights To modify a user s or group s rights to the device station or port do the following 1 In the Configuration Righ...

Страница 129: ...out having to access the device directly Note 1 If the link between the CC2000 and the device should be broken for some reason device configuration changes made on these pages will not be transmitted to the device When this happens you can log in to the device directly to make the changes See CC2000 Options page 84 for details 2 The Device Configuration item does not appear if the device is offlin...

Страница 130: ...dant Slave Servers page 21 Although this setting does not appear on the device s ANMS page it will take effect on the device if the preferred server becomes unavailable 2 On the CC2000 s secondary Panel Menu ANMS settings page there is an entry labeled Event Trap and Notification There are four events listed as described in the following table Put a check in the checkbox to enable the item events ...

Страница 131: ...l s Administration chapter to obtain the necessary information When you have finished making your configuration settings click Save Note 1 The Station Configuration Panel Menu does not appear if the device is offline or if the device is on a port nested under another device 2 The changes you make to the User Management settings affects the Power device s internal authentication operations It does ...

Страница 132: ...To edit a user s information do the following 1 From the User Management secondary Panel Menu page click Edit at the top right of the panel 2 When the User Management page comes up make your changes then click Save To remove a user s port access rights do the following 1 From the User Management secondary Panel Menu page click to select the radio button in front of the user s name 2 Click Remove a...

Страница 133: ... if the device is on a port nested under another device 2 If the link between the CC2000 and the device should be broken for some reason port configuration changes made on these pages will not be transmitted to the device When this happens you can log in to the device directly to make the changes See CC2000 Options page 84 for details Port Settings To bring up the port settings page for a particul...

Страница 134: ...ve finished making your changes on this page click Save Schedule Settings The Schedule Settings page allows you to set up a scheduled Power On Off configuration for each of the outlets To bring up the schedule settings page for a particular outlet select it in the sidebar hover over Port Configuration on the Panel Menu bar then select Schedule Settings on the secondary menu that appears If the out...

Страница 135: ...s User Manual for a description of how to set up a scheduled Power On Off configuration for the outlets When you have finished making your changes on the Port Configuration page click Save Note The schedule settings for power device outlets made on the CC2000 replace any schedule settings made locally on the device itself cc2k book Page 121 Tuesday December 21 2010 4 00 PM ...

Страница 136: ...ights Access rights can be configured for the entire device or port by port After selecting the device or port clicking this Panel Menu item brings up a page that shows a list of all the users and groups that have been given access to it Adding Users or Groups to the Device or Port Access List To give a user or group access to the device or port do the following 1 Click Add A list of qualified use...

Страница 137: ... or No access 3 If a Port was selected in the Access Rights column that corresponds to the user or group you want to modify click on the arrow select Telnet SSH or both of them then click Close 4 click Save at the top right of the panel Deleting a User s or Group s Rights To remove a user s or group s rights to a device station or port do the following 1 Click to put a check in the checkbox in fro...

Страница 138: ...ion functions described in the device s User Manual For configuring the settings refer to the manual s Administration chapter to obtain the necessary information When you have finished making your configuration settings click Save Note 1 The Device Configuration Panel Menu does not appear if the device is offline or if the device is on a port nested under another device 2 If the link between the C...

Страница 139: ...tems Port Settings and Advanced Port Settings Port Settings To bring up the settings page for a particular port select it in the sidebar then click Port Configuration on the Panel Menu bar A page similar to the one below comes up Refer to the Port Property Settings section of the device s User Manual for an explanation of the fields When you have finished making your changes on this page click Sav...

Страница 140: ...g 1 Select the port in the sidebar hover over Port Configuration on the Panel Menu bar then select Advanced Port Settings on the menu that appears A page similar to the one below comes up 2 Refer to the Port Alert Settings section of the device s User Manual for an explanation of the fields When you have finished making your changes on this page click Save cc2k book Page 126 Tuesday December 21 20...

Страница 141: ...partment Location or Type do the following 1 Select Department Location or Type on the Menu Bar The Department Location or Type List page comes up 2 Click Add at the top right of the panel The Add Department or Location or Type page comes up 3 Fill in the Name and Description fields then click Save Assigning Devices and Ports To assign a device or port to a Department Location or Type do the follo...

Страница 142: ...dify 3 On the Panel Menu bar select Properties 4 Make your changes then click Save Deleting a Department Location or Type To delete a Department Location or Type do the following 1 Select Department Location or Type on the Menu Bar The Department Location or Type List page comes up 2 Click to put a check mark in front of the name of the Department Location or Type you wish to remove then click Del...

Страница 143: ...wing 1 Add the device s firmware upgrade file to the CC2000 See Appliance Files page 175 for details on how to do this 2 Once the device s firmware upgrade file is stored on the CC2000 its checkbox on this page becomes active Click to put a check mark in the checkbox 3 Following Step 2 the Firmware Upgrade button at the top right of the panel becomes active 4 Click Firmware Upgrade to upgrade the ...

Страница 144: ...CC2000 User Manual 130 This Page Intentionally Left Blank cc2k book Page 130 Tuesday December 21 2010 4 00 PM ...

Страница 145: ...the NET provides secure centralized single IP address login access to all your data center equipment from anywhere there is an internet connection at any time For administrative and deployment purposes one of the CC2000 servers is considered the master server the others are considered slaves When you click the System Management tab the CC2000 opens to the default CC Network page which looks simila...

Страница 146: ... Panel Menu Submenus Page System Management CC Network CC Servers Properties 133 Sessions 179 Sessions 134 Security 135 Monitor 136 This Server Server Information 137 Server Settings SMTP 141 NTP 143 Syslog 144 Dial In 145 Dial Out 146 Master Settings1 149 VMWare Settings 150 Security 151 Certificate 153 License 156 Tasks 159 Appliance Files 175 cc2k book Page 132 Tuesday December 21 2010 4 00 PM ...

Страница 147: ...n A green check on the icon means that the server is currently accessible a red X means that it is not currently accessible The Interactive Display Panel provides a table listing of the CC2000 servers along with some basic information about them If this page is being viewed from a master any slaves can be deleted by putting a check in the box before its name and clicking Delete at the top right of...

Страница 148: ...he installation the term Remote and the CC2000 s IP address appears Role The two major roles in the CC2000 management system are Master and Slave In addition there is a third role Substitute Master in which one of the slaves temporarily takes over the master s role should the master become disconnected from the system due to network problems for example The substitute master returns to its slave s...

Страница 149: ...tempt to log in an unlimited number of times with no restrictions For security purposes we recommend that you enable the lockout policy Key the number of login failures you wish to allow before the user gets locked out in the Maximum login failures field The value specified here must be at least 1 The default is 5 Key the amount of time in minutes a locked out user must wait before being allowed t...

Страница 150: ...ck an icon to bring up the server s Properties page This is the same page that comes up when you click the server s name in the Sidebar or on the CC Server Interactive Display panel list see the screenshot on page 133 Note When this page is open the Timeout setting for the user see Adding User Accounts page 50 is ignored the user will not be timed out You can create map views and save them as Favo...

Страница 151: ...r Master Settings VMWare Settings Security and Certificate Note 1 Changes to other servers on the installation can only be made by logging into them directly 2 Only master servers have a Server Settings Panel Menu entry slave servers have a Master Settings Panel Menu entry instead see page 149 for details Server Information The default page is Server Information and looks similar to the one below ...

Страница 152: ...re port that the CC2000 uses to communicate with a browser over the internet CC Port The port that the CC2000 uses to communicate with other CC2000 servers on the installation Device Port The port that the CC2000 uses to communicate with devices on the installation Viewer Port The port that the CC2000 uses for the viewers to communicate with when Multiviewer is in effect See Launch Multiviewer pag...

Страница 153: ...nd all other online slaves automatically recognizing the new master Note 1 This button is only active on slave units 2 You must switch to a different page and come back to this one in order to see the change 3 We recommend that all CC2000 servers on the installation be online at the time of role promotion If any slaves are offline at the time of role promotion they must perform the Master Settings...

Страница 154: ...r Administrator s or System Administrator s username and password 2 After registration most of the original data on the formerly independent CC2000 master or slave is lost As a slave server it will now get almost all of its data from the master server it is registered with Any devices that are connected to the newly registered slave have to be added again See Adding Devices page 81 for details reg...

Страница 155: ...P The CC2000 can send email notification of event traps on the installation to specified users Note Event notification recipients are designated on the The Notification Settings page See page 184 for details To enable SMTP server setting do the following 1 Check the Enable report from the following SMTP server checkbox 2 Specify the IP address or domain name of the computer running your SMTP serve...

Страница 156: ... server setting is configured properly A screen similar to the one below appears 7 Key in an email address for the recipient of the test email then click OK If the settings have been configured correctly the recipient will receive the test email Note The email address of the recipient cannot exceed the equivalent of 128 English alphanumeric characters 8 Click Save to complete the procedure cc2k bo...

Страница 157: ...server do the following 1 Check the Enable auto adjustment checkbox 2 Drop down the time server list to select your preferred time server or Check the Preferred custom server IP checkbox and key in the IP address of the time server of your choice 3 If you want to configure an alternate time server check the Alternate time server checkbox and repeat step 2 for the alternate time server entries 4 Ke...

Страница 158: ...heck Enable 2 Key in the IP address and the port number of the Syslog server The valid port range is 1 65535 3 Select whether to log a short message or a full message 4 Drop down the list to select the language you want the message sent in When all your settings have been made click Save cc2k book Page 144 Tuesday December 21 2010 4 00 PM ...

Страница 159: ... the table below When all your settings have been made click Save Item Action Enable Fixed Number DialBack If this radio button is selected the switch will dial back to the modem whose phone number is specified in the Dial back number field Key the number that you want the CC2000 to dial back to in this field Note You need to specify a number here even if you intend to use flexible dial back Enabl...

Страница 160: ...odem to dial up to your ISP account If you want to be able to dial out activate the dial out function by putting a checkmark in the Enable Dial Out checkbox Note Unless this function is enabled you will only be able to dial in None of the dial out functions described below will be available cc2k book Page 146 Tuesday December 21 2010 4 00 PM ...

Страница 161: ...re is no space before or after the colon For example 09 18 The CC2000 will dial out every day at the time s you specify PPP online time specifies how long you want the ISP connection to last before terminating the session and hanging up the modem A setting of zero means it is always on line Emergency Dial Out If the CC2000 gets disconnected from the network or the network goes down this function p...

Страница 162: ...e port that the server listens on in the SMTP Port field If the server requires authentication put a check in the My server requires authentication checkbox then key in the appropriate account name and password in the fields below Key in the email address of the person responsible for the SMTP server or some other equally responsible administrator in the Email From field Key in the email address a...

Страница 163: ... change is made at the OS level not the CC2000 service level the CC2000 system is unaware of the change Therefore master can t change this information on the slaves automatically It must be done manually on all slaves 2 Any CC2000 slave that is offline can t be automatically notified at the time of change therefore this procedure must be performed at the time the slave comes back on line 3 This pr...

Страница 164: ... page similar to the one below appears To install the plugin do the following 1 Key in the IP address and port number of the vSphere 4 or ESX 4 plugin file repository The default port number is 443 2 Key in the path to the directory on the CC2000 server that you want to save the plugin file to 3 Click Download After the plugin has completed downloading it appears in the corresponding VMRC Plugin F...

Страница 165: ... is selected all the addresses specified in the Address List are denied access all other addresses are allowed access IP filters can consist of a single address or a range of addresses You can add as many IP addresses as you require Key the addresses directly into the IP address text input box as follows For multiple single address entries use a comma between the IP addresses There is no space bef...

Страница 166: ...ess all other addresses are denied access If the Exclude button is selected all the addresses specified in the address list are denied access all other addresses are allowed access MAC filters can consist of a single address or a range of addresses You can add as many MAC addresses as you require Key the addresses directly into the IP address text input box using a comma between the addresses Ther...

Страница 167: ...signed certificate based on the installation information similar to the one below Changing a Self Signed Certificate Changing a self signed certificate allows you to provide additional information in the certificate that wasn t generated in the installation certificate The way to change a self signed SSL certificate is to create a new one To create a new self signed certificate do the following 1 ...

Страница 168: ... Name FQDN for which you are requesting the SSL certificate For example www yourdomainname com Organization This is your Full Legal Company or Personal Name as legally registered in your locality Organizational Unit The branch of your company that is ordering the certificate For example accounting marketing etc City or Location Key in the full name of the city or location For example Taipei State ...

Страница 169: ... sends you the certificate open the Server Certificate page click Update at the top right of the panel 4 Select Import a signed SSL server certificate then browse to where the certificate file is located and select it 5 Click Save at the top right of the panel Note Each of the certificate types mentioned in this section provides an equal level of security The advantage of the changed self signed c...

Страница 170: ...Description Key serial number The serial number of the license key Note This is different from the software serial number that you used when installing the CC2000 server The license serial number can be found on the key Slaves The total number of slave units on the installation up to 31 units depending on the license purchase Nodes The total number of nodes permitted on the installation according ...

Страница 171: ... licenses is sent to each slave at the time that it registers with the master see Register page 140 Although there is no limit to the number of devices that can be added to the CC2000 management system only as many nodes as there are licenses for can actually be created for management see Preliminary Procedures page 76 When devices are added to the CC2000 management system the default configuratio...

Страница 172: ...ion has been detected at master server Remote CC server IP the conflicting servers IP If this occurs there are a number of ways to resolve the conflict 1 On one of the two masters either shut it down or stop service or disconnect it from the network or uninstall the CC2000 2 Register the conflicting CC2000 the second one with the normal one the first one The Registered CC2000 becomes a slave This ...

Страница 173: ...and procedure See Restore page 215 for details Exporting event logs Power controlling devices Upgrading the firmware of selected appliances Backing up device configuration and account information Exporting the device log Exporting the session history When you open the Tasks page on a master CC2000 a screen similar to the one below appears Note This figure depicts a page for a master server The pag...

Страница 174: ...es for you to make While each of the tasks is different for the most part the procedures involved in setting them up are similar The following examples take you through the various task procedures you will encounter Heading Explanation Name The name you gave to the task when you configured it Type The type of task that it is Next Run If the task is scheduled to be run at a certain time the time th...

Страница 175: ...abase If you don t set a password you can restore the database without one See Restore page 215 for information on restoring the database 3 The password cannot exceed the equivalent of 8 English alphanumeric characters 4 The extension of the backup file is cbk cbk 2 Select the location where you want to store the backup file and fill in the fields accordingly The default setting is for the backup ...

Страница 176: ...hly schedule appears Note If you set a time in the schedule for the backup to take place Monthly for example but you want it to start with this month make sure you set the start date or time to something later than the date or time shown on the page Since the time setting on the page shows the time that you accessed the page it will have passed by the time you save your changes Which means that th...

Страница 177: ... to the Task List on the main page Note You can run a task or tasks at any time by putting a check in the box in front of its name and clicking Run Now at the top right of the panel Export Event Log When you choose the Export event log task the following page appears cc2k book Page 163 Tuesday December 21 2010 4 00 PM ...

Страница 178: ... position you want 5 For Choose Export Period selecting All exports all the records in the database To export records for a particular time period select the radio button below it and set the time parameters with the From and To settings 6 For Export File Language choose Default to have the file exported in the language that your browser is set to If you prefer a different language drop down the l...

Страница 179: ... as a whole or on a port by port basis When you choose this task the Power Control page appears with the Target Device category selected If you prefer to perform the task on a port by port basis select the Outlets category instead 1 Provide a name for the task 2 Put a check in front of the target devices or ports you want to control or put a check at the top of the column to select all of them 3 S...

Страница 180: ...t The procedure completes and you return to the Tasks main page The Power Control a Device task configured according to the choices you made is now added to the Sidebar and the Task List Upgrade Selected Appliance Firmware This task allows you to schedule the firmware upgrading of devices on your installation so that they can take place at the most convenient time When you choose Upgrade Selected ...

Страница 181: ...nless you have a particular reason for choosing a specific other one 2 If you choose Upgrade with a selected firmware file before upgrading you must first upload the upgrade file See Firmware Files page 175 for details 2 If you choose Upgrade with the latest stored version recommended all the devices are automatically selected for the upgrade If you choose Upgrade with a selected firmware file cli...

Страница 182: ...all Note For KVM switches with Adapter Cables click the arrowhead in front of the switch s name to select the Adapter Cable firmware you wish to upgrade 8 Click Next 9 Make your schedule choices in the Schedule page that comes up Note The schedule choices are similar to the ones described for the Backup master server database task Refer back to Step 2 on page 162 for details if necessary 10 When y...

Страница 183: ...ce List put a check in the box in front of the name of the device you want to back up then click Next 3 Make your schedule choices in the Schedule page that comes up Note The schedule choices are similar to the ones described for the Backup master server database task Refer back to page 162 for details if necessary 4 When you have completed your schedule choices click Next The procedure completes ...

Страница 184: ...rs 1 Provide an appropriate name for the task For example if you want to export the device log for all devices you might name the task All device log if you want to export the device log for CN8000 devices on a weekly basis you might name the task cn8000 weekly device log Note The Export Device Log operation is performed on each server independently and stored on each server independently To searc...

Страница 185: ... and To settings To export all records that do not include a particular time period select the Exclude radio button and set the time parameters that you do not want to include with the From and To settings 5 For Export File Type click the radio button in front of your choice If you choose one of the encryption options AES or DES key a password into the Password field that comes up Note Make a note...

Страница 186: ... the one for Export Device Log Fill in the rest of the page according to the information given under Export Device Log starting on page 170 2 For the device list put a check in the checkbox in front of the desired devices or check the box at the top of the column to select them all If you prefer to only export the session history for selected ports instead of clicking the device s checkbox click t...

Страница 187: ...ting tasks that you can perform changing a task s schedule and changing the parameters of what you want the task to perform To change a task s schedule do the following 1 Click on its name either on the Sidebar or in the Task List 2 The Schedule page comes up Make the schedule changes you want then click Save To change the parameters of what you want the task to perform do the following 1 Click on...

Страница 188: ...ess rights that are configured on it By replicating it sends all that information to be incorporated into the master s database and made available to the rest of the CC2000 management system 2 When the slave registers with a master its database is automatically replicated 3 The default is for the database to be automatically replicated once a day at 00 00 You can use this page to change the replic...

Страница 189: ... available for distribution from this single location you can easily perform upgrades from within the CC2000 and ensure that all the devices on your installation are operating at the same most up to date firmware level Note 1 Firmware upgrades are performed under the Tasks submenu See page 159 for details 2 New firmware upgrade packages are posted on our website as they become available Check the ...

Страница 190: ... alone configuration the CC2000 will not let you load it Deleting Firmware Files To remove a firmware file from the list do the following 1 Select Firmware in the Sidebar 2 In the Interactive Display panel click to put a check in front of the file you wish to remove from the list Note You can remove more than one file by checking as many items as you require You can remove all the files by checkin...

Страница 191: ...ge lists the backup configurations for the server made with the Backup device configuration account information task see page 169 for details and allows you to delete the files you no longer wish to keep To delete a device s configuration do the following 1 Put a check in front of the configuration you want to delete 2 Click Delete at the top right of the panel cc2k book Page 177 Tuesday December ...

Страница 192: ...a page with two Panel Menu entries Properties and Sessions Properties The Properties page is loaded as the default This page displays information reflecting the server s configuration settings It is view only Any changes to these settings must be made through the Server Information Panel Menu of the This Server menu see page 137 cc2k book Page 178 Tuesday December 21 2010 4 00 PM ...

Страница 193: ...all the users currently logged into this particular CC2000 and provides information concerning the who where and when of each of their sessions This page also gives the administrator the option of forcing a user logout by selecting the user and clicking End Session Note The End Session function is only available when the selected server is the one that you are currently logged in on cc2k book Page...

Страница 194: ...CC2000 User Manual 180 This Page Intentionally Left Blank cc2k book Page 180 Tuesday December 21 2010 4 00 PM ...

Страница 195: ...C Logs Logs When you click the Logs tab the CC2000 opens to the default CC Logs page which looks similar to the page below The default layout shows information concerning all of the events that have taken place on all the logs on the entire CC2000 installation displayed in reverse chronological order You can change the sorting order of the display by clicking the column headings You can reverse th...

Страница 196: ...age the rightmost takes you to the last page the middle buttons move you backward or forward one page Note These buttons are only active when there is a relevant action they can perform For example when there is more than one page of information and you are on the first page the move forward and last page buttons are active but the move backward and first page buttons are not Clicking on an item s...

Страница 197: ...is then select the number of days or records to maintain the database for When the number is reached events are discarded on a first in first out basis The valid range is from 7 90 days and 1000 100 000 records Display Sets the maximum number of events to display on the web page The valid range is from 10 100 Save Click a radio button to select whether to save only the events that are displayed or...

Страница 198: ...the CC Log the Syslog or both Clicking to put a checkmark in a checkbox enables your choice There are 7 event categories each category contains a list of separate events To record all of the events for a category put a checkmark in the checkbox in front of the Enable all events entry To only record selected events for a category rather than all of them click the arrowhead in front of the category ...

Страница 199: ...o to more than one person use a semicolon to separate the email addresses There should not be a space before or after the semicolon 5 Select whether the message type will be Full or Short 6 Select an event that you want to receive email notification of in the Available column then click Add to move it into the Selected column Repeat for any other events you want to receive email notification of 7 ...

Страница 200: ...n the Email Notification table then click Delete at the top right of the panel Testing Event Notifications To check that an event notification is working properly click to put a check in the checkbox in front of the notification s Subject name in the Email Notification table then click Test If the system is working properly the event notification recipient will receive an email with the event noti...

Страница 201: ...From and To settings 4 For Export File Language choose Default to have the file exported in the language that your browser is set to If you prefer a different language drop down the list and select one of the languages offered 5 For Export File Type click the radio button in front of your choice If you choose one of the encryption options key a password into the Password field that comes up Note M...

Страница 202: ...eviously saved log file do the following 1 Either key in the full path to the file in the Log file field or click Browse to navigate to it 2 If the file has been encrypted key the password that was used when it was created into the Password field 3 Click Import at the top right of the panel When the file is imported its contents appear in the CC Log List panel cc2k book Page 188 Tuesday December 2...

Страница 203: ...exist in the database To search for a particular time period click Include or Exclude and set the time parameters with the From and To settings Note 1 If Include is selected all the events that fall within the specified time range are searched 2 If Exclude is selected only the events that fall outside of the specified time range are searched 5 When you have finished making your choices click Searc...

Страница 204: ...olumn heading changes the sorting order between standard and reverse alphabetical order The Sidebar provides a filtering function click a device to only display the events that pertain to it The navigation buttons arrowheads at the top right of the main panel move you through the pages of the log list The leftmost takes you to the first page the rightmost takes you to the last page the middle butt...

Страница 205: ... time period select either the Include or Exclude radio button and set the time parameters with the From and To settings Note 1 If the Include button is selected all the events that fall within the specified time range are searched 2 If the Exclude button is selected only the events that fall outside of the specified time range are searched 3 When you have finished making your choices click Search...

Страница 206: ...ntain the database for When the number is reached events are discarded on a first in first out basis Display allows you to set the maximum number of record events to display on the web page Save allows you to save the device logs to a file 1 First click a radio button to choose whether to save only the currently selected device log records or all of the device log records then click Save at the to...

Страница 207: ...and To settings Note 1 If the Include button is selected all the events that fall within the specified time range are searched 2 If the Exclude button is selected only the events that fall outside of the specified time range are searched 2 When you have finished making your time range choices click Search at the top right of the panel The search results are displayed in the Session History List in...

Страница 208: ...ow appears Maintenance allows you to select whether to maintain the session history database on a days or records basis Click a radio button to make your selection then key in the number of days or records to maintain the database for When the number is reached events are discarded on a first in first out basis To save your settings click Save at the top right of the panel cc2k book Page 194 Tuesd...

Страница 209: ...er spill liquid of any kind on the device Unplug the device from the wall outlet before cleaning Do not use liquid or aerosol cleaners Use a damp cloth for cleaning The device should be operated from the type of power source indicated on the marking label If you are not sure of the type of power available consult your dealer or local power company The device is designed for IT power distribution s...

Страница 210: ...o not attempt to service the device yourself Refer all servicing to qualified service personnel If the following conditions occur unplug the device from the wall outlet and bring it to qualified service personnel for repair The power cord or plug has become damaged or frayed Liquid has been spilled into the device The device has been exposed to rain or water The device has been dropped or the cabi...

Страница 211: ...efore extending a device from the rack Use caution when pressing the device rail release latches and sliding a device into or out of a rack the slide rails can pinch your fingers After a device is inserted into the rack carefully extend the rail into a locking position and then slide the device into the rack Do not overload the AC supply branch circuit that provides power to the rack The total rac...

Страница 212: ...expansion cards and software Any error messages displayed at the time the error occurred The sequence of operations that led up to the error Any other information you feel may be of help USB Authentication Key Specifications Email Support support aten usa com Online Technical Support Troubleshooting Documentation Software Updates http www aten usa com support Telephone Support 1 888 999 ATEN ext 4...

Страница 213: ...1322 KN2124v KN2140v KN4124v KN4140v2 KN9008 KN9016 KN9108 KN9116 PN01083 PN9108 SN0108 SN0116 SN3101 Note 1 These are the supported devices at the time of writing Visit our web page to see if any additional devices have been supported since this manual was published 2 These switches can be used as parents to cascade the switches mentioned in the next section 3 The CC2000 doesn t support the PN010...

Страница 214: ...level Device ANMS Settings To enable CC Management of a device from the device s ANMS settings page do the following 1 Log into the device 2 Refer to the device s User Manual to locate its ANMS settings page 3 In the ANMS page click the checkbox to enable CC Management then key in the IP address and device port number see Device port page 13 of the CC2000 server that will manage the device cc2k bo...

Страница 215: ...sed to connect several sites in a CC2000 management system the only CC2000 server that is absolutely necessary to manage that system is a single Master server rather than the network of Master and slave CC2000 servers necessary with the standard Internet deployment We recommend that at least one CC2000 slave server is deployed however in order to provide redundant services to the connected devices...

Страница 216: ...nction in the next section 4 The CC2000 Slave server s HTTPS port Optional Note 1 CC2000 Client Workstations can open web browser sessions to CC2000 Slave servers inside the same firewall Communication and access with the other CC2000 servers on the installation outside of the firewall takes place through the CC Port and Proxy port therefore the HTTPS port isn t necessary There is a drawback to do...

Страница 217: ...rt must be opened on the firewall Note 1 While a CC2000 Client Workstation outside the firewall can open a web browser session with a CC2000 server inside the firewall when the proxy port hasn t been specified and opened viewers for the KVM and Serial Console devices managed by that CC2000 server cannot be opened 2 If the Proxy function isn t enabled and you still want to access the devices you mu...

Страница 218: ...ee CC2000 Authentication page 67 The following characters may not be used Screen name Up to 32 Bytes The following characters may not be used Password The equivalent of 0 16 English alphanumeric characters The minimum number is based on the account policy settings see CC2000 Authentication page 67 0 means no password authentication Description Up to 256 Bytes Session Timeout 1 99 min 3 min Unexpec...

Страница 219: ...age 67 The following characters may not be used 6 Password Minimum The equivalent of 0 16 English alphanumeric characters The minimum number is based on the account policy settings see CC2000 Authentication page 67 0 means no password authentication 6 Password Expires No limit on the number of days Devices Name 0 32 Bytes Description Up to 256 Bytes Contact name No limit on the number of Bytes Tel...

Страница 220: ...vice Log Pattern No limit on the number of Bytes CC Log Options By Period 7 90 days By Record 1000 100 000 Records per page 10 100 Log Notification Settings Subject 1 128 Bytes Mail from Up to 64 Bytes Send to Up to 128 Bytes Preferences Web Options Display screen name 0 32 Bytes Category Length Range Default cc2k book Page 206 Tuesday December 21 2010 4 00 PM ...

Страница 221: ...d but the alert is triggered because the certificate s name is not found on the Microsoft list of Trusted Authorities You can ignore the warning and click Yes to go on Note To avoid users having to go through the certificate acceptance prompt each time they log in you can use a third party certificate authority CA to obtain a signed certificate See Importing a Signed SSL Server Certificate page 15...

Страница 222: ...emove all files from the older version see Uninstalling the CC2000 page 19 Uninstall the CC2000 following the procedures mentioned and reinstall I key in the IP address for the CC2000 Website but I can t bring up the CC2000 login page 1 The CC2000 only allows HTTPS requests HTTP requests from a browser are automatically redirect to HTTPS requests The default port for HTTP is 80 the default port fo...

Страница 223: ...be trusted however See Trusted Certificates page 207 for details After I log in to the CC2000 There is no Port Access tab or Port Access page You have not been authorized to access any ports Check with your CC2000 administrator to get authorization to access the ports you are responsible for After I log in to the CC2000 I cannot bring up the page for the device I want to access Check with your CC2...

Страница 224: ...check the device s ANMS settings to be sure that CC Management has been enabled and that the IP and port address of the CC2000 you want the device to be recognized by has been correctly specified 4 After trying 2 if the devices do show up there was probably a network problem Perform the Replicate Database to the Master function See Replicate Database page 174 for details My ATEN ALTUSEN device isn...

Страница 225: ... enable Active Scripting ActiveX controls and Java applets To enable Active Scripting ActiveX controls and Java applets follow these steps a Start Internet Explorer b On the Tools menu click Internet Options c In the Internet Options dialog box click Security d Click Default Level e Click OK 2 Verify that Active Scripting ActiveX and Java are not blocked If some computers work but other verify tha...

Страница 226: ...der History click Clear History and then click Yes j Click OK 5 Make sure that you have the latest version of Microsoft DirectX installed For information about how to install the latest version of Microsoft DirectX visit the following Microsoft Web site http www microsoft com windows directx default aspx url windows directx downloads default htm 6 Make sure that you have the latest version of the ...

Страница 227: ... s parameters from the desktop of the computer that the CC2000 runs on without having to invoke the browser GUI In Windows to run the program open the Start menu navigate to the CC2000 entry Programs CC2000 and select CC2000 Utility In Linux as root go to the home CC2000 Runable directory and run the CC2000_Utility file cc2k book Page 213 Tuesday December 21 2010 4 00 PM ...

Страница 228: ...s The HTTP port is the regular port that Apache Tomcat listens on The default is 80 If you use a different port users must specify the port number in the URL of their browsers The HTTPS port is the secure port that Apache Tomcat listens on The default is 443 If you use a different port users must specify the port number in the URL of their browsers If a port conflict occurs with the ports that you...

Страница 229: ...tabase to a previously saved version see Backup the Master Server Database page 161 Click Browse to navigate to the location of the file After you select the file and return to the dialog box click Start to begin the operation The progress of the operation is indicated in the Progress field Administrator Management Clicking Reset returns the default System Administrator s account to the default ad...

Страница 230: ...User Manual 216 View License The View Licenses tab lets you view the licenses that are related to the CC2000 package To view a license click its radio button cc2k book Page 216 Tuesday December 21 2010 4 00 PM ...

Страница 231: ... F W Upgrade sections offer utilities that allow you to upgrade the key s firmware F W Upgrade and to upgrade the number of servers and nodes authorized by the license License Upgrade Section Purpose Key Status Indicates whether the key has been recognized and accepted as valid or not Key Information Displays the key s current firmware version and serial number License Information Displays the num...

Страница 232: ... firmware file to a convenient location on your computer 2 With the authentication key plugged in run the Key Status Utility CCAuthKeyStatus exe Note 1 CCAuthKeyStatus exe only runs under Windows 2 Firmware version 2 1 204 or higher is required for CC2000 authentication keys to support the license upgrade function 3 KeyStatus exe can be found on the CD that comes with the CC2000 package This file ...

Страница 233: ...e 5 In the File Open dialog box that appears select the firmware upgrade file then click Open 6 Read and Agree to the License Agreement enable the I Agree radio button Continues on next page cc2k book Page 219 Tuesday December 21 2010 4 00 PM ...

Страница 234: ...re level with that of the upgrade files If it finds that the device s version is higher than the upgrade version it brings up a dialog box informing you of the situation and gives you the option to Continue or Cancel If you don t enable Check Firmware Version the Utility installs the upgrade files without checking if they are a higher level Click Next to continue Continues on next page cc2k book P...

Страница 235: ...revious page Upgrade Succeeded After the upgrade has completed a screen appears to inform you that the procedure was successful Click Finish to close the Firmware Upgrade Utility cc2k book Page 221 Tuesday December 21 2010 4 00 PM ...

Страница 236: ... email authorization details if the dealer distributor performs the upgrade the client provides him with the Authentication Key Off Line A Windows based Key Status Utility is used to extract the key s information and write it to a Key Information Data File The key information data file is then used in a a browser session to generate a license upgrade file After the license upgrade file has been ge...

Страница 237: ...sword mypassword5678 Order Information Order ID 1017000700 authorized number 2068919892 This order requests 7 more server s and 20500 more node s Either the client or the dealers distributors can perform the upgrade If the dealer does it the client provides the dealer with his license key if the client does it the dealer forwards the confirmation email to him To perform a an online upgrade do the ...

Страница 238: ...ing the upgrade by clicking the Upgrade Help button 2 Accept the certificate s if asked 4 When the upgrade Login screen comes up log in with the Username and Password provided in the authorization email 5 In the screen that comes up key in the Order ID number and Order Authorization number that applies to the upgrade then click Continue cc2k book Page 224 Tuesday December 21 2010 4 00 PM ...

Страница 239: ...You can use the Key status utility CCAuthKeyStatus exe to see the current number of licenses If only server licenses are being upgraded the Upgrade Order Information Screen looks like the one below If the node licenses are already set to be unlimited put a check in the checkbox otherwise fill in the appropriate node numbers in the From field cc2k book Page 225 Tuesday December 21 2010 4 00 PM ...

Страница 240: ...t Save to disk 10 Leave the browser open exactly as it is go to where you downloaded the file and execute it Note This step must be done in the same web session that you downloaded the KeyUpgrade exe file in Otherwise the upgrade will not succeed The upgrade utility comes up and starts the upgrade The actions it performs are reported in the main panel cc2k book Page 226 Tuesday December 21 2010 4 ...

Страница 241: ... number of licenses on the key has been changed to reflect the successful upgrade Upgrade Succeeded After the upgrade has succeeded the dealer distributor receives an email from ALTUSEN informing him that the upgrade has been completed online For example Your order Order ID 1017000700 has been completed successfully by the online utility The key PSN 10504460 server number has been upgraded from 1 ...

Страница 242: ...m the upgrade the first step that the client must perform is to create a Key Information Data File as follows 1 With the authentication key plugged in run the Key Status Utility CCAuthKeyStatus exe 2 In the License Upgrade panel of the dialog box that comes up click Save to create a Key Information Data File KeyUpload dat Note The Key Information Data File is created in the same directory that the...

Страница 243: ...to upgrade your key s license Login Information Username myname3 Password mypassword3 Order Information Order ID 1017000750 authorized number 1605991978 This order requests 1 more server s and 448 more node s To perform the upgrade do the following 1 Follow steps 1 3 given for the Online Upgrade see page 223 2 When the upgrade Login screen comes up log in with the Username and Password provided in...

Страница 244: ...ense Upgrade Order Information screen comes up key in the number of current licenses in the From fields The To fields are automatically filled in Note If necessary you can use the Key Status Utility CCAuthKeyStatus exe to see the number of current licenses 5 Select that this is to be an Offline upgrade then click Continue cc2k book Page 230 Tuesday December 21 2010 4 00 PM ...

Страница 245: ...lick Browse load the KeyUpload dat file that was generated in the Preliminary Steps section then click Continue 7 The next screen that comes up summarizes the transaction up to this point Click Continue to move on cc2k book Page 231 Tuesday December 21 2010 4 00 PM ...

Страница 246: ... on 10 In the confirmation popup that appears click Yes A summary page confirming the order appears 11 Click Logout to exit Note 1 If you are upgrading more than one key you can rename the KeyUpgrade dat files to separately recognizable names keeping the dat extension 2 If the client is performing the upgrade the dealer distributor provides the KeyUpgrade dat file to the client 12 Run the Key Stat...

Страница 247: ... up navigate to the upgrade file KeyUpgrade dat and select it Once you click Open a window pops up stating that the upgrade was successful The figure for the number of licenses in the License Information panel changes to reflect the upgrade cc2k book Page 233 Tuesday December 21 2010 4 00 PM ...

Страница 248: ...er 0917280288 License Upgrade Info From 1 to 2 concurrent servers From 64 to 512 concurrent nodes Confirmation Info Username newname Password 1123091022112900 If you have any problem with upgrading your CC Authentication key s license please confirm it online at http xxx xxx x xxx using the username and password above You can repeat steps 11 Run the Key Status Utility and 12 Click Upgrade this tim...

Страница 249: ... more emails reminding him that order has not been processed are sent 1 Your order will expire in one week 2 Your order will expire in one day If the order still has not been processed by the end of the deadline a final email is sent informing the dealer distributor that the order has expired as follows Your order has expired and has been cancelled If you still wish to add licenses you must place ...

Страница 250: ...CC2000 User Manual 236 This Page Intentionally Left Blank cc2k book Page 236 Tuesday December 21 2010 4 00 PM ...

Страница 251: ...s The following services have been tested and approved for use with the CC2000 AD Server Microsoft Windows Server 2003 LDAP Microsoft Windows Server 2003 OpenLDAP RADIUS Microsoft IAS for Windows Server 2003 FreeRADIUS TACACS Microsoft Windows Server 2003 ClearBox Microsoft Windows NT Domain LDAP LDAPS OpenLDAP Setting Example In this example the external server uses OpenLDAP its IP address is 192...

Страница 252: ... Server procedure see LDAP LDAPS page 69 In this example the fields would be filled in as follows IP 192 168 10 100 Port 389 BaseDN dc aten dc com UserRDN ou software Key attribute cn Object class person Full name attribute sn After the LDAP LDAPS Authentication server has been added the CC2000 Administrator can use the Browse button to browse all the user names in the software directory cc2k book...

Страница 253: ...ers Domain aten com in our example Users A window similar to the one below appears The CC2000 Administrator gets this information to use in the Adding an External Authentication Server procedure see Active Directory page 70 In this example the fields would be filled in as follows IP 192 168 10 100 UserRDN cn users After the Active Directory Authentication server has been added the CC2000 Administr...

Страница 254: ... For example cc2000 10 0 0 131 then click Next A screen similar to the one below appears 5 In this example the CC2000 s IP is 10 0 0 131 the Client Vendor is RADIUS Standard For the Shared secret use password 6 After clicking OK you return to the Internet Authentication Services screen In the left panel click Remote Access Policies in the main panel right click Use Windows authentication for all u...

Страница 255: ...ample the fields would be filled in as follows IP 10 0 0 100 Authentication type CHAP Shared secret password After the RADIUS Authentication server has been added when the CC2000 Administrator adds user accounts he must use the names that were configured on the RADIUS server under Open Start Control Panel Administrative Tools Computer Management Local Users and Groups Users for the Login names cc2...

Страница 256: ...ou set when you installed the ClearBox RADIUS TACACS Server 4 In the ClearBox Server Configurator screen that comes up select the Server Settings tab A screen similar to the one below appears 5 In this example the TACACS service port is 49 6 Open Start All Programs ClearBox RADIUS TACACS Server Configurator 7 In the screen that comes up in the left panel select Realms def then select the Authentic...

Страница 257: ...ough MS Access The CC2000 Administrator gets this information to use in the Adding an External Authentication Server procedure see RADIUS and TACACS page 70 In this example the fields would be filled in as follows IP 10 0 0 100 Port 49 Authentication type MSCHAP Shared secret the password that you set when you installed the ClearBox RADIUS TACACS Server After the TACACS Authentication server has b...

Страница 258: ...ar to the one below appears The CC2000 Administrator gets this information to use in the Adding an External Authentication Server procedure see Windows NT Domain page 71 In this example the fields would be filled in as follows Server IP QA_NT_SERVER After the NT Domain server has been added when the CC2000 Administrator adds user accounts he must use the names that were configured under User Manag...

Страница 259: ...mple on page 237 1 Under the CC2000 User Manager tab select Authentication Services Authentication Servers 2 Select the OpenLDAP server then click Group Authorization 3 Click the Group has Member attribute radio button 4 Click Add at the top right of the panel 5 In this example add the groups1 group The screen should look similar to the one below cc2k book Page 245 Tuesday December 21 2010 4 00 PM...

Страница 260: ...cription 2 Edit the cc2000ldap ldif file to add a definition for groups1 and have cc2000 user accounts fall under groups1 as follows dn cn groups1 ou groups dc aten dc com objectclass groupofnames member cn cc2000 ou software dc aten dc com cn groups1 Note 1 The entry after dn cn should be the name of an actual group created under Group Authorization see Group Authorization page 72 on the CC2000 s...

Страница 261: ...o the permissions assigned to the group Example 2 By default OpenLDAP only supports the Group has Member attribute setting for the group related schema this was the setting used in Example 1 An alternative setting used by other LDAP servers User has Member Of attribute can also supported under OpenLDAP by extending the schema In this example the external server is OpenLDAP on Windows Server 2003 a...

Страница 262: ...schema file Extend the schema as follows attributetype 1 2 840 113556 1 2 102 NAME memberof DESC RFC2256 member of a group SUP distinguishedName objectclass 1 2 840 113556 1 5 9 NAME person SUP organizationalPerson STRUCTURAL MUST cn MAY userPassword description sn mail memberof 2 Edit the cc2000ldap ldif file to add a user account to the groups1 group as follows dn cn cc2000test ou software dc at...

Страница 263: ...f cn should be the name of an actual group created under Group Authorization see Group Authorization page 72 on the CC2000 server 3 You can check the group definition with LDAP Browser You should see a screen similar to the one below 4 Repeat step 2 for each user account that you want to add to the group Once these procedures are completed CC2000 users who are authenticated through the LDAP LDAPS ...

Страница 264: ...xample add the CC2000GP group The Active Directory administrator uses this name CC2000GP in our example to create a group under Active Directory with the same name as the one just created on the CC2000 server as follows 1 Open Start Control Panel Administrative Tools Active Directory Users and Computers Domain CA QA com in our example 2 In the left panel right click Domain Controllers select New s...

Страница 265: ...ies select Members A window similar to the one below appears 5 Click Add The dialog that comes up lets you add members to the group The members are selected from the accounts found in the Users folder see the left panel of the original screen cc2k book Page 251 Tuesday December 21 2010 4 00 PM ...

Страница 266: ...CC2000 User Manual 252 This Page Intentionally Left Blank cc2k book Page 252 Tuesday December 21 2010 4 00 PM ...

Страница 267: ...s 178 Sessions 179 CC Viewer 38 CC2000 capable products 199 redundancy 21 CC2000 Authentication 67 CC2000 Utility Overview 213 Restore 215 System settings 214 View license 216 Certificate 153 Self signed 153 Signed SSL 155 Connections 41 Control Center Interactive Display Panel 27 Navigation Buttons 26 Screen Components 25 User Interface 24 Creating groups 59 D Deleting user accounts 57 Department...

Страница 268: ...rites View 44 Features 3 Filter 35 Firewalls 202 Firmware Files Adding 175 Deleting 176 Folders Adding 81 G Generic Device Adding 93 Group Authorization settings example 245 Group Device Adding 96 Groups Access rights 62 Adding users 60 Creating 59 Removing users 61 I Import Logs 188 Installation Linux 16 Windows 10 Interactive Display Panel 27 Internal Authentication 67 IP Filtering 151 K Key Fir...

Страница 269: ...ngs example 244 NTP Settings 143 O Online Registration iii Outlet Configuration 119 Overview 1 P Parameters Name description range 204 Password System administrator 24 Port Access 33 Connections 41 Department view 42 Device view 42 Favorites view 44 Location view 43 Port view 41 Target view 41 Type view 43 Port Configuration KVM 111 outlets 119 Serial 125 Port Display 47 Port Operation 38 Port Vie...

Страница 270: ...140 Slave to master promotion 139 SMTP Settings 141 Station Configuration 117 Syslog Settings 144 System administrator password 24 System Management 131 Appliance Files 175 CC Servers 133 CCNetwork 133 Certificate 153 Dial In settings 145 Dial Out settings 146 License 156 License upgrade 157 Master settings 149 Monitor 136 NTP settings 143 Security 135 151 Server information 137 Server settings 14...

Страница 271: ...ip 54 Modifying 54 User Information changing 54 User Interface 24 User Management 49 Adding User Accounts 50 Authentication Services 66 Deleting User Accounts 57 Groups 59 Managing user accounts 54 Types 62 Unlocking User Accounts 58 User Notice iii User Preferences 29 Port access 47 User types 62 Custom types 65 Members 63 System types 64 Type information 63 Users Management Accounts 50 V Virtual...

Отзывы: