34
9
EV1157M
EV
07
88
EV
07
88
EV
07
88
EV
07
88
EV
11
59
M
E
V
1
1
5
8
M
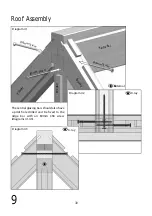
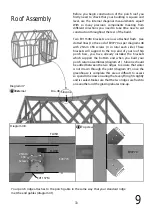
Your roof hip porch bars (EV0788) can now each be lowered
into place (pointed end towards the porch ridge) and secured
with two 25mm csk screws at the top (diagram 49) and one at
the bottom (diagram 50).
On each hip (EV0788) you will notice a notched out section on
the underside face. These house your hip mid brackets
(EV1159), the wider part of the castings are orientated towards
the eaves bars / ground and are again attached with a 25mm
csk screw (diagram 51).
25mm CSK
Screws
Bottom view
25mm
CSK
25mm
CSK
Screw
Diagram 49
Diagram 50
Diagram 51
Roof Assembly
Internal
Internal
Internal
Ex
ternal
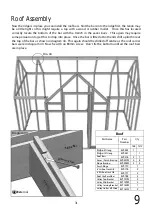
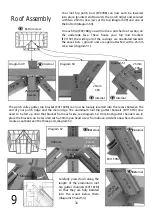
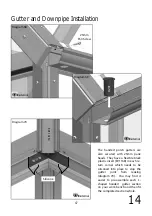
The porch valley gutter top bracket (EV1160M) can now be loosely inserted into the recess between the
end of your porch ridge and the main ridge. The aluminium roof hip gutter channels (EV1161M) now
need to be fed up onto that bracket from each side, see diagram 52. Once both gutter channels are in
place the bracket can be secured with a 50mm pan head screw from above. Add silicone where shown to
create a seal between the three parts, diagram 52.
Diagram 54
EV
11
61
M
PO
RCH
EA
VE
S
BA
R
Ex
ternal
Diagram 53
EV
11
61
M
EV1159M
Carefully press down along the
length of the aluminium roof
hip gutter channels (EV1161M)
so that they are fully bedded
into the wood below them
(diagrams 53 and 54).
Silicone
Diagram 52
Ex
ternal
EV0770
EV1160M
EV0476
Silicone
EV
11
61
M
EV
11
61
M
50mm Pan
Screw
(EV0367)

