background image

41 


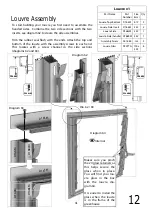
Louvre Assembly


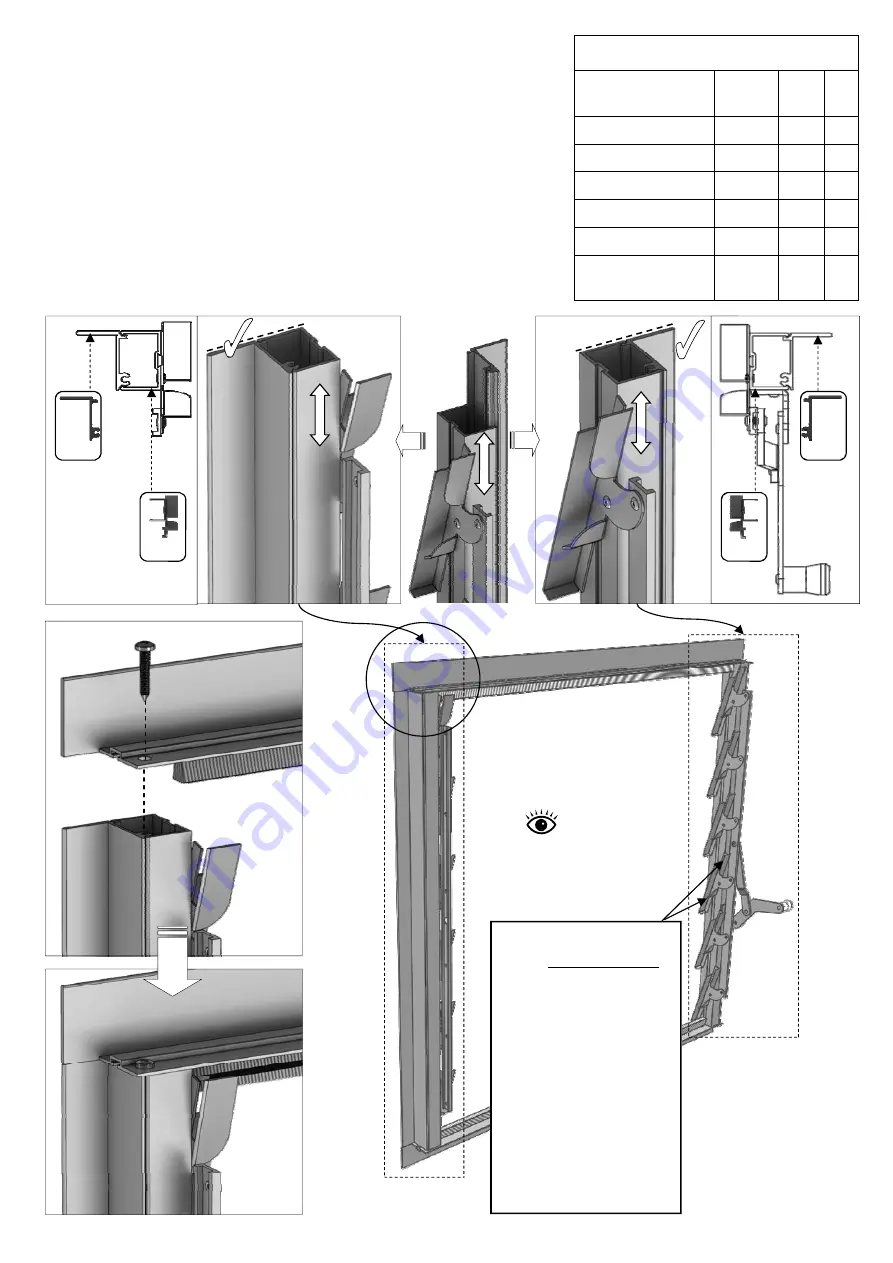
To start building your louvre you first need to assemble the 
handed sides.  Combine the two side sections with the two 
inserts, see diagram 62 to create the side assemblies.   
 
Trim the rubber seal flush with the ends. Attach the top and 
bottom of the louvre with the assembly screws in each end.  
This locates with a screw channel in the side sections 
(diagrams 62 and 63).     

Dia. 62 / 63 

D166M 

D166M 

D168LM 

D168RM 

Louvre x 1 

Part Name 

Part 

Number 

Size 

(mm) 

Qty 

Louvre Top/Bottom 

D165M 

612 

Louvre Side Insert 

D166M 

552 

Louvre Side 

D168LM 

552 

Louvre Side (handle)  D168RM  552 

Assembly Screw 

02-1864 

n/a 

Louvre Glass 

D729TG  100 x 

525 

Internal 

D166M 

D168LM 

D166M 

D168LM 

D165M 

Diagram 63 

D165M 

Diagram 62 

Diagram 64 

Makes sure you pinch 
the 24 glass retainers as 
this helps secure the 
glass when in place. 


You will find your lou-
vre glass in the box 
with the louvre, dia-
gram 64.   
 
It is easier to install the 
glass when the louvre 
is in the frame of the 
greenhouse.  

12 

Содержание DURHAM PORCH HB

Страница 1: ...07 14 07 19 DURHAM 7HB 7 x 12 7 x 8 DURHAM PORCH HB...

Страница 2: ...ion Glazing part 1 Gutter and Downpipe Installation Glazing part 2 Roof Vent Installation Optional Cresting End Caps and Finials Finish Installation Optional Auto Louvre Installation Parts Lists Secti...

Страница 3: ...ad the construction over two or more days We recommend that you avoid leaving the building partially glazed If you ever have to leave your greenhouse half assembled and not anchored down weigh it down...

Страница 4: ...choose a site where your Alton Greenhouse will look right so that it will complement your garden We cannot emphasis how important it is to have a proper base for your Alton Greenhouse to be erected up...

Страница 5: ...Dimensions EXTERNAL GREENHOUSE DIMENSIONS mm Model sizes listed are nominal use mm measurements i e an 7 x 12 is the model 7 5 x 12 7 MODEL A mm TOTAL WIDTH B mm LENGTH C mm DIAG D mm PORCH E mm PORC...

Страница 6: ...t Level Pencil PZ2 Screwdriver Bit Cordless Screwdriver 2 would be ideal 1 to drill and 1 to screw 4mm Drill Bit 7mm Masonry Bit Hammer Drill Hammer Wooden Rubber Mallet Tall step ladders x 2 Tape Mea...

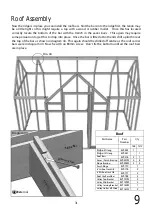
Страница 7: ...er butt when doing this Once the roof is glazed fit the roof vents This is done from the inside gain access through the opening on a set of steps Longer Models If your building is longer than 12 i e h...

Страница 8: ...Porch Long RH EV1172M 960 1 Side Base 12 EV306M 3731 1 EV0311M D174M Internal Diagram 1 Base Assembly Lay out your aluminium base sections as the diagram shows Use the twist in crop head bolts in the...

Страница 9: ...components with the part numbers and sizes First of all drill pilot holes through the bottom of each mortise on the cill section e g EV0018 diagram 2 page 10 Then slot each glazing bar into the mortis...

Страница 10: ...ng similar If you are going to glue your joints this is the first point you would do this EV0501 Eaves bar internal face e g EV0421 Diagram 3 Internal Cill e g EV0018 EV0501 50mm CSK Screw Pilot hole...

Страница 11: ...to drill pilot holes in the bottom of the mortise holes diagram 5 Assemble the glazing bar EV0501 with the gable cill flat on the ground as you did with the rear section This locates in the two outer...

Страница 12: ...the standard glazing bars EV0501 These are handed parts and it is important to fit them the correct way round The purlings will have rounded edges on one side and square cut edges on the other the rou...

Страница 13: ...e side corner bar into place fix the bottom of the bar with an 80mm screw With the top of the bar lined up with the end of the purling keeping the inside edges flush drill a pilot hole close to the in...

Страница 14: ...d screws EV0332 diagram 10 E V 0 4 8 1 EV0480 Internal Internal EV0460 End Gable Assembly Pilot hole here Once the side corner bars are secure slot the above purling glazing bars into place With all o...

Страница 15: ...he parts are not completely supported it is a good idea to have a helper at this point Now using 25mm countersunk screws fix the purlings to the glazing bars as shown in diagram 11 and 12 Make sure th...

Страница 16: ...o build these side by side to make sure you are fitting the parts in the correct orientation As before start by fixing the gable bars to the cills shown in diagrams 13 and 14 EV0505 EV0504 EV0005 EV00...

Страница 17: ...17 Diagram 14 6 Porch Front Assembly Now slot the purling bars into place again as with the end assemblies these will be fixed later Dia 14 EV0408 EV0504 EV0414 EV0408 Internal...

Страница 18: ...ide face of the purlings tenon diagram 16 then fix with a 25mm countersunk screw This is only a transit screw so just make sure the joint is nice and tight a larger fixing will be added later 20mm 16m...

Страница 19: ...bars onto the gable bars and fix with 40mm Pan Head screws diagram 18 Slot the above purling glazing bars into place ready to take the roof corner bars You should now drill the pilot holes shown in d...

Страница 20: ...ional batten EV0791 which is attached using 50mm CSK screws see diagrams 21 24 Study diagrams 20 25 to see how 50mm CSK and 80mm CSK screws are used to join the pieces together Remember as before to a...

Страница 21: ...80mm CSK Screws 50mm CSK Screws EV0906 EV0907 EV0794 EV0791 80mm CSK Screws 30mm 16mm 25mm 16mm Diagram 20 Diagram 21 Diagram 22 Diagram 23 50mm CSK Screw central position on EV0791 10mm from top 50mm...

Страница 22: ...f steps Now offer the side assembly or side 4 8 extension assembly if your model is longer than 12 slotting the corner bar onto the end of the eaves bar do not fix this joint as it will be done at a l...

Страница 23: ...ot hole positions shown in diagrams 29 and 30 Diagrams 31 and 32 on the next page show the direction the holes should be drilled in Diagram 28 Diagram 29 Diagram 30 19mm 30mm EV0404 EV0503 EV0503 E V...

Страница 24: ...from the glass rebate on the front of the building start by inserting the 80mm screw through the side of the eaves bar into the tenon on the end of the purling Next insert the 100mm screw vertically d...

Страница 25: ...n sections in a similar manner to the rear side using 80mm and 100mm CSK screws You may find you need to adjust the corner brackets that hold the aluminium base together to get the corners to meet up...

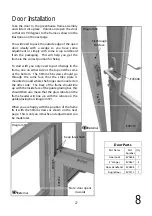
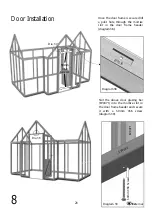
Страница 26: ...need to do is attach the door handle to install this to the building Start by sliding the spindle through the top hole in the door diagram 34 then locate one of the door handles on this and fix with...

Страница 27: ...d go through the same face that the strike plate is mounted on and where the hinges are mounted on the other side The back of the frame should line up with the inside face of the gable glazing bar thi...

Страница 28: ...hole through the mortise slot in the door frame header diagram 38 Slot the above door glazing bar EV0471 into the mortise slot in the door frame header and secure it with a 50mm CSK screw diagram 39 D...

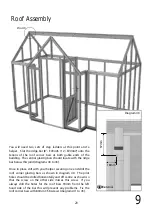
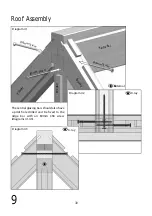
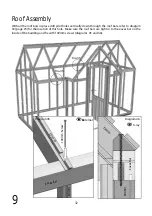
Страница 29: ...his joint diagrams 40 to 43 Once in place still with your helper securing one end drill the roof corner glazing bars as shown in diagram 40 The pilot holes should be drilled horizontally and off centr...

Страница 30: ...2 Diagram 43 80mm Screw 80mm Screw 80mm Screw Ridge Bar E V 0 4 8 1 E V 0 4 8 0 EV0460 The central glazing bars should also have a pilot hole drilled and be fixed to the ridge bar with an 80mm CSK scr...

Страница 31: ...the bar as shown in diagram 44 This again should be drilled off centre as the roof corner bars were in diagram 40 Now fix with an 80mm screw Don t fix the bottom until all the roof bars are in place...

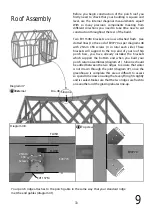
Страница 32: ...through the roof bars refer to diagram 30 page 23 for the location of this hole Make sure the roof bars are tight in to the eaves bar on the inside of the building and fix with 100mm screws diagrams 4...

Страница 33: ...oof hip porch bars you have already installed the brackets which support the bottom end when you built your porch return assemblies diagram 21 Silicone should be added between the two ridges to ensure...

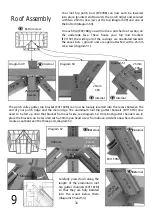
Страница 34: ...ternal Internal Internal External The porch valley gutter top bracket EV1160M can now be loosely inserted into the recess between the end of your porch ridge and the main ridge The aluminium roof hip...

Страница 35: ...538M Diagram 57 Internal The handed roof jack glazing bars now need to be fitted see diagrams 55 and 56 They attach to the ridge and porch ridge as per previous roof bars using 80mm CSK screws The bot...

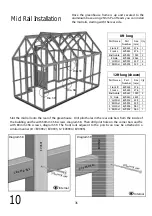
Страница 36: ...to the aluminium base using 25mm Pan Heads you can install the mid rails starting with the rear side 8ft long Part Name Part Number Size mm Qty Front R EV0424 576 1 Front L EV0425 576 1 End Gable EV0...

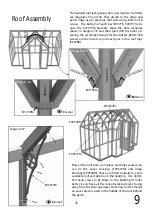
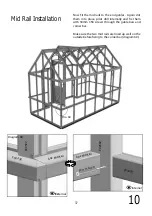
Страница 37: ...id Rail EV0432 Internal External Now Fit the mid rails to the end gables Again slot them into place pilot drill internally and fix them with 50mm CSK screws through the gable bars and corner bar Make...

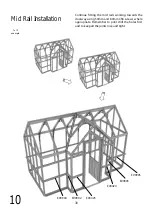
Страница 38: ...fitting the mid rails working towards the doorway using 50mm and 80mm CSK screws where appropriate Remember to pilot drill the holes first and to keep all the joints nice and tight 7 x 12 example EV09...

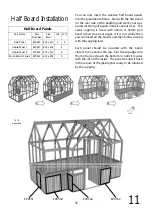
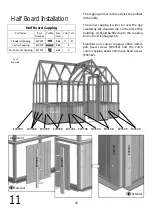
Страница 39: ...nd work your way round inserting all panels in their various sizes The cedar capping is fixed with 40mm or 50mm pan head screws see next page if it is not windy then you can insert all the boards and...

Страница 40: ...l Dia 61 7 x 12 example EV0599 EV0598 EV1200 EV0599 EV0598 EV0599 EV0598 EV0599 EV0598 EV0598 The capping comes in three styles see profiles in the table The corner capping is wider to cover the gap c...

Страница 41: ...62 63 D166M D166M D168LM D168RM Louvre x 1 Part Name Part Number Size mm Qty Louvre Top Bottom D165M 612 2 Louvre Side Insert D166M 552 2 Louvre Side D168LM 552 1 Louvre Side handle D168RM 552 1 Asse...

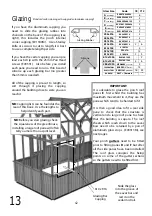
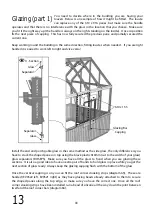
Страница 42: ...to fit a rear side pane to check that the structure is vertical and a large roof pane to check that the building is square The roof sheets which reach down to the eaves bars need to be retained by a p...

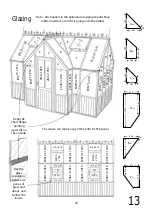
Страница 43: ...1 0 x 91 6 EV 40 5 x 91 6 EV 40 5 x 91 6 A B B E V 6 1 0 x 1 3 4 5 E V 6 1 0 x 1 3 4 5 D E E F 610 x 610 610 x 610 100 x 525 x6 EV610 x 1345 EV610 x 1345 EV610 x 1345 EV610 x 726 610 x 610 EV610 x 916...

Страница 44: ...n the same method as the side glass the only difference is you have to stack the shaped panes on top using the black plastic 610mm cut to the width of your glass glass separators ROSEPS Make sure you...

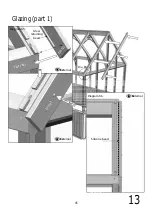
Страница 45: ...45 Glazing part 1 Dia 65 Glass retaining bead Diagram 65 External 40mm Screw E V 0 5 2 2 External Silicone bead Diagram 66 External Eaves Bar EV0522 13 Eaves Bar...

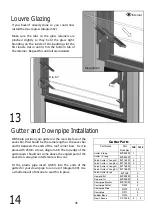
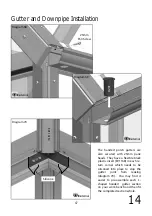
Страница 46: ...25mm screws diagram 68 The top edge of the gutter parts should not come above the angled part of the eaves bars else glass interference will occur Fit the plastic pipe insert D201 into the ends of the...

Страница 47: ...eads They have a flexible black plastic insert EV1168 in each re turn corner which needs to be siliconed into place to stop the gutter joint from leaking diagram 70 You may find it easier to pre assem...

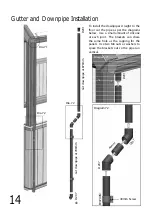
Страница 48: ...m D207 40mm Screw D201 Dia 71 Dia 72 Dia 72 Diagram 72 To install the downpipes straight to the floor cut the pipe as per the diagrams below Use a small amount of silicone at each joint The brackets c...

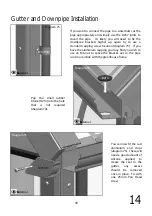
Страница 49: ...removed once in place Fix with one 25mm Pan Head screw Diagram 75 If you want to connect the pipe to a waterbutt cut the pipe appropriately and simply use the D207 joints to divert the pipe Its likel...

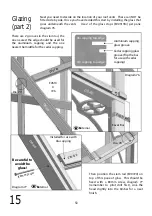
Страница 50: ...ilot drill first sink the head slightly into the timber for a neat finish There are 2 grooves in the slam rail the one nearest the edge should be used for the aluminium capping and the one nearer the...

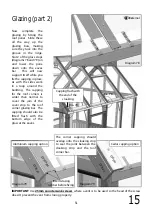
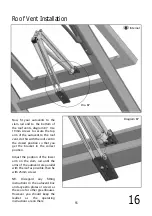
Страница 51: ...e roof corner glazing bar The capping should also be fitted flush with the bottom edge of the glass at the eaves Glazing part 2 15 IMPORTANT Use 25mm countersunk screws where a vent is to be used so t...

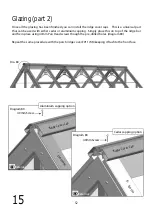
Страница 52: ...lace this on top of the ridge bar and fix in place using 40mm Pan Head screws though the pre drilled holes diagram 80 Repeat the same procedure with the porch ridge cover EV1174M keeping it flush to t...

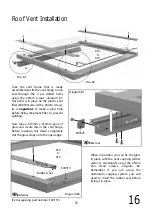
Страница 53: ...ke a 610mm x 610mm pane of glass and locate this in the vent hinge Before lowering this down completely slot the glass stops onto the open edge EV0315M EV0323 Diagram 81 When in position you can fix t...

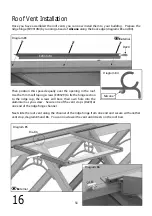
Страница 54: ...roof Use the 13mm self taping screws EV0329 to fix the hinge section to the ridge cap the screws will bore their own hole into the aluminium as you screw Secure one of the vent stops D220 at one end o...

Страница 55: ...on so that you get the bracket in the correct position Adjust the position of the lower arm on the slam rail until the arms of the autovent are parallel with the roof as possible then fix with 25mm sc...

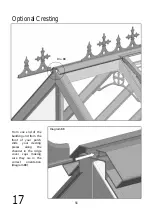
Страница 56: ...ting 17 Diagram 88 From one end of the building and from the front of your porch slide your cresting pieces along the channel in the ridge cover caps making sure they are in the correct orientation di...

Страница 57: ...2mm M6 bolt The easiest way to attach this is to slide the end cap onto the end of the ridge cover cap then slide the bolt on the end cap the head should locate in the lower recess of the end cap with...

Страница 58: ...and square you can fix the greenhouse to the ground Use brown rawl plugs 50mm screws and a 7mm hammer drill to secure it through the base brackets previously attached diagram 91 Finally check the door...

Страница 59: ...vre is installed in the greenhouse you can replace the manual handle with the automatic unit First of all remove the screw to release the arm diagram 93 Next Remove the handle from the frame of the lo...

Страница 60: ...frame using the 2 plates and 2 washers diagram 97 You should have either 19mm or 25mm screws spare from the greenhouse frame for this Once fixed in place attached the louvre arm to the opener and hol...

Страница 61: ...2 Mid Rail Rear 6ft wide EV0432 1959mm HB 1 EV0504 Glazing Bar Gable R 6ft wide EV0504 2208mm HB 1 EV0505 Glazing Bar Gable L 6ft wide EV0505 2208mm HB 1 EV0460 Glazing Bar Above Middle Purling 6ft wi...

Страница 62: ...MOSS 1 D211 Grey Downpipe Length 1625mm 2 EVPORHOU612P6B2 Evo Victorian with Porch 6x12 House Box 2 of 2 EV0313M Glass Stop EV0313 MOSS 20 EV0537M Alton Eaves Bracing EV0537 MOSS 8 EV0538M Alton Ridg...

Страница 63: ...Corner R EV0556 946mm HB DW 2 EV0557 Cedar Capping Side Corner L EV0557 946mm HB DW 2 EV0564 Cedar Capping Gable 6ft wide R EV0564 1424mm HB DW 2 EV0565 Cedar Capping Gable 6ft wide L EV0565 1424mm HB...

Страница 64: ...er EV0227 Glazing PVC 10m m700 1729D10GP coil 7 EV0231 Glazing PVC 100m m700 1729D10GP coil 1 Aluminium Capping EVPOR61CAPAHB Evo Victorian Porch Alu Capping 6ft x 1ft HB Quantity Gable EV0656M ALU Vi...

Отзывы: