Page 2
900-0125-12-01 Rev A
©2017 OutBack Power Technologies. All Rights Reserved.
Page 3
Access to the Main Menu
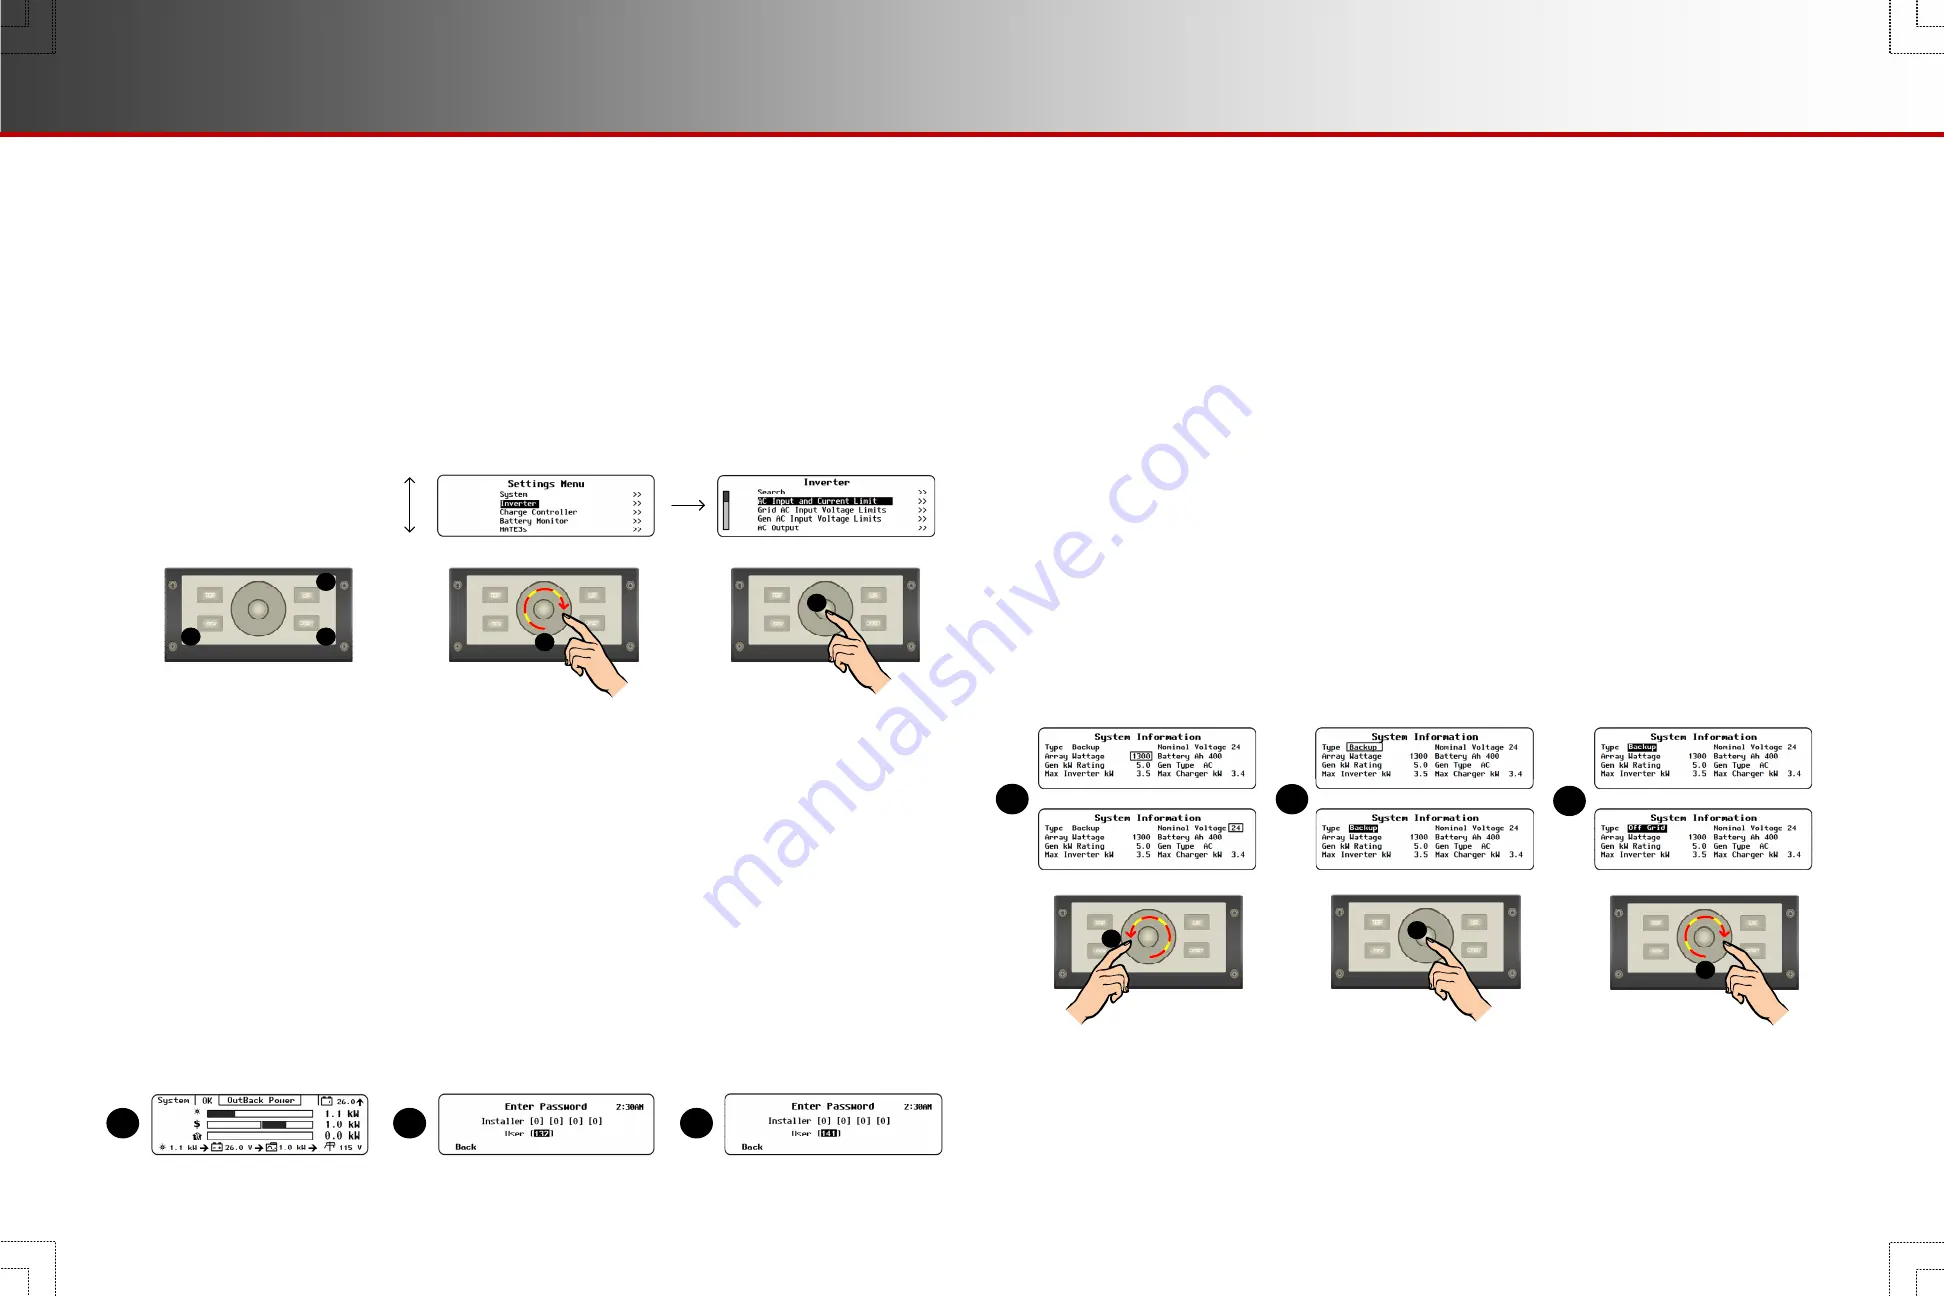
Programming the system is done in the
Main Menu
. A password is required to access the
Main Menu
screen.
This password is
141
. It is preprogrammed and cannot be changed.
To access the
Main Menu
, enter the password as follows:
1.
From the home screen
H
, press the
LOCK
key
C
. This brings up the
Enter Password
screen
I
. The default entry is
132
.
2.
Trace a clockwise circle on the control wheel
E
until the display shows
141
as shown in
J
.
3.
Press the center button
F
to accept the password.
o
Access to menus can been restricted by an installer or OEM by setting an installer password. The installer password can
be entered from
I
to allow full access.
o
Press the
UP
key
B
to enter the installer password. The default installer password is
1732
. This password
can be changed. See page 9.
Menu Navigation
Control Wheel
The control wheel is a touch-sensitive navigation control with a center button. It is used to navigate through the
advanced menu structure. It is also used to change set points once selected.
To navigate:
1.
Use the control wheel
E
to scroll forward or backward (up or down) in the menu map. Tracing a clockwise circle scrolls
down. A counterclockwise circle scrolls up. The present selection is highlighted black when scrolling.
2.
When the desired menu item is highlighted, press the center button
F
to move forward into that screen. The screens
below show an example of scrolling through the
Settings
menu. See the
MATE3s Menu Map.
F
B
C
D
H
I
J
E
Set Points
A set point is a condition, measurement, or baseline that a user establishes in order for something else to happen
(such as when to start or stop a generator). The MATE3 allows a user to view, monitor, and establish all the
settings and values that occur while the system is running. Occasionally components may be added or upgraded,
electrical loads increase, or patterns of usage may change. These settings and values can be adjusted to match.
On screens with set points, the control wheel
E
serves two functions: navigation and set point adjustment.
o
Set points are adjustable settings for each specific menu item.
o
Set points will vary depending on the system configuration.
o
When a screen with set points is available, the present selection is identifiable by a black line around the item. To change
the setting, follow the instructions below.
To change set points:
1.
The black line around an item shows it is in
Field Select
mode. In this mode, the control wheel
E
can switch between all
selectable fields or items on the screen. A clockwise movement on the control wheel scrolls to the next field. A
counterclockwise movement (
L
) scrolls to the previous field as shown in
K
.
2.
When the desired item is selected, press the center button
F
. The box around the field should become solid black as
shown in
M
. This shows it is in
Adjust Set Point
mode. The selectable field becomes an adjustable set point.
3.
Use the control wheel
E
to change the set point value as shown in
N
.
4.
When the set point is correct, press the center button
F
again to return to
Field Select
mode.
5.
Repeat Steps 1-4 for each set point to be adjusted. The screens below show an example of scrolling through the
System Information
menu and selecting a different
System Type
.
Ports
If a screen shows a port number in the upper right corner, those settings only apply to that particular device.
Other devices can be individually selected by using the
PORT
key
D
. Screens with no port designation, such
as those shown on this page, are for system-wide changes.
K
M
N
Set Points
Menu Navigation
L
F
E


