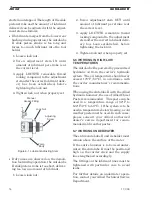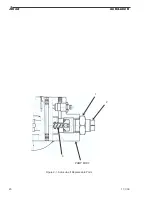
started and stopped. The length of the slide
piston stroke and the amount of lubricant
delivered can be adjusted with the adjust-
ment stem as follows:
·
If lubricant emerges from the lower wear
bushing during operation, the AutoLube
II slide piston stroke is too long and
forces too much lubricant into the tool
holder.
1.
Loosen lock nut.
2.
Screw adjustment stem IN until
amount of lubricant per stroke is at
the correct level.
3.
Apply LOCTITE removable thread
locking compound to the adjustment
stem after the correct lubricant deliv-
ery has been established, before
tightening the lock nut.
4.
Tighten lock nut when properly set.
·
If dry areas are observed on the demoli-
tion tool during operation, the AutoLube
II slide piston stroke is too short, deliver-
ing too low an amount of lubricant.
1.
Loosen lock nut.
2.
Screw adjustment stem OUT until
amount of lubricant per stroke is at
the correct level.
3.
Apply LOCTITE removable thread
locking compound to the adjustment
stem after the correct lubricant deliv-
ery has been established, before
tightening the lock nut.
4.
Tighten lock nut when properly set.
6.6 WORKING IN HIGH/LOW
TEMPERATURES
The AutoLube II is powered by pressurized
hydraulic oil from the carrier’s hydraulic
system. The oil temperature should never
exceed 176
o
F (80
o
C), in accordance with
the carrier manufacturer’s recommenda-
tions.
When using the Autolube II with the Allied
hydraulic hammer, the use of Allied Chisel
Paste is recommended. This paste can be
used in a temperature range of 32
o
F to
122
o
F (0
o
C to 50
o
C). If the system is to be
used in temperatures below freezing, a cold
weather paste must be used. In such cases,
please consult your Allied authorized
dealer’s service department for recom-
mended cold weather pastes.
6.7 WORKING UNDERWATER
The entire AutoLube II and its holder must
remain above the surface of the water.
If the entire hammer is to be used under-
water, the Autolube II must be positioned
high on the carrier stick and the supply
lines lengthened accordingly.
The fittings on the lubricant lines must be
tightened with particular care to avoid
leaks.
For further details on underwater opera-
tion, contact your Allied Technical Service
Department.
A
llied
AutoLube II
14
11/1/03
Lock Nut
Adjusting
Screw
Pump
Body
Manual
Grease Fitting
Figure 6-1. Lubricant Adjusting Stem
Содержание AutoLube II
Страница 4: ...Allied AutoLube II ii 11 1 03 This page intentionally left blank ...
Страница 6: ...Allied AutoLube II 2 11 1 03 This page intentionally left blank ...
Страница 8: ...Allied AutoLube II 4 11 1 03 This page intentionally left blank ...
Страница 10: ...Allied AutoLube II 6 11 1 03 This page intentionally left blank ...
Страница 12: ...Allied AutoLube II 8 11 1 03 This page intentionally left blank ...
Страница 16: ...Allied AutoLube II 12 11 1 03 This page intentionally left blank ...
Страница 22: ...Allied AutoLube II 18 11 1 03 This page intentionally left blank ...
Страница 24: ...Allied AutoLube II 20 11 1 03 1 2 PUMP BODY 3 Figure 9 1 AutoLube II Replaceable Parts ...
Страница 26: ...Allied AutoLube II 22 11 1 03 2 4 5 9 1 3 6 7 8 Figure 9 2 AutoLube II Seal Kit ...
Страница 28: ......


