


SECTION 5.0
AUTOLUBE II INSTALLATION
~
WARNING
Disconnect the battery cables to pre-
vent electrical damage before perform-
ing any welding work.
~
CAUTION
Shield all hydraulic hoses in the
AutoLube II mounting vicinity during
welding to avoid the risk of fire or dam-
age to the hoses from excessive heat.
The AutoLube II is Hy-Ram Model specific
for the newer Hy-Rams. Models 750 and
770 Hy-Rams have a slot burned out in the
hammer box to which the AutoLube II is
mounted with a clamp. All other models
are mounted on a bracket that is welded to
the hammer box. All accessories, hardware
and hoses are included in the AutoLube II
Kit. Section 9.0 lists the AutoLube II Kit
part numbers. Each kit also has a drawing
specific to that model.
~
CAUTION
Nominal inside diameter of the
hydraulic line MUST be at least .23 in.
(6 mm) and nominal inside diameter of
the lubricant supply line MUST be at
least .16 in. (4 mm)
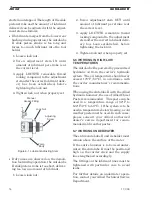
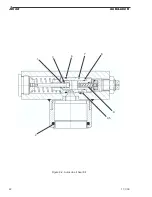
5.1 INSTALLATION
(Refer to Figure 5-1.)
1. On models with a mounting bracket,
weld mounting bracket in place.
2. Remove lubricating nipple from ham-
mer lubrication port and install adapter
(1).
3. Remove plug from AutoLube II hydrau-
lic pressure port on hammer and install
adapter (2).
NOTE
Some Hy-Ram Models have a sepa-
rate pressure port for the AutoLube
II on the cylinder head. This port is
marked with a small
P
. Other
Hy-Ram Models have a pressure
port connection in the flange on the
hydraulic pressure inlet port. This
port is marked with a large
P
. See
Section 9.0 Parts Information for
specific HyRam Model pressure port
type.
4. Install 90
o
elbows on adapters:
·
Elbow (3), #4JIC, for lubrication con-
nection.
·
Elbow (4), #6JIC, for hydraulic con-
nection.
5. Connect hoses to elbows (refer to Sec-
tion 5.2 for retrofit kit instructions):
·
Hose (5), 1/4-inch, for lubrication con-
nection.
·
Hose (6), 3/8-inch, for hydraulic con-
nection.
A
llied
AutoLube II
11/1/03
9
Содержание AutoLube II
Страница 4: ...Allied AutoLube II ii 11 1 03 This page intentionally left blank ...
Страница 6: ...Allied AutoLube II 2 11 1 03 This page intentionally left blank ...
Страница 8: ...Allied AutoLube II 4 11 1 03 This page intentionally left blank ...
Страница 10: ...Allied AutoLube II 6 11 1 03 This page intentionally left blank ...
Страница 12: ...Allied AutoLube II 8 11 1 03 This page intentionally left blank ...
Страница 16: ...Allied AutoLube II 12 11 1 03 This page intentionally left blank ...
Страница 22: ...Allied AutoLube II 18 11 1 03 This page intentionally left blank ...
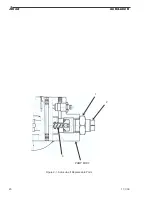
Страница 24: ...Allied AutoLube II 20 11 1 03 1 2 PUMP BODY 3 Figure 9 1 AutoLube II Replaceable Parts ...
Страница 26: ...Allied AutoLube II 22 11 1 03 2 4 5 9 1 3 6 7 8 Figure 9 2 AutoLube II Seal Kit ...
Страница 28: ......