Installation Guide for AT-AR3050S, AT-AR4050S Routers
25
Installing the Router on a Wall
This procedure requires the following items:
A wall mount kit (not provided)
Two equipment rack brackets (not provided)
Cross-head screwdriver (not provided)
If you are fixing the routers to a solid masonry or hollow wall, you
need equipment to drill a 6 mm hole. The wall mount kit is supplied
with screws and rawplugs to fasten the brackets to a masonry or
plasterboard wall. If you are fixing the routers to a wooden wall, the
screws are self-tapping.
Note
Wall mount kits can be purchased separately from your Allied
Telesis dealer.
To install the routers on a wall, perform the following procedure:
1. Turn the router over and place it on a table.
2. If the rubber feet are attached to the bottom of the router, remove them
by prising off with a flat-head screwdriver.
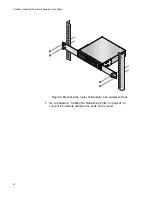
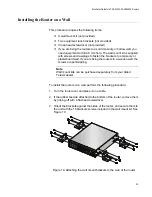
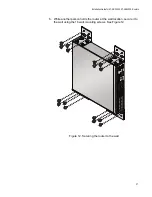
3. Orient the brackets against the sides of the router, and secure them to
the unit with the 16 brackets screws included in the wall mount kit. See
Figure 10.
Figure 10. Attaching the wall mount brackets to the side of the router
CLA
SS 1
LAS
ER P
ROD
UCT
CONSO
LE
SD
SD
FAUL
T
PWR
FNC
1
FN
C2
RESET
1
2
3
4
5
6
7
8
1
2
BY
PAS
S
1
2
1
2
USB
HA
FD
X
HD
X
COL
RE
ADY
FAU
LT
READ
Y
FAU
LT
MA
STE
R
STAN
DB
Y
ETH
ET
H
A
R3050S
1000 L
INK
AC
T
100 L
INK
AC
T
A
R3050S
Содержание AT-AR3050S
Страница 8: ...Figures 8 ...
Страница 10: ...Tables 10 ...
Страница 14: ...Preface 12 ...
Страница 50: ...Chapter 2 Beginning the Installation 16 ...
Страница 76: ...Chapter 5 Troubleshooting 40 ...

