background image

Qu Mixer Getting Started Guide 

22 

 AP10025 iss2


9.9


A few more functions 

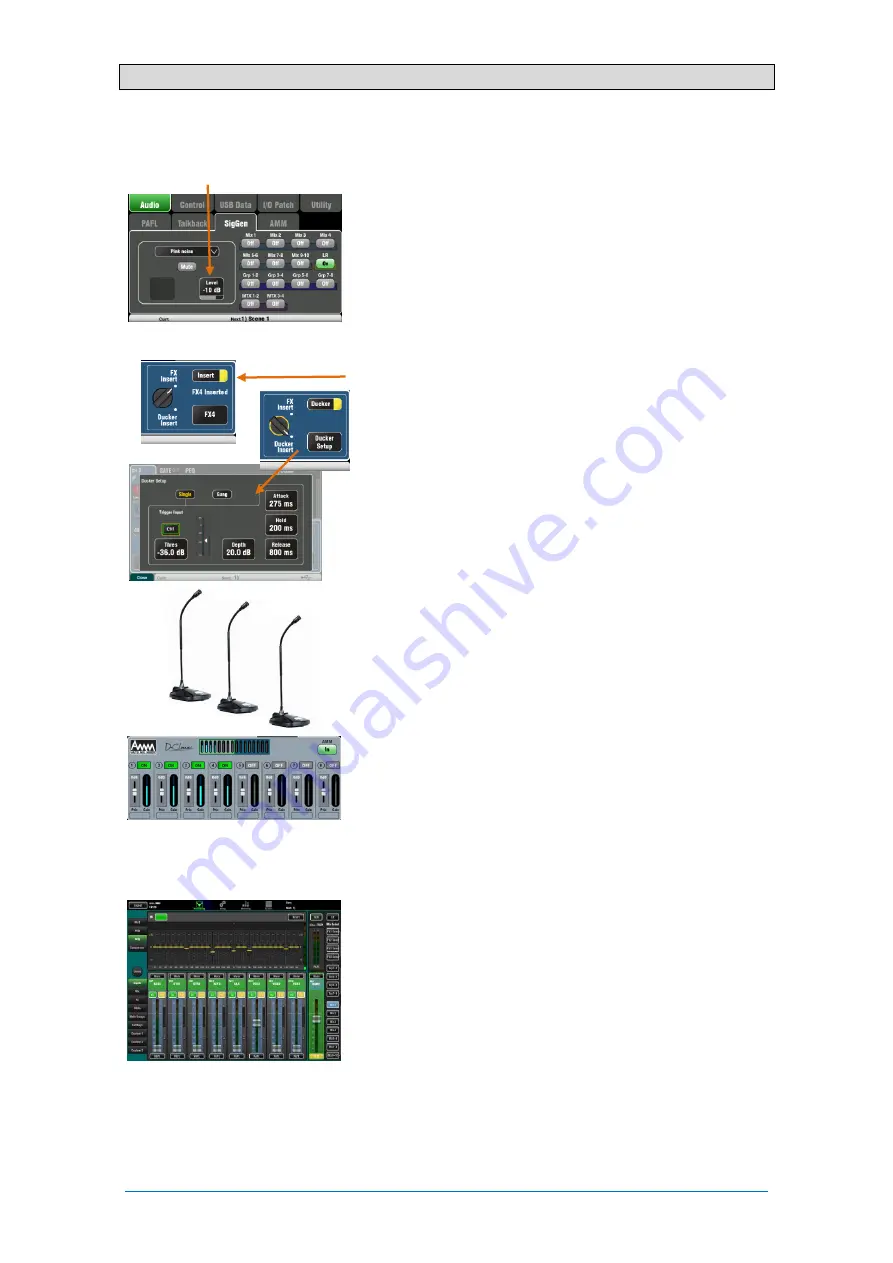
Use the Signal Generator to test speakers - After plugging up 

the PA check that all the amplifier and speaker levels are correctly 

set. Turn the system on in the correct sequence:  

 Turn the mixer on first, amplifier/speakers on last. 

Pink  noise  is  an  excellent  source  for  testing  speakers.  It 

generates  equal  energy  per  octave  across  all  frequencies.  It 

can be used to check that all speaker drivers are working and 

to listen for phasing and polarity issues. 

Set the LR and monitor master faders to their normal operating 

position.  Go  to  the 

Setup  /  Audio  /  SigGen

  screen.  Select 

Pink Noise and make sure its Level is fully off. Now select LR 

and slowly raise the SigGen level to hear the noise in the PA 

speakers. Also test the monitor speakers in this way. 


Inserted FX – You can insert an internal FX (reverb,  delay or 

modulation) directly into an input channel or mix master signal 

path.  Balance  between  the  unaffected  (dry)  signal  and  the 

effect (wet) using the D/W control in the 

FX

 screen. 

Channel Ducker – You can insert a ducker into input channels 

or  groups.  This  lets  you  use  any  Qu  signal  to  automatically 

duck  (attenuate)  other  channels  when  active.  For  example, 

use a paging mic as a trigger to duck the background music 

channel. Adjust how fast it ducks and recovers. 


Automatic Mic Mixing (AMM) – This is very useful for speech 

applications  such  as  conferences  and  seminars  involving 

several  microphones  around  a  table.  The  Qu  AMM  can 

automatically  take  over  the  level  of  these  mics  to  improve 

clarity and reduce the risk of feedback caused by many open 

microphones. 

To  set  up  the  AMM,  start  with  the  mix  master  fader  turned 

down.  Use  PAFL  to  check  each  mic  signal  and  set  preamp 

gain  for  a  healthy  meter  reading  for  speech  at  the  expected 

distance from the mic. Go to the 

Setup / Audio / AMM

 screen 

and turn on the associated mic channels. Their fader levels will 

jump to their ‘0’ open position.  Now slowly bring up the mix 

master fader. We recommend you use a DCA or audio Group 

as  a  master  fader  for  the  speech  mics  if  you  are  also  mixing 

other audio sources. 

Refer to the Qu Mixer Reference Guide for more about how the 

AMM works and can be used. 


Ringing  out  the  monitors  –  The  Qu-Pad  app  gives  you  the 

freedom to stand in front of a vocal mic on stage and use the 

iPad  to  dial  the  vocal  into  the  monitor  speaker  and  tune  out 

any ringing (feedback) you hear using the mix GEQ. Touch the 

Master strip Mix button for the monitor mix. The strip becomes 

the  master  for  that  monitor  mix.  Touch  to  select  it  and  open 

the GEQ tab. Touch its PAFL button to send the signal to the 

RTA.  The  fader  strips  present  the  sends  to  that  monitor  mix. 

Raise  the  vocal  channel  send  fader  to  hear  your  voice  in  the 

monitor. Carefully raise the fader until you just start to hear a 

frequency  ring.  A  red  dot  in  the  RTA  display  above  the  GEQ 

will show which frequency is ringing. Pull back its GEQ slider a 

few dB until the ring stops. Slowly raise the vocal level again 

until you hear the next frequency ring. To avoid degrading the 

overall  tone  of  the  sound  do  not  tune  out  too  many 

frequencies in this way. 

Start with the level turned down 


Содержание QU

Страница 1: ...Getting Started Guide For Firmware Version V1 9 Before starting please check www allen heath com for the latest Qu mixer firmware and documentation Publication AP10025...

Страница 2: ...period Repair or direct replacement of the product under the terms of this warranty may be fulfilled with functionally equivalent service exchange units This warranty is not transferable This warrant...

Страница 3: ...r to the Allen Heath website for further information knowledgebase and technical support You can join our Allen Heath Digital Community to share knowledge and information with other Qu users Check for...

Страница 4: ...ne out Remote Part AB1608 ME Personal Mixing System ME 1 Personal Mixer ME U 10 port PoE hub Qu Pac Mixer LEDlamp Right angled 4 pin XLR LED lamp with built in dimmer Part LEDlampX Dust covers AP9262...

Страница 5: ...9 7 Security and user access 20 9 8 USB recording and playback 21 9 9 A few more functions 22 10 Resetting the Mixer 23 10 1 Reset Mix Settings A starting point for mixing 23 10 2 System Hard Reset C...

Страница 6: ...ds 2 more stereo Groups Qu Pac Rack mountable version of the Qu 32 without faders for iPad and front panel control Qu SB Rack mountable version of the Qu 32 without faders and front panel controls for...

Страница 7: ...add Groups and Matrix Other differences are shown here Qu 16 Qu 24 Qu 32 32 fader strips 4 Group masters 2 Matrix masters 4 DCA Group masters 4 stereo Group mix selects Larger Touch Screen Shelf for...

Страница 8: ...e for the latest firmware available USB Audio A USB hard drive formatted on one model can be used on the other Stereo and multitrack Qu Drive recordings are compatible USB B audio streaming is compati...

Страница 9: ...hese areas clear when casing installing or operating the mixer flight Blocking or obstructing the ventilation slots may cause damage to the mixer through overheating Qu 16 Rack Mount Option A kit of p...

Страница 10: ...e can also be downloaded from the Allen Heath website To avoid loud thumps do not switch the mixer on or off while the PA speakers are powered Always switch the amplifiers on last and switch them off...

Страница 11: ...keys There strip functions are marked across the panel Press both keys together to select the Custom Layer You can assign any combination of channels masters and DCAs to this layer There is space for...

Страница 12: ...tputs PAFL Route to L R Output BAL LR post AMM CH1 16 POL 0 TRIM HPF GATE PEQ COMP DELAY FX Insert or Ducker Mic Line L M R Mic Line Inputs ST1 L M R ST2 ST3 L R Mic Talkback Line Inputs 1 24 32 Qu Dr...

Страница 13: ...hout password in future select your network in their device Settings Wi Fi menu and use the Forget this network function Connect to the wireless network Power up the router Wait a few minutes for it t...

Страница 14: ...screen Qu has three User Profiles Admin user has access to everything and is typical for the mixer owner or senior engineer Standard and Basic users have restricted access as set by Admin Passwords c...

Страница 15: ...cted by the compressor This is ideal for using the mixes as monitor sends For effects and other sends you could change this to post fade post Delay after all processing Set up the Groups Groups can be...

Страница 16: ...input channel direct outputs Recommended direct out setting is post delay pre fader post mute Patch the USB outputs Use the Setup I O Patch USB Audio screen to patch any of the Qu outputs to the Qu Dr...

Страница 17: ...nd complete way to set a starting point before sound check once you have named your channels Copy Paste Reset These keys provide a powerful tool for quickly setting up your processing They work in a s...

Страница 18: ...that you may make after sound check or the LR mix processing including GEQ which you may change as the audience fills the room Use the Scenes Global Filter screen This presents a grid of buttons to bl...

Страница 19: ...he Routing key to access routing parameters for the selected channel Press the Fn key to work with DCA and Mute Group assignments and masters Press a blue Mix key to work with mix sends routing and pr...

Страница 20: ...key to access the Matrix sends while a Matrix is selected or the Mute DCA group assignments and naming while anything else is selected 9 7 Security and user access Qu features several functions that p...

Страница 21: ...Format the USB device on the Qu mixer before recording using the Setup Utility Qu Drive screen This clears the drive and sets up the Qu directory structure Patch the sources to record using the Setup...

Страница 22: ...AMM can automatically take over the level of these mics to improve clarity and reduce the risk of feedback caused by many open microphones To set up the AMM start with the mix master fader turned dow...

Страница 23: ...Creating your own start settings You can start by resetting the mixer and then editing the patching levels and parameters to suit your starting preferences Name and store this as a Scene for example S...

Страница 24: ...Qu Mixer Getting Started Guide 24 AP10025 iss2...

Отзывы: