background image

Replacing 

the 

Coin-Cell 

Battery  |  

17

Replacing the Coin-Cell 


Battery


WARNING:  

Before working inside your computer, read the safety 

information that shipped with your computer and follow the steps in 
"Before You Begin" on page 9. For additional safety best practices 
information, see the Regulatory Compliance Homepage at dell.com/
regulatory_compliance.

Procedure

1

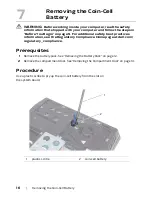
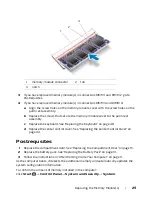
Hold the coin-cell battery with the positive side facing up.

2

Slide the coin-cell battery into the slot and gently press until it snaps into place.

Postrequsites

1

Replace the compartment door. See "Replacing the Compartment Door" on page 15.

2

Replace the battery pack. See "Replacing the Battery Pack" on page 13.

3

Follow the instructions in "After Working Inside Your Computer" on page 11.

8

Содержание Alienware M17x R4

Страница 1: ...Alienware M17x R4 Owner s Manual Computer model M17x R4 Regulatory model P11E Regulatory type P11E002...

Страница 2: ...ittenpermission of Dell Inc is strictly forbidden Trademarksusedinthistext Dell andtheDELLlogoaretrademarksofDellInc Alienware is a registered trademark of Alienware Corporation Bluetooth is a registe...

Страница 3: ...12 Procedure 12 4 Replacing the Battery Pack 13 Procedure 13 Postrequsites 13 5 Removing the Compartment Door 14 Prerequsites 14 Procedure 14 6 Replacing the Compartment Door 15 Procedure 15 Postrequs...

Страница 4: ...Postrequsites 25 13 Removing the Graphics Card Heat Sink Fan 26 Prerequsites 26 Procedure 27 14 Replacing the Graphics Card Heat Sink Fan 28 Procedure 28 Postrequsites 28 15 Removing the Processor Hea...

Страница 5: ...sor Heat Sink 37 Procedure 37 Postrequsites 37 21 Removing the Processor Module 38 Prerequsites 38 Procedure 38 22 Replacing the Processor Module 40 Procedure 40 Postrequsites 40 23 Removing the Cente...

Страница 6: ...rocedure 51 Postrequsites 52 29 Removing the WirelessHD Card 53 Prerequsites 53 Procedure 53 30 Replacing the WirelessHD Card 54 Procedure 54 Postrequsites 54 31 Removing the Power Button Board 55 Pre...

Страница 7: ...edure 63 Postrequsites 63 37 Removing the Palm Rest Assembly 64 Prerequsites 64 Procedure 65 38 Replacing the Palm Rest Assembly 66 Procedure 66 Postrequsites 66 39 Removing the Bluetooth Card 67 Prer...

Страница 8: ...76 Postrequsites 76 45 Removing the System Board 77 Prerequsites 77 Procedure 78 46 Replacing the System Board 79 Procedure 79 Postrequsites 79 Entering the Service Tag in the BIOS 80 47 System Setup...

Страница 9: ...old the power button for about 5 seconds after the computer is unplugged to ground the system board Safety Instructions Use the following safety guidelines to protect your computer from potential dama...

Страница 10: ...rm internal components CAUTION When you disconnect a cable pull on its connector or on its pull tab not on the cable itself Some cables have connectors with locking tabs or thumb screws that you must...

Страница 11: ...screws remain inside your computer Connect any external devices cables cards and any other part s you removed before working on your computer Connect your computer and all attached devices to their e...

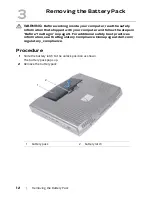
Страница 12: ...your computer and follow the steps in Before You Begin on page 9 For additional safety best practices information see the Regulatory Compliance Homepage at dell com regulatory_compliance Procedure 1...

Страница 13: ...itional safety best practices information see the Regulatory Compliance Homepage at dell com regulatory_compliance Procedure CAUTION To avoid damage to the computer use only the battery designed for t...

Страница 14: ...ou Begin on page 9 For additional safety best practices information see the Regulatory Compliance Homepage at dell com regulatory_compliance Prerequsites Remove the battery pack See Removing the Batte...

Страница 15: ...s information see the Regulatory Compliance Homepage at dell com regulatory_compliance Procedure 1 Align the tabs on the compartment door with the slots on the computer base and slide the compartment...

Страница 16: ...9 For additional safety best practices information see the Regulatory Compliance Homepage at dell com regulatory_compliance Prerequsites 1 Remove the battery pack See Removing the Battery Pack on page...

Страница 17: ...see the Regulatory Compliance Homepage at dell com regulatory_compliance Procedure 1 Hold the coin cell battery with the positive side facing up 2 Slide the coin cell battery into the slot and gently...

Страница 18: ...tery See Removing the Battery Pack on page 12 CAUTION To prevent data loss turn off your computer See Turn Off Your Computer and Connected Devices on page 9 Do not remove the hard drive while the comp...

Страница 19: ...Removing the Hard Drive s 19 Primary hard drive assembly Secondary hard drive assembly 1 captive screws 3 2 primary hard drive assembly 1 captive screws 3 2 secondary hard drive assembly 1 2 1 2...

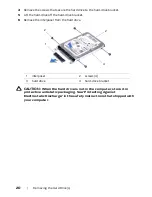
Страница 20: ...hard drive bracket 6 Remove the interposer from the hard drive CAUTION When the hard drive is not in the computer store it in protective antistatic packaging See Protecting Against Electrostatic Disc...

Страница 21: ...on the new hard drive Procedure 1 Remove the new drive from its packaging Save the original packaging for storing or shipping the hard drive 2 Connect the interposer to the hard drive 3 Place the har...

Страница 22: ...f your computer You can access connectors DIMM 3 and DIMM 4 by removing the memory module cover on top of the palm rest assembly Prerequsites 1 Remove the battery pack See Removing the Battery Pack on...

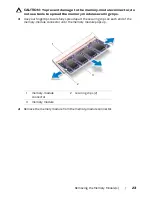
Страница 23: ...spread the memory module securing clips 3 Use your fingertips to carefully spread apart the securing clips on each end of the memory module connector until the memory module pops up 4 Remove the memor...

Страница 24: ...emory module connectors You can access connectors DIMM 1 and DIMM 2 by removing the compartment door at the bottom of your computer You can access connectors DIMM 3 and DIMM 4 by removing the memory m...

Страница 25: ...Keyboard on page 48 d Replace the center control cover See Replacing the Center Control Cover on page 44 Postrequsites 1 Replace the compartment door See Replacing the Compartment Door on page 15 2 R...

Страница 26: ...n page 9 For additional safety best practices information see the Regulatory Compliance Homepage at dell com regulatory_compliance WARNING The graphics card assembly may be very hot during normal oper...

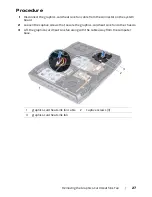
Страница 27: ...from the connector on the system board 2 Loosen the captive screws that secure the graphics card heat sink fan to the chassis 3 Lift the graphics card heat sink fan along with the cable away from the...

Страница 28: ...m regulatory_compliance Procedure 1 Align the screw holes on the graphics card heat sink fan with the screw holes on the chassis 2 Tighten the captive screws that secure the graphics card heat sink fa...

Страница 29: ...page 9 For additional safety best practices information see the Regulatory Compliance Homepage at dell com regulatory_compliance WARNING The processor heat sink may be very hot during normal operation...

Страница 30: ...cable from the connector on the system board 2 Loosen the captive screws that secure the processor heat sink fan to the chassis 3 Lift the processor heat sink fan along with the cable away from the c...

Страница 31: ...com regulatory_compliance Procedure 1 Align the screw holes on the processor heat sink fan with the screw holes on the chassis 2 Tighten the captive screws that secure the processor heat sink fan to t...

Страница 32: ...tion see the Regulatory Compliance Homepage at dell com regulatory_compliance WARNING The graphics card assembly may be very hot during normal operation Ensure that it has had sufficient time to cool...

Страница 33: ...y 33 Procedure 1 Remove the screws that secure the graphics card assembly to the system board 2 Lift and slide the graphics card assembly to disconnect it from the connector on the system board 1 grap...

Страница 34: ...ard connector at a 45 degree angle into the connector on the system board 2 Press the other end of the graphics card assembly down into the slot on the system board and replace the two screws that sec...

Страница 35: ...on see the Regulatory Compliance Homepage at dell com regulatory_compliance WARNING If you remove the processor heat sink from the computer when the heat sink is hot do not touch the metal housing of...

Страница 36: ...indicated on the processor heat sink loosen the captive screws that secure the processor heat sink to the system board 2 Lift the processor heat sink at an angle toward the front of the computer and o...

Страница 37: ...sink is reinstalled If the processor heat sink is replaced use the thermal grease provided in the kit to ensure that thermal conductivity is achieved Procedure 1 Slide the processor heat sink in plac...

Страница 38: ...r to the processor module when turning the cam screw 1 Remove the battery pack See Removing the Battery Pack on page 12 2 Remove the compartment door See Removing the Compartment Door on page 14 3 Rem...

Страница 39: ...Removing the Processor Module 39 2 Lift the processor module from the ZIF socket 1 ZIF socket 2 ZIF socket cam screw 2 1...

Страница 40: ...the processor module is properly seated all four corners are aligned at the same height If one or more corners of the module are higher than the others the module is not seated properly CAUTION To pr...

Страница 41: ...nce Homepage at dell com regulatory_compliance Prerequsites 1 Remove the battery pack See Removing the Battery Pack on page 12 2 Remove the compartment door See Removing the Compartment Door on page 1...

Страница 42: ...he palm rest assembly CAUTION Be extremely careful when removing and handling the center control cover Failure to do so could result in scratching the display panel 4 Turn the center control cover tow...

Страница 43: ...Removing the Center Control Cover 43 1 media control keys cable 1...

Страница 44: ...regulatory_compliance Procedure 1 Connect the media control keys cable to the connector on the system board 2 Align the tabs on the center control cover with the slots on the palm rest assembly and sn...

Страница 45: ...the Compartment Door on page 15 3 Remove the center control cover See Removing the Center Control Cover on page 41 Procedure 1 Remove the screws that secure the keyboard to the computer base CAUTION...

Страница 46: ...46 Removing the Keyboard 4 Lift the release latches on the connectors on the system board and disconnect the keyboard cable and backlit keyboard cable 1 screws 5 2 keyboard 1 2...

Страница 47: ...Removing the Keyboard 47 5 Lift the keyboard off the palm rest assembly 1 keyboard cable 2 backlit keyboard cable 1 2...

Страница 48: ...heir connectors on the system board and press down on their connector latches to secure the cables 2 Slide the tabs on the keyboard into the slots on the palm rest assembly and lower the keyboard into...

Страница 49: ...ess Mini Card with your computer the card is already installed Your computer supports one half Mini Card slot for WLAN NOTE Depending on the configuration of the computer when it was sold the Mini Car...

Страница 50: ...system board 3 Lift the Mini Card out of the connector on the system board CAUTION When the Mini Card is not in the computer store it in protective antistatic packaging For more information see Protec...

Страница 51: ...ing CAUTION Use firm and even pressure to slide the card into place If you use excessive force you may damage the connector CAUTION The connectors are keyed to ensure correct insertion If you feel res...

Страница 52: ...artment door See Replacing the Compartment Door on page 15 4 Replace the battery pack See Replacing the Battery Pack on page 13 5 Follow the instructions in After Working Inside Your Computer on page...

Страница 53: ...lready installed Prerequsites 1 Remove the battery pack See Removing the Battery Pack on page 12 2 Remove the compartment door See Removing the Compartment Door on page 14 3 Remove the center control...

Страница 54: ...sure correct insertion If you feel resistance check the connectors on the card and on the system board and realign the card 2 Insert the wirelessHD card connector at a 45 degree angle into the connect...

Страница 55: ...battery pack See Removing the Battery Pack on page 12 2 Remove the compartment door See Removing the Compartment Door on page 14 3 Remove the center control cover See Removing the Center Control Cove...

Страница 56: ...lignment posts on the chassis and secure the power button board in place 2 Replace the screws that secure the power button board to the palm rest assembly 3 Connect the power button board cable to the...

Страница 57: ...n page 41 4 Remove the keyboard See Removing the Keyboard on page 45 5 Disconnect the antenna cables from the Mini Card See Removing the Mini Card on page 49 6 Disconnect the wirelessHD card cable fro...

Страница 58: ...sembly 5 Remove the screws that secure the display assembly to the computer base 6 Lift the display assembly off the computer 1 wirelessHD card cable 2 display cable 3 captive screws 2 4 camera cable...

Страница 59: ...Removing the Display Assembly 59 1 display assembly 2 screws 6 1 2...

Страница 60: ...Connect the display cable to the connector on the system board 4 Tighten the captive screws that secure the display cable to the system board 5 Connect the camera cable and infrared cable to the respe...

Страница 61: ...12 2 Remove the compartment door See Removing the Compartment Door on page 14 3 Remove the center control cover See Removing the Center Control Cover on page 41 4 Remove the keyboard See Removing the...

Страница 62: ...62 Removing the Status Light Board 1 screws 2 2 status light board 3 status light board cable 1 2 3...

Страница 63: ...ce the screws that secure the status light board to the palm rest assembly 3 Route the status light board cable through the routing guides on the palm rest assembly 4 Connect the status light board ca...

Страница 64: ...omepage at dell com regulatory_compliance Prerequsites 1 Remove any installed card or blank from the 9 in 1 Media Card Reader 2 Remove the battery pack See Removing the Battery Pack on page 12 3 Remov...

Страница 65: ...edia Card Reader cable from the connectors on the system board 2 Remove the screws that secure the palm rest assembly to the computer base 3 Carefully pry out the palm rest assembly along the rear edg...

Страница 66: ...ystem board Postrequsites 1 Replace the status light board See Replacing the Status Light Board on page 63 2 Replace the display assembly See Replacing the Display Assembly on page 60 3 Replace the po...

Страница 67: ...compartment door See Removing the Compartment Door on page 14 3 Remove the center control cover See Removing the Center Control Cover on page 41 4 Remove the keyboard See Removing the Keyboard on page...

Страница 68: ...68 Removing the Bluetooth Card 1 Bluetooth card cable 2 Bluetooth card 3 screw 1 3 2...

Страница 69: ...to the connector on the system board Postrequsites 1 Replace the palm rest assembly See Replacing the Palm Rest Assembly on page 66 2 Replace the status light board See Replacing the Status Light Boar...

Страница 70: ...ng the Center Control Cover on page 41 4 Remove the keyboard See Removing the Keyboard on page 45 5 Remove the power button board See Removing the Power Button Board on page 55 6 Remove the display as...

Страница 71: ...Removing the Speakers 71 1 speakers 2 2 screws 4 3 speakers cable 1 2 3...

Страница 72: ...nect the speakers cable to the connector on the system board Postrequsites 1 Replace the palm rest assembly See Replacing the Palm Rest Assembly on page 66 2 Replace the status light board See Replaci...

Страница 73: ...r Control Cover on page 41 4 Remove the keyboard See Removing the Keyboard on page 45 5 Remove the power button board See Removing the Power Button Board on page 55 6 Remove the display assembly See R...

Страница 74: ...g the Optical Drive 4 Remove the screws that secure the optical drive bracket to the optical drive 1 optical drive cable 2 screws 2 3 optical drive 1 optical drive 2 optical drive bracket 3 screws 5 1...

Страница 75: ...Removing the Optical Drive 75 5 Disconnect the interposer from the optical drive 1 interposer 1...

Страница 76: ...he optical drive assembly to the computer base 5 Slide the optical drive cable into the connector on the system board and press down on the connector latch to secure the cable Postrequsites 1 Replace...

Страница 77: ...emoving the Coin Cell Battery on page 16 6 Remove the memory module s See Removing the Memory Module s on page 22 7 Remove the graphics card heat sink fan See Removing the Graphics Card Heat Sink Fan...

Страница 78: ...ove the speakers See Removing the Speakers on page 70 22 Follow the instructions from step 1 to step 3 in Removing the Optical Drive on page 73 Procedure 1 Remove the screws that secure the system boa...

Страница 79: ...page 69 4 Replace the palm rest assembly See Replacing the Palm Rest Assembly on page 66 5 Replace the status light board See Replacing the Status Light Board on page 63 6 Replace the wirelessHD card...

Страница 80: ...blank that you removed from the 9 in 1 Media Card Reader 23 Follow the instructions in After Working Inside Your Computer on page 11 24 Turn on the computer NOTE After you have replaced the system bo...

Страница 81: ...ard is held down for extended periods of time To avoid possible keyboard failure press and release F2 in even intervals until the System Setup screen appears 2 While the laptop is booting press F2 imm...

Страница 82: ...e version ME version Displays the Intel ME firmware version CPU Displays the type of processor installed CPU Frequency Displays the speed of the processor CPU L3 Cache Displays the processor cache siz...

Страница 83: ...y when this option is off USB Wake Support Allows you to enable USB devices to wake the computer from standby or to disable the USB wake support feature NOTE If USB Powershare is enabled a device conn...

Страница 84: ...nu For more information see Advanced Menu Performance Options on page 85 SATA Operation Allows you to configure the operating mode of the integrated SATA hard drive controller AHCI SATA is configured...

Страница 85: ...r limit Set Duration Limit Allows you to set the turbo mode power limit 2 values in watts Bus Clock Current Frequency Displays the current bus clock frequency New Frequency in 10KHz increments Allows...

Страница 86: ...device Wireless Switch Hotkey Allows you to disable all internal wireless devices Security Menu Supervisor Password Displays if the supervisor password is clear or set User Password Displays if the u...

Страница 87: ...o exit System Setup and save your changes to CMOS Save Change Without Exit Allows you to remain in System Setup and save your changes to CMOS Exit Discarding Changes Allows you to exit System Setup an...

Страница 88: ...or Express Service Code a Select one of the following options Automatically detect my Service Tag for me Choose from My Products and Services List Choose from a list of all Dell products b Click Cont...

Отзывы: