Operation
18
Adjusting the spray pattern
CAUTION!
Risk of injury!
Improper handling of the paint spray system can cause injury.
− Never depress the trigger when adjusting the air cap.
− Before each adjustment, ensure that the paint spray system has been
switched off.
You can set three different spray patterns on the paint spray system to suit the appli-
cation and object (see
Fig. G
):
Position Property
Application
A
Vertical flat jet
Horizontal surfaces
B
Horizontal flat jet
Vertical surfaces
C
Round jet
Corners, edges, hard-to-reach surfaces
Setting the spray pattern for the spray unit for lacquers and glazes
When turning the adjusting ring, ensure that you do not loosen the
union nut or unscrew it from the spray unit. If necessary, re-tighten the
union nut after the spray pattern required has been set by turning it
clockwise.
− Turn the adjusting ring
12
on the union nut clockwise or anticlockwise to move
the air cap
19
to the spray pattern position required (see
Fig. G
).
Setting the spray pattern for the spray unit for interior wall paints
1. Loosen the union nut
4
slightly by turning it anticlockwise.
2. Turn the air cap
19
to the spray pattern position required (see
Fig. G
).
3. Hold the air cap firmly and tighten the union nut by turning it clockwise.
Controlling the flow of material
The flow of material can be controlled as required using the adjusting screw
7
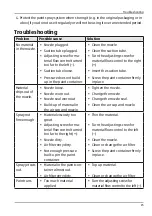
for
material flow control on the trigger
6
(see
Fig. D
). A scale is provided on the trigger
as a guide.
− Turn the adjusting screw anticlockwise (
–
) to reduce the quantity of material.
− Turn the adjusting screw clockwise (
+
) to increase the quantity of material.


