background image


42

If you require any technical guidance or find that your product is not operating as intended, a simple solution can often be found in the 

Troubleshooting 

section of these instructions,

TV systems management

Let’s get started

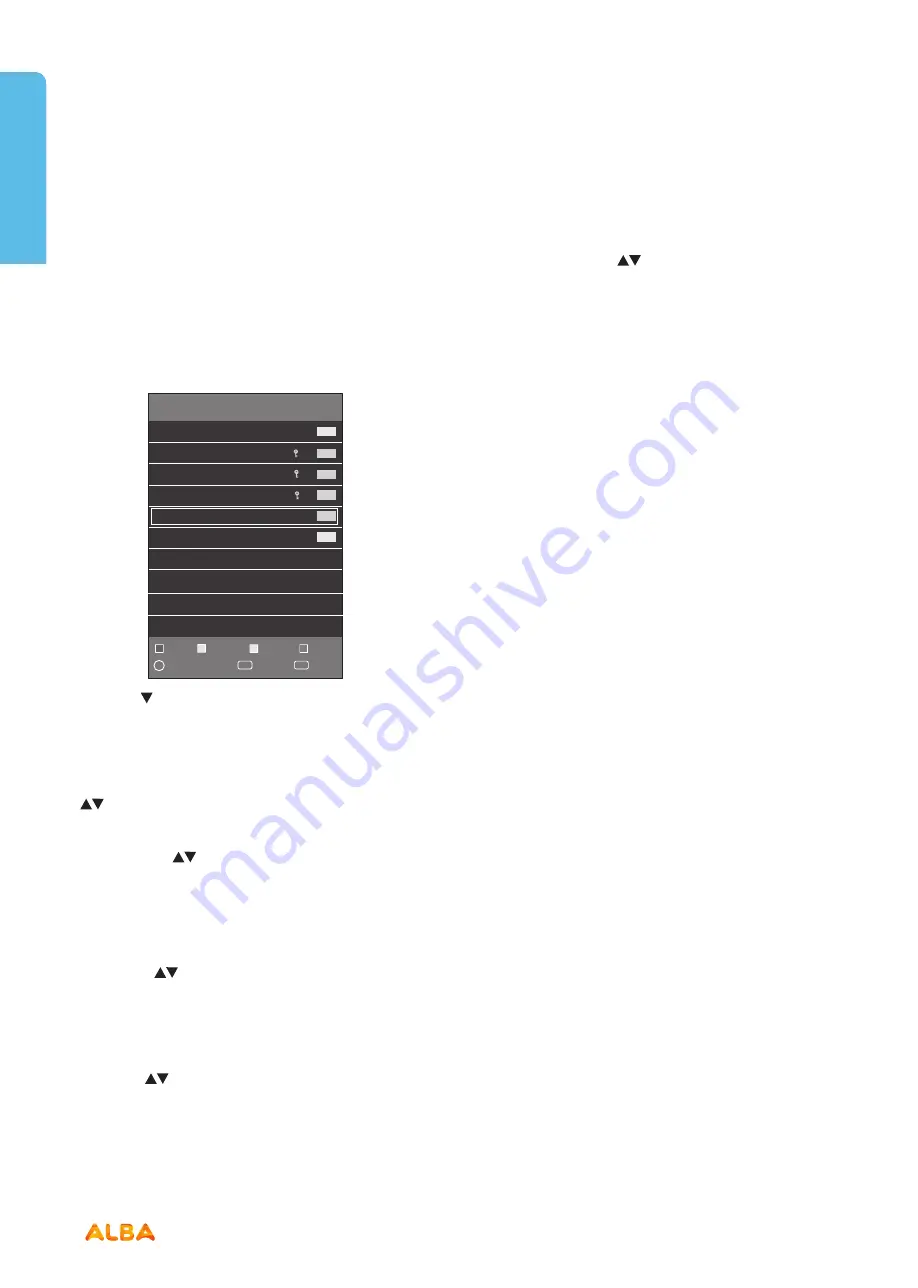
Channel Edit

Allows you to edit TV channel information in the Channel 

List.

1. Press the 

MENU

 button to display the main interface 

and then select 

CHANNEL

 menu to enter the Channel 

Edit.

2.  Press the   button to select 

Channel Edit

 and

     press the OK button on the remote control to open

     the submenu.

Delete: 

Highlight the channel you want to delete using 

the 

 buttons. Press the 

RED

 button on the remote 

control to delete the programme from the 

EPG 

menu.

Rename:

 Use the 

 buttons to highlight the channel 

you 

want to rename in the EPG menu and press the GREEN 

button on the remote control to rename.(only available in 
ATV mode)

Move: 

Use the 

 buttons to highlight the channel you 

want to move in the 

EPG

 menu and press the 

YELLOW


button on the remote control. Move the channel to the 

position you want it in and press the yellow button again.

Skip: 

Use the 

 buttons to highlight the channel you 

want to skip in the 

EPG 

menu and press the BLUE button 

on the remote control.

Fav: 

Select the channels you want to add to your 

favourites list using the 

 buttons then press the 

FAV 

button on the remote control to confirm.

Signal Information

Allows you to view the signal strength  of the selected 

channel TV signals.     

CI (Common Interface)

Digital TV channels only

This function allows you to view the common interface 

module information.

Important:

 Do not keep removing and Resetting the 

Common Access Module as it could damage the 
interface and cause a malfunction.

Favour

Fav

Select

Back

Channel Edit

Delete

2   C1

DTV

1   Barnkanalen

DTV

3   C2

DTV

4   C4

DTV

1   BBC1

ATV

2   S-03

ATV

Move

Skip

OK

MENU

Rename

TV systems management

Содержание LE-28GA06-B3+DVD

Страница 1: ...28 LED TV with DVD Player Instruction manual LE 28GA06 B3 DVD...

Страница 2: ...help you get the most from your TV Should you require any guidance a simple solution can often be found online at www argos support co uk If you still require further assistance call one of our exper...

Страница 3: ...Watching Recorded Programmes 33 5TV systems management Picture Menu 38 Sound Menu 39 Channel Menu 40 Lock Menu 44 Time Menu 45 Settings Menu 47 6Entertainment Features Using The USB Features 52 Viewi...

Страница 4: ......

Страница 5: ...5 Safety information 1...

Страница 6: ...torms and lightning when going on holiday or when the TV is not used for a long period of time disconnect the power cord from the mains power socket Do not place the TV furniture etc on the power cord...

Страница 7: ...y result in fire electrical shock or other hazards Handling discs To keep the disc clean only handle the disc by its edge Do not touch the surface Do not stick paper or tape on the disc If the disc is...

Страница 8: ......

Страница 9: ...9 Getting Started 2...

Страница 10: ...Volume Limiting PLL Frequency Search PC input Plug Play for Windows 98 ME 2000 XP Vista DVD Features DVD CD CD R CD RW MP3 JPEG MPEG playback NTSC PAL playback according to disc content LPCM audio via...

Страница 11: ...the screen can cause eyestrain Soft and indirect lighting is recommended for comfortable viewing Allow enough space between the TV and the wall to permit ventilation Avoid excessively warm locations t...

Страница 12: ...DTV mode 6 P MODE Select picture mode Dynamic Standard Mild Personal 7 S MODE Select sound mode Standard Music Movie Personal 8 TV RD Select TV program or Radio program DTV mode 9 LANG Select DTV aud...

Страница 13: ...tuner memory 19 MENU Display the OSD On Screen Display menu 20 EXIT Exit the OSD On Screen Display menu 21 Press once to stop USB DVD mode FAV Display the Favourite Channel list ATV DTV mode 22 Recor...

Страница 14: ...To select the page number of the index from teletext ATV DTV mode AUDIO Press repeatedly to switch amony audio option if available DVD mode 31 REVEAL Reveals hidden information such as the answer to...

Страница 15: ...t signal sources 6 MENU button Displays the OSD on screen display menu 7 Press to eject disc DVD mode 8 Press to start playback or pause DVD mode 9 button Turns the TV on when in standby mode or turns...

Страница 16: ...he remote control is not going to be used for long periods of time the batteries should be removed Otherwise the remote control may be damaged caused by battery leakage and corrosion Batteries Switchi...

Страница 17: ...ct Access Press number buttons on the remote control to select programmes between 0 and 9 The TV will switch to the selected channel To Program Your SKY Remote For Your TV Set up your Sky Q remote to...

Страница 18: ...Reverse Slow motion play is not available In some cases the subtitle language will not be changed immediately to the selected one When the preferred language will not select even after pressing the b...

Страница 19: ...e X Rapid reverse TITLE SIZE Display disc menu if available Display disc menu if available X X SUBTITLE Subtitle on off Press repeatedly to switch between subtitle option Subtitle on off Press repeate...

Страница 20: ......

Страница 21: ...21 Connections 3...

Страница 22: ...to the back of the TV before mounting on the wall Insert or remove the CI module only when the TV is SWITCHED OFF You should refer to the module instruction manual for details of the settings The Each...

Страница 23: ...ontrol to turn the TV on The red LED indicator on the front of the TV will turn blue then you will go to the First Time Installation menu 5 Language is preset to English 6 Press buttons to select coun...

Страница 24: ...ondary Region menu will open use the buttons to select your secondary region then press the OK button 12 After pressing the OK button the Channel Tuning menu will be displayed again for a few minutes...

Страница 25: ......

Страница 26: ......

Страница 27: ...27 How to use your TV 4...

Страница 28: ...only Your TV has an Electronic Programme Guide EPG to help you navigate through all your possible viewing options The EPG supplies information such as programme listings start and end times for all av...

Страница 29: ...l display on the left top of the selected programme Mode Once Mode Everyday Mode Every Week GREEN button Prev Day Press the green button to scroll through the previous 7 days of programmes Note This o...

Страница 30: ...3 You can also press the RED button on the remote control instead of the TTX button when the red Teletext logo is shown on the TV screen 4 Press the TTX button again to exit the Teletext menu How to...

Страница 31: ...the II button on the remote control to show the PVR Time Shift progress bar 3 Use the buttons to select the button on the progress bar then press the OK button to start watching the programme will be...

Страница 32: ...tton I Press to jump backwards approximately 30s of the recording time I Press to jump forwards approximately 30s of the recording time Press to stop the Time Shift recording RECORDING DTV PROGRAMMES...

Страница 33: ...o the TV you need to firstly select one of them and then press OK to confirm and select MOVIE to enter 3 Use the buttons to select _MSTPVR and press OK button to confirm 4 Use the buttons to select th...

Страница 34: ...tedly to rewind at x2 x4 x8 x16 x32 speeds FF Press repeatedly to fast forwards at x1 x2 x4 x8 x16 x32 speeds Repeat Press to select the repeat function you want Choose form NONE ONE SEQUENCE RANDOM T...

Страница 35: ......

Страница 36: ......

Страница 37: ...37 TV systems management 5...

Страница 38: ...option s setting Picture Mode Choose between Dynamic Standard Movie Personal modes Contrast Adjusts the difference between light and dark levels in the picture Brightness Increases or decreases the am...

Страница 39: ...Volume Level Turn On Off to automatically adjust volume levels e g volume levels in adverts are generally louder than programmes DTS TruSurround Switches the virtual surround sound feature on or off D...

Страница 40: ...e following options and use buttons to adjust each option s setting Auto Tuning 1 Select the Auto Tuning submenu and press the OK button to confirm 2 Use the buttons to select the tuning type among DT...

Страница 41: ...do small adjustments to improve the signal IMPORTANT If the number about to save is the same as a channel that is already being used the manually adjusted channel will replace the existing channel Dig...

Страница 42: ...name only available in ATV mode Move Use the buttons to highlight the channel you want to move in the EPG menu and press the YELLOW button on the remote control Move the channel to the position you wa...

Страница 43: ...show press the EXIT button on the remote control to close the Recorded List menu Schedule List Use the button to select Scheduled List from the menu and press the OK button to display the menu You can...

Страница 44: ...is 0000 before you can change any of the settings in the lock menu 1 Press MENU button to display the main interface then use buttons to navigate and select LOCK menu and press OK button to enter 2 P...

Страница 45: ...ttons Choose the age rating you want and press the OK button to confirm Key lock Use to lock the remote control you must enter the password before the remote control will function Turn key lock on and...

Страница 46: ...nent YPbPr DVD PC HDMI1 HDMI2 HDMI3 Composite AV Press the button and select a channel for TV or Radio using the buttons Press the button and set the volume using the buttons After you have finished s...

Страница 47: ...ng Impaired First Time Installation Software Update USB Restore Factory Default PVR File System TV systems management 1 Press MENU button to display the main interface then use buttons to navigate and...

Страница 48: ...tton to confirm Press the MENU button to return to the SETTINGS menu Hearing Impaired Shows additional information for people with impaired hearing when switched on if supported by the broadcaster Use...

Страница 49: ...lectronics Control CEC so that you can control up to 15 CEC enabled devices that are connected through HDMI directly from one remote control Please note CEC also allows for individual CEC enabled devi...

Страница 50: ......

Страница 51: ...51 Entertainment Features 6...

Страница 52: ...ion of the USB hard disk please use an appropriate power adapter with the hard disk If you are using a USB Hub please ensure its mains adapter is connected to the mains supply as the total current con...

Страница 53: ...the function List of functions Previous Press to watch the previous programme in the playlist Next Press to watch the next programme in the play list Play Pause Press to play pause the programme Stop...

Страница 54: ...on Bar will be displayed Use the buttons to select the different functions available on the function bar press the OK button to select the function List of functions Previous Press to skip to previous...

Страница 55: ...vious Press to view the previous photo Next Press to view the next photo Play Pause Press to play pause the programme Stop Press to go back to the menu Rotate Press to rotate clockwise Rotate Press to...

Страница 56: ...press the OK button Use the buttons to select the USB device you want to look in if more than one device is connected to your TV then press the OK button Use the buttons to navigate through the folde...

Страница 57: ......

Страница 58: ......

Страница 59: ...59 Using the DVD Features 7...

Страница 60: ...button to confirm Press the button on the unit or the button on the remote control to start playing 4 Press the button if you want to remove the disc Using the Bulit in DVD Player Disc Types Disc Log...

Страница 61: ...ressing the button will restart the disc from the beginning If the current track is the last one pressing the button will stop the playback For DVD discs the above functions may very due to different...

Страница 62: ...m Press the Aspect button to select the size you want Goto for DVD CD Multimedia discs This function allows you to play your favourite Title Chapter Time Press the GOTO button to activate the on scree...

Страница 63: ...ge Setup menu and then press the buttons to select the menu options Press the Setup button to exit the menu In Setup mode the disc playback function will not be available OSD Set the OSD language to y...

Страница 64: ...p TV System Brightness Contrast 4 3 LB 4 3 PS 16 9 OK Screen Saver Last Memory TV Display 4 3 Pan Scan Widescreen picture shown in the full screen with some part cut 4 3 Letter box Widescreen picture...

Страница 65: ...ess Contrast Using the DVD Audio Setup Page In the DVD mode press the SETUP button on the remote control Press the buttons to select the Audio Setup menu and then press the buttons to select the menu...

Страница 66: ...enter setup To change the password you need to 1 Input old password for initial use please enter factory default password 8899 2 Input a new 4 digit password and then press the OK button to If you fo...

Страница 67: ......

Страница 68: ......

Страница 69: ...69 Other information 8...

Страница 70: ...de W 0 5W Maximum Power W 50W Standby Mode After 4 Hours Digital reception MHEG 5 ENGINE compliant with ISO IEC 13522 5 UK engine Profile 1 for UK Object carousel support compliant with ISO IEC 135818...

Страница 71: ...maged it must be replaced by a qualified electrician Connect blue lead to N Neutral Connect brown lead to L Live k i 5 Energy label This is called the product Fiche the information needs to be present...

Страница 72: ......

Страница 73: ...73 Product Support 9...

Страница 74: ...itable plugs used to connect the aerial 6 If you are in doubt consult your dealer No sound 1 Has the TV been set to mute To cancel mute press the button or increase the volume level 2 Sound is coming...

Страница 75: ...the information can be recorded a DVD disc has a greater capacity than a single 1 2mm thick disc Since the two thin discs are adhered to each other there is the potential to achieve doule sided play...

Страница 76: ...d Packaging materials such as foil bag must be kept away from children Information for Users on Disposal of old Equipment and Batteries European Union only These symbols indicate that equipment with t...

Страница 77: ...of purchase You can find these on the rating plate a small information panel usually a sticker or metal plate on the rear of your product This will be shown on your receipt Local call rates applies Li...

Страница 78: ...ironment and human health Presence of this label on the product means it should not be disposed of as unsorted waste and must be collected separately As a consumer you are responsible for ensuring tha...

Страница 79: ...g this period by the dealer from who your purchased the unit The guarantee is subject to the following provisions The guarantee does not cover accidental damage misuse cabinet parts knobs or consumabl...

Страница 80: ...Contact www argos support co uk Helpline 0345 604 0105...

Отзывы: