


65
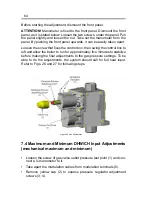
• Turn the red pressure regulator adjustment screw (3) clockwise up to
its end position.
• Set the maximum pressure to the desired value by rotating the pres
-
sure regulator adjustment screw (4) with a 10 mm spanner. Turning
clockwise increases and anti-clockwise reduces the pressure.
• Set the minimum pressure to the desired value by rotating the red mi
-
nimum pressure adjustment screw (3). Turning clockwise increases
and anti-clockwise reduces the pressure.
• Replace yellow pressure regulator cap (2) and the modulation cab
-
les.
NOTE:
For I3+ category adjusted appliances, where adjustment of the
maximum pressure is not allowed and gas supply pressures do not ex-
ceed 29 mbar for G30 (butane) and 37 mbar for G31 (propane), set the
maximum pressure regulator adjustment screw to its maximum position,
then set the minimum pressure regulator adjustment screw as above.
ATTENTION! To disable unauthorized persons’ interference, the yellow
cap on the gas valve should be painted with a red paint to seal it.
7.5 Final Operational Checks
• After the gas pressure have been set check for correct modulation as
follows.
• Set the DHW knob to the max level and fully open a hot water tap.
Check that the desired maximum burner pressure is attained.
• Slowly close the hot tap and note that modulation takes place.
• Close the tap and check that the burner goes off.
7.6 Commissioning – Heating System
•
Fully open all radiator valves.
•
Set the heating system in operation and balance the radiators.
Содержание HARMONY - D
Страница 1: ...1 USERS INSTALLATION AND SERVICING INSTRUCTIONS HARMONY D ...
Страница 2: ...2 Code No A 1 2 8i Publishing Date 200114 Revision Date 200114 ...
Страница 36: ...36 HARMONY_D USERS INSTALLATION AND SERVICE MANUAL 27 Figure 15 Wall Connections Figure 16 Extensions Elbow ...
Страница 70: ...70 HARMONY_D USERS INSTALLATION AND SERVICE MANUAL 55 Appendix A FAULT DETERMINATION ...
Страница 71: ...71 ...