background image

• Mode Switching:


1. Swipe from left to right on the home page. 
2. Click “Mode Switch” to enter Photo Mode.

• Personalized Settings:


Swipe up to enter the personalized settings and adjust to specifications. 

• Playback:


Swipe right to enter the playback page and record videos, preview, or delete photos.

• Camera Settings:


Swipe down to turn on the specification settings interface and set the general settings.

6

133:48

4K30  4:3

00:00/00:52

Record video

Video Setting

Resolution

4K  30

EV

0EV

ISO

Auto

Metering

Auto

Turn off

Image Stabilization

CAM

White Balance

Preferences

14:54

Function Specifications

Swipe up – 

specification settings

Swipe down –

 general settings

Swipe left – 

quick switch to Photo Mode

Swipe right - 

playback

EN

6

Содержание Brave 8

Страница 1: ...USER MANUAL AKASO Brave 8 Action Camera V2 3...

Страница 2: ...tting Started Overview Of Modes Comprehensive Functions Instructions Camera Settings Resolution Setting Personalized Setting Connecting To App Playing Back Your Content Connecting To Usb Maintaining Y...

Страница 3: ...2 Remote Control x 1 Battery Charger x 1 Battery x 2 Handle Bar Pole Mount x 1 Mount x 7 Lens Cloth x 1 Tethers x 5 Bandages x 4 USB Cable x 1 Remote Control Strap x 1 Double Sided Tape x 2 V2 0 Quic...

Страница 4: ...3 10 9 8 YOUR BRAVE 8 4 5 6 7 1 2 EN 2...

Страница 5: ...tor Screen Mode Button Battery Cover 9 10 11 Note on Buttons Function Power Button Press to wake the device from sleep Press and hold to power on o Mode Button Press to switch mode Press and hold to s...

Страница 6: ...when recording a video 4 Photo Mode switch modes or display the current mode 5 Resolution Ratio display current resolution ratio or set the resolution ratio 6 Zoom adjust the shooting angle 7 Photo P...

Страница 7: ...t memory card capacity maximum of 512GB 4 The FAT32 format memory card will stop recording when the storage of each le exceeds 4GB and start to record again on a new le POWERING ON OFF To Power On Pre...

Страница 8: ...rd videos preview or delete photos Camera Settings Swipe down to turn on the speci cation settings interface and set the general settings 6 133 48 4K30 4 3 00 00 00 52 Record video Video Setting Resol...

Страница 9: ...ote that comparing to time lapse mode this function improves the anti shake feature but the clarity will slightly decrease Slow Motion Video Mode It uses high resolution to shoot videos and can slow d...

Страница 10: ...from the phone will have the correct SuperSmooth function only when SuperSmooth is enabled in the APP Zoom Click Touch the screen to zoom in or out it helps take close up shots 4K30 16 9 COMPREHENSIV...

Страница 11: ...camera then turn on the included remote you can control the camera using the remote Standard NTSC default PAL Code H 264 default H 265 Choose H 265 for video encoding the video volume will be reduced...

Страница 12: ...tor Light On default O Video Sound On default O Sound 0 100 Volume On default O Key Tone Beep Tone Photo Beep Tone Adjustable Gyroscope On O default Swipe down to general settings press Press and hold...

Страница 13: ...16 9 1440P 1080P Multiple speed 2x 5x 10x 15x 30x Image Stabilization O Image Stabilization SuperSmooth Slow Motion Video Mode Resolution ratio 2 7K 1440P 1080P 720P Multiple speed 2x 4x 8x 16x NTSC 4...

Страница 14: ...5min 10min 30min 1h 48M 12M 133 48 2 7K30 4 3 Resolution Ratio Note Video Functions Speci cations 4K30 4 3 4K60 16 9 4K30 16 9 2 7K90 4 3 2 7K60 4 3 2 7K30 4 3 2 7K120 16 9 2 7K90 16 9 2 7K60 16 9 2...

Страница 15: ...ization feature will cut the visual area SuperSmooth Enhanced Image Stabilization will cut the visual area After this function is enabled on the camera the video needs to be exported from the APP to e...

Страница 16: ...videos of 15s or 30s continuously when the memory card is full the camera will delete the earliest videos automatically to guarantee the shooting Audio Stereo HM Stereo recording the audio with stere...

Страница 17: ...ite Balance Auto 2300K 2800K 3200K 4000K 4500K 5000K 5500K 6000k 6500K Select the color of photos and videos Sharpness 0 1 2 3 4 5 6 Set the level of detail for videos and photos shooting Color Normal...

Страница 18: ...the camera by default Wi icon on the quick menu Wireless connection under the Settings CONNECTING TO APP Preferences 14 54 Voice Control Language Standard Code Wireless Connection Wireless Connection...

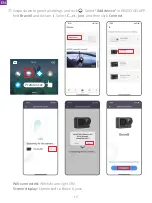
Страница 19: ...ipe down to general settings and click Select Add device in AKASO GO APP nd Brave8 and click on it Select C ct Join and then click Connect Wi connected Wi indicator light ON Screen display Connected t...

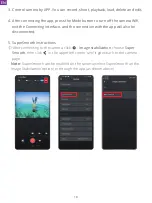
Страница 20: ...the connection with the app will also be disconnected 5 SuperSmooth Instructions After connecting to the camera click Image stabilization choose Super Smooth then click in the upper left corner until...

Страница 21: ...Click choose the video with click and select Download Supersmooth then the video downloaded on the phone will be the one with the correct supersmooth e ect 00 00 52 00 00 52 Supersmooth EN 19...

Страница 22: ...click Upgrade rmware on the pop up window Then click Download Note Please insert the memory card before upgrading the rmware You can also choose Do not upgrade now Click Connect and then click Select...

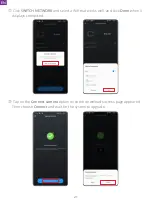
Страница 23: ...ETWORK and select a Wi that works well and click Done when it displays connected Tap on the Connect camera option once the download success page appeared Then choose Connect and wait for the system to...

Страница 24: ...Now just click Try it now and the camera rmware has been upgraded to the latest version EN 22...

Страница 25: ...e Delete icon to delete les and click the Select icon to settle les PLAYING BACK YOUR CONTENT Plug in the cable when the camera powers on and select USB storage copy les from memory card to PC Select...

Страница 26: ...Wireless Connections when not using Capture videos at lower frame rates and resolutions Use screen protection setting Battery storage and operation Do not expose the camera to extreme cold or hot wea...

Страница 27: ...th Set and Record button Press Set and Record button at the same time until the red and blue lights are on for 1 second and then release The screen will display the current camera status information a...

Страница 28: ...ode 4 Turn o the Camera Function Operation Detail Controls the Camera to Shutdown Press and hold the Power button for 5 seconds Press and hold the Power button for 5 seconds you can control the camera...

Страница 29: ...ACCESSORIES EN 27...

Страница 30: ...ducts please feel free to contact us We will respond within 24 hours Tel 888 466 9222 US Email cs akasotech com Web www akasotech com The microSD microSDHC microSDXC and SD marks and logos are tradema...

Отзывы: