


OG-UDC 3G-SDI Up, Down, Cross-Converter v1.0 14 www.aja.com
Front OG-UDC Card Installation
1. Open the openGear frame door as follows:
A. Gently pull the side door tabs towards the center of the door, releasing the
door from the frame.
B. Using both hands, pull the door towards you. The door extender arms
prevent the door from falling.
2. Locate the Rear Card you installed as described above. The interior slot
number is dependent on the slot combinations into which you installed the
Rear Card. This allows adequate spacing to avoid damaging the card, the
cards installed in the neighboring slots, or both.
3. Hold the card by the edges and carefully align the card edges with the rails
inside the frame. The slots are numbered starting from the left-most slot
when facing the frame front.
IMPORTANT: OG-UDC cards are installed into the right (even numbered) slot of the pair in
order to connect with the rear panel.
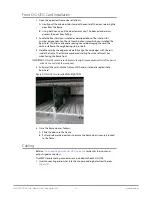
4. Fully insert the card into the frame until the card is properly seated in the
Rear Card.
Figure 9. OG-UDC card
inserted Into Right Slot
5. Close the frame door as follows:
A. Slide the door into the frame.
B. Pull and release the door tabs to ensure the frame door is securely locked
to the frame.
Cabling
Refer to
"I/O Connections for the OG-UDC" on page 6
to identify the input and
output signal connectors.
Two WECO audio mating connectors are included with each OG-UDC.
1. Insert connecting audio wires into their corresponding holes from the rear
(
Figure 10)
.