ULTIMA 2000
Chillers
Chillers
Installation & Maintenance Manual : 903-099 IM E 05/00
27
Commissioning Data
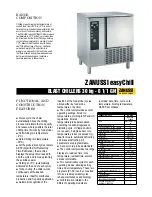
ELECTRICAL DATA
compressor Start-Up
Information
6
4
2
6
4
2
6
4
2
L1
L2
L3
PE
5
3
1
OL1
6
5
4
3
CP1
2
1
6
5
4
3
CP3
2
1
6
5
4
3
CP5
2
1
5
3
CP7
1
POWER
FACTOR
CORRECTION
CAPACITOR
5
3
PF1
1
RED
YEL
BLU
CB1
6
5
4
3
2
1
CLIENTS
INCOMING
SUPPLY
400/3/50
W
U
PRR1
V
PHASE
ROTATION
RELAY
6
5
CB2
4
3
2
1
1 4
12
11
1 4
12
11
E
COMPRESSOR
3~
X
Z
Y
U
V
W
M1
RED
YEL
BLU
POWER
FACTOR
CORRECTION
CAPACITOR
RED
YEL
BLU
RED
YEL
BLU
RED
YEL
BLU
RED
YEL
BLU
RED
YEL
BLU
RED
YEL
BLU
POWER FACTOR CORRECTION
OPTIONAL EXTRA
CLOSED TRANSITION START
OPTIONAL EXTRA
new
Starting Sequence (Star-
Delta Starting)
CP5
On
CP1
On
CP5
Off
CP3
On
5 Sec ± 1
< 40 ms
Star
Delta
new
Operational Sequence
new
Refrigerant Charge
Liquid refrigerant should be charged into the condenser before compressor starting to
ensure that refrigerant is present at compressor start-up.
new
Crankcase Heater
The mains supply to the crankcase (oil) heater should be switched on at least 8 hours
prior to compressor starting to avoid refrigerant migration.
new
Pre-Start-Up Check
Before compressor start-up, make sure that an oil level is showing in the compressor
sight glass, and that all refrigerant ball valves are opened, including the liquid
injection line.
new
Checks at Compressor
Start-up
As soon as the compressor starts, make sure that the solenoid valve for liquid injection
opens, and that the suction and liquid/discharge pressure gauges are showing low and
high pressures respectively.
new
If there is no liquid present or no differential pressure occurs, isolate immediately.
new
CAUTION
Check phase rotation by connecting pressure gauges to the suction and
discharge ports.
new
Liquid Injection
Never shut down the liquid injection circuit whilst the compressor is still running, at any
loading condition as this may permanently damage the compressor.
new