(217) 352-9330
|
[email protected]
artisantg.com
Find the
Keysight / Agilent J1407A OmniBER 720
at our website:
Click HERE
Страница 1: ...tilized and idle equipment along with credit for buybacks and trade ins Custom engineering so your equipment works exactly as you specify Critical and expedited services Leasing Rentals Demos In stock...
Страница 2: ...U K 05 00 J1407 90003 User Guide OmniBER 720 In This Book This book tells you how to select and use the various instrument functions available Artisan Technology Group Quality Instrumentation Guarante...
Страница 3: ...rticular purpose Agilent Technologies shall not be liable for errors contained herein or for incidental or consequential damages in connection with the furnishing performance or use of this material W...
Страница 4: ...User Guide OmniBER 720 OmniBER 720 SONET_Usr bk Page 1 Wednesday December 13 2000 11 11 AM Artisan Technology Group Quality Instrumentation Guaranteed 888 88 SOURCE www artisantg com...
Страница 5: ...ing logging and printing results with general printer information Using instrument and disk storage Using the OTHER features The selections available will depend on the options fitted to your instrume...
Страница 6: ...Setting Receive Interface 30 Selecting Test Features SDH Operation Using Transmit Overhead Setup 32 Using Receive Overhead Monitor 34 Setting Overhead Trace Messages 36 Setting Overhead Labels 37 Gene...
Страница 7: ...ncy Offset 84 Adding Errors and Alarms 85 Adding Pointer Adjustments 86 Jitter Caused by Pointer Adjustments 86 T1 105 GR 253 Pointer Sequences Explained 88 Using Pointer Graph Test Function 94 Stress...
Страница 8: ...TE Testing 127 TCTE Source Testing 127 TCTE Sink Source Testing 132 Storing Logging and Printing Saving Graphics Results to Instrument Store 134 Recalling Stored Graph Results 135 Viewing the Bar Grap...
Страница 9: ...to Disk 171 Saving Configurations to Disk 173 Recalling Configuration from Disk 174 Copying Configuration from Instrument Store to Disk 175 Copying Configuration from Disk to Instrument Store 177 Man...
Страница 10: ...or 195 Dumping Display to Disk 196 Running Self Test 198 Background Patterns SDH Operation 202 SONET Operation 203 ETSI ANSI Terminology ETSI ANSI Conversion and Equivalent Terms 206 Glossary of Terms...
Страница 11: ...8 List of Contents SONET_Usr bk Page 8 Wednesday December 13 2000 11 11 AM Artisan Technology Group Quality Instrumentation Guaranteed 888 88 SOURCE www artisantg com...
Страница 12: ...to the Network page 12 Connecting Accessories page 16 Front Panel Soft Recovery Cold Start page 17 OmniBER 720 Options page 18 SONET_Usr bk Page 9 Wednesday December 13 2000 11 11 AM Artisan Technolo...
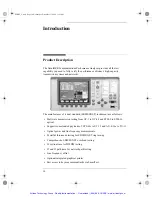
Страница 13: ...ptical Supports concatenated payloads of STS 48c to VT 1 5 and AU 4 16c to TU 11 Optical power and line frequency measurements Powerful thru mode testing for SDH SONET ring turn up Comprehensive SDH S...
Страница 14: ...from one instrument setting to another This is an example of a pop up menu Pop up menus are an alternative way of selecting instruments settings instead of using softkeys To access a pop up menu high...
Страница 15: ...All Connectors CAUTION When connecting or disconnecting ensure that you are grounded or make contact with the metal surface of the Mainframe with your free hand to bring you the module and the mainfr...
Страница 16: ...ollowing practices are observed during system operation ALWAYS DEACTIVATE THE LASER BEFORE CONNECTING OR DISCONNECTING OPTICAL CABLES When connecting or disconnecting optical cables between the module...
Страница 17: ...PRODUCT translates as follows Finnish LUOKAN 1 LASERLAITE Finnish Swedish KLASS 1 LASER APPARAT This label indicates that the radiant energy present in this instrument is non hazardous OPTICAL IN Allo...
Страница 18: ...al fibre of the fixed connector requires further cleaning this entails disassembly of the module which should only be carried out by suitably trained service personnel 4 Apply some isopropyl alcohol t...
Страница 19: ...vailable for remote control Remote Control GPIB RS232 10 BASE T Remote control connection is given in the Remote Control Manual The port selected for remote control use is not available for an externa...
Страница 20: ...he softkeys pressed 4 When the LOS LED has flashed OFF and then ON again the keys can be released 5 The LOS LED will flash OFF ON again several times 7 followed by an audible beep and the display indi...
Страница 21: ...ce analyzer mainframe J1407A OC 48 12 3 1 and STM 16 4 1 0 transmit and receive 1310 nm optical interfaces 104 SDH only 001 SDH SONET dual standard 002 SONET only 003 LAN GPIB and RS 232 remote contro...
Страница 22: ...o match the network being tested Setting Transmit Interface page 20 Setting THRU Mode page 24 Using Smart Test page 27 Setting Receive Interface page 30 SONET_Usr bk Page 19 Wednesday December 13 2000...
Страница 23: ...ngle VC 4 4c This VC 4 4c consists of one Path Overhead and a single container capable of carrying a tributary signal at rates up to approximately 600 Mb s Once assembled a VC 4 4c is multiplexed swit...
Страница 24: ...to OFF When the laser is on the laser symbol at the bottom right of the display is illuminated yellow HOW TO 1 Make your choice of SIGNAL rate Choose unless is required If is chosen see Setting THRU M...
Страница 25: ...ce and return to the display 5 If TU 2 mapping is chosen TU CONCATENATION selection is enabled choose or the tributary at which the concatenation begins TU2 2C through TU2 6C The BACKGROUND PATTERN IN...
Страница 26: ...test TUG 3 s Refer to Appendix A for a table of background patterns for AU 3 and TUG 3 9 If TU 12 mapping is chosen for the test TUG 3 choose the PATTERN IN OTHER TU 12 s SONET_Usr bk Page 23 Wednesda...
Страница 27: ...ough the transmitter completely unchanged The figure below illustrates the settings for this mode 2 Hitless THRU Mode This mode enables you to change the channel under test and the payload mapping wit...
Страница 28: ...select THRU MODE on the SDH display See Setting Transmit Interface page 20 2 Make the PAYLOAD OVERWRITE choice required Hitless Mode The Payload Overwrite enable disable field next to the PAYLOAD OVER...
Страница 29: ...Make the SOH POH CHANNEL OVERWRITE choice required The B1 B2 and B3 BIP s are recalculated before transmission SONET_Usr bk Page 26 Wednesday December 13 2000 11 11 AM Artisan Technology Group Quality...
Страница 30: ...tified you can select a channel of interest and explore further into the payload Smart Tests Allows you to quickly access the most commonly used instrument features such as Signal quality Functional t...
Страница 31: ...ent exits smartsetup and sets the receiver to the test pattern detected in the selected channel HOW TO Run a Smart Test Signal Quality Frequency Measurement 1 Ensure a valid signal is connected to the...
Страница 32: ...g Smart Test 6 Press to display the frequency screen Or press to exit Smart Tests SELECT CANCEL SONET_Usr bk Page 29 Wednesday December 13 2000 11 11 AM Artisan Technology Group Quality Instrumentatio...
Страница 33: ...er to be configured to the same settings as the transmitter HOW TO 1 Choose the required SIGNAL source 2 Choose mapping and type of payload 3 If TU 2 mapping is chosen and CONCATENATION is enabled cho...
Страница 34: ...40 Adding Frequency Offset page 42 Adding Errors and Alarms page 43 Adding Pointer Adjustments page 44 Using Pointer Graph Test Function page 52 Stressing Optical Clock Recovery Circuits page 54 Gene...
Страница 35: ...alues defined by ITU T If a test function is active then the overhead byte value is determined by the choices made in the Test Function If APS Messages is chosen for example K1K2 value is set by the A...
Страница 36: ...0 to 3 i e 111111 00 to 11 COC1 Sequence Binary count sequence of 0 to 3 i e 110000 00 to 11 5 If TRACE MESSAGES is chosen see Setting Overhead Trace Messages page 36 NOTE Any bit of an overhead byte...
Страница 37: ...TO 1 Set up the receive SDH interface and payload as required See Setting Receive Interface page 30 2 Choose the type of overhead to MONITOR 3 If SOH Section Overhead is chosen choose the STM 1 numbe...
Страница 38: ...message format is assumed and displayed If the CRC7 structure is not detected for J0 or J2 all 16 bytes are displayed 6 If LABELS is chosen the S1 sync status HP path label C2 and the LP Path label V...
Страница 39: ...There are two ways you can edit a user message as follows Use the edit keys at the bottom of the display JUMP PREVIOUS CHAR NEXT CHAR and that are displayed when you position the cursor on a User mess...
Страница 40: ...ttom of the display If you select USER use the softkeys at the bottom of the display to edit the label key or press then use the softkeys and pop up keypad to edit the label Detailed instructions on h...
Страница 41: ...the sequence repeatedly until STOPPED is chosen 4 Choose the overhead type as required RSOH Regenerator Section Overhead MSOH Line Overhead POH Path Overhead 5 Choose the byte or bytes of overhead re...
Страница 42: ...ically only uses three of these bytes which ones are not defined in the standards so will vary between manufacturers to gain and maintain frame synchronization In many cases the A1A2 bytes selected ar...
Страница 43: ...ive Interface page 30 2 Select SDH O H CAPTURE as shown above 3 Choose the overhead type as required RSOH Regenerator Section Overhead MSOH Multiplexer Section Overhead POH Path Overhead 4 Choose the...
Страница 44: ...ate 5 Up to 16 records of overhead state are provided Each record will represent between 1 and 64 000 frames A capture is started by pressing CAPTURE and terminates when up to 16 records have been cap...
Страница 45: ...steps using and or press for a pop up numerical keypad The amount of applied Frequency Offset can be varied while measurements are taking place If the value of the SDH line rate offset chosen is suffi...
Страница 46: ...red Errors can be added at preset rates and at USER programmable rate With the exception of ENTIRE FRAME A1A2 FRAME and BIT errors can be added at ERROR ALL rate If B2 BIP errors are chosen errors can...
Страница 47: ...the jitter on payload signals that is due to pointer adjustments Pointer adjustment activity within a network can be randomly spaced individual pointer adjustments pointer bursts or periodic pointer...
Страница 48: ...pt TU 3 the minimum spacing between adjustments is 2 ms Choose ADJUST POINTER ON to add the chosen burst NEW POINTER You can choose a pointer value in the range 0 to 782 with or without a New Data Fla...
Страница 49: ...zation sequence followed by a cool down period and then run the chosen sequence This is selected using the key shown in the display on the previous page Initialized pointer sequences are made up of th...
Страница 50: ...equence as used for the subsequent measurement sequence If the product of the period T and the selected optional background pattern 87 3 or 26 1 exceeds 60 seconds then the longer period is used for t...
Страница 51: ...selectable see Note 1 Added adjustments occur every 30 seconds G 783 c PERIODIC CANCEL Periodic Single adjustments with selectable polarity and cancelled adjustment 1 less The interval between pointer...
Страница 52: ...he minimum see Note 2 page 50 Pointer polarity is selectable The time interval between pointer adjustments can be set see Note 1 Added adjustments occur every 30 seconds or every repeat of the 87 3 pa...
Страница 53: ...1 Pattern This selection is only available if you have selected TU11 mapping or TU12 with ASYNC DS1 selected The sequence pattern is 26 pointer movements followed by 1 missing pointer movement The ad...
Страница 54: ...2 048 TU 2 34 368 TU 3 44 736 AU 3 139 264 AU 4 G 783 a Periodic Single X X X G 783 b Periodic Add X X X G 783 c Periodic Cancel X X X G 783 d Periodic Double X X G 783 e Single X X X G 783 f Burst X...
Страница 55: ...HOW TO 1 Set up the receive SDH interface and payload as required See Setting Receive Interface page 70 2 On the RECEIVE Test Function page select then choose the CAPTURE INTERVAL required The capture...
Страница 56: ...imate total capture window is as follows 1 SEC display window of approximately 5 minutes 5 SECS display window of approximately 25 minutes 20 SECS display window of approximately 1 hour 40 minutes 1 M...
Страница 57: ...the first three bytes of overhead byte 10 at 155 Mb s byte 37 at 622 Mb s and byte 145 at 2488 Mb s The remainder of the Virtual Container will contain the signal structure and pattern as defined on...
Страница 58: ...row of section overhead bytes ALL ONES a PRBS the first row of section overhead bytes ALL ZEROS a PRBS and the first row of section overhead bytes 2 If you choose ALL ONES or ALL ZEROS as the stressin...
Страница 59: ...oose the TOPOLOGY required 3 Choose the message to be transmitted If LINEAR topology is chosen choose the CHANNEL the BRIDGED CHANNEL NO the ARCHITECTURE and the RESERVED bits you require If RING topo...
Страница 60: ...he front panel of the Multirate Analyser module DCC INSERT is available on the display Select SDH then use the right cursor key to access DCC INSERT selection DCC DROP is available on the display Sele...
Страница 61: ...58 SONET_Usr bk Page 58 Wednesday December 13 2000 11 11 AM Artisan Technology Group Quality Instrumentation Guaranteed 888 88 SOURCE www artisantg com...
Страница 62: ...to match the network being tested Setting Transmit Interface page 60 Setting THRU Mode page 64 Using Smart Test page 67 Setting Receive Interface page 70 SONET_Usr bk Page 59 Wednesday December 13 200...
Страница 63: ...nal operating at rates up to approximately 600 Mb s Once assembled a STS 12c SPE is multiplexed switched and transported through the network as a single entity Benefits Test the entire bandwidth in on...
Страница 64: ...page 64 2 Make your choice of CLOCK source The clock can be internally sourced from the instrument recovered from the signal at the optical RECEIVE port or externally sourced from the CLOCK REF IN po...
Страница 65: ...pping is chosen VT CONCATENATION selection is enabled choose or the tributary at which the concatenation begins VT6 2C through VT6 6C The BACKGROUND PATTERN IN OTHER VT 6s is fixed at NUMBERED that is...
Страница 66: ...st string of n 1consecutive ones in a 2n 1 pattern The ITU T definition also applies in the US except for 215 1 and 223 1 PRBS patterns Through common practice NORMAL indicates that the PRBS pattern i...
Страница 67: ...ed through the transmitter completely unchanged The figure below illustrates the settings for this mode 2 Hitless THRU Mode This mode enables you to change the channel under test and the payload mappi...
Страница 68: ...NNEL overwrite feature is available HOW TO 1 Make the required SIGNAL RATE choice and select THRU MODE on the SONET display See Setting Transmit Interface page 60 2 Make the PAYLOAD OVERWRITE choice r...
Страница 69: ...Payload Overwrite is enabled Select the folder and setup as required 4 Make the TOH POH CHANNEL OVERWRITE choice required The Section Line and Path CVs are recalculated before transmission TEST FUNCT...
Страница 70: ...received signal has been identified you can select a channel of interest and explore further into the payload Smart Tests Allows you to quickly access the most commonly used instrument features such a...
Страница 71: ...hen select the instrument exits smartsetup and sets the receiver to the test pattern detected in the selected channel HOW TO Run a Smart Test Signal Quality Frequency Measurement 1 Ensure a valid sign...
Страница 72: ...ng Smart Test 6 Press to display the frequency screen Or press to exit Smart Tests SELECT CANCEL SONET_Usr bk Page 69 Wednesday December 13 2000 11 11 AM Artisan Technology Group Quality Instrumentati...
Страница 73: ...VT 6 mapping is chosen and CONCATENATION is enabled choose the tributary at which the concatenation begins If VT 6 VT 2 or VT 1 5 mapping is chosen choose the test tributary under CHANNEL 4 Choose the...
Страница 74: ...e ITU T definition also applies in the US except for 215 1 and 223 1 PRBS patterns Through common practice NORMAL indicates that the PRBS pattern is non inverted Therefore when the US PRBS polarity co...
Страница 75: ...72 SONET_Usr bk Page 72 Wednesday December 13 2000 11 11 AM Artisan Technology Group Quality Instrumentation Guaranteed 888 88 SOURCE www artisantg com...
Страница 76: ...e 82 Adding Frequency Offset page 84 Adding Errors and Alarms page 85 Adding Pointer Adjustments page 86 Using Pointer Graph Test Function page 94 Stressing Optical Clock Recovery Circuits page 96 Gen...
Страница 77: ...wish to set up DEFAULT Use to set all overhead bytes to the standard values defined by BELLCORE ANSI If a test function is active then the overhead byte value is determined by the choices made in the...
Страница 78: ...ence of 0 to 3 i e 111111 00 to 11 COC1 Sequence Binary count sequence of 0 to 3 i e 110000 00 to 11 4 If TRACE MESSAGES is chosen see Setting Overhead Trace Messages page 78 NOTE Any bit of an overhe...
Страница 79: ...TO 1 Set up the receive SONET interface and payload as required See Setting Receive Interface page 70 2 Choose the type of overhead to MONITOR 3 If Transport Overhead is chosen choose the STS 3 and ST...
Страница 80: ...ructure is not detected for J0 or J2 all 16 bytes are displayed 6 If LABELS is chosen the S1 sync status STS path label C2 and the VT Path label V5 are monitored 7 If APS MESSAGES is chosen choose the...
Страница 81: ...ere are two ways you can edit a user message as follows Use the edit keys at the bottom of the display JUMP PREVIOUS CHAR NEXT CHAR and that are displayed when you position the cursor on a User messag...
Страница 82: ...at the bottom of the display If you select USER use the softkeys at the bottom of the display to edit the label key or press then use the softkeys and pop up keypad to edit the label Detailed instruc...
Страница 83: ...T RUN runs the sequence repeatedly until STOPPED is chosen 4 Choose the overhead type as required SOH Section Overhead LOH Line Overhead POH Path Overhead 5 Choose the byte or bytes of overhead requir...
Страница 84: ...pically only uses three of these bytes which ones are not defined in the standards so will vary between manufacturers to gain and maintain frame synchronization In many cases the A1A2 bytes selected a...
Страница 85: ...ceive Interface page 70 2 Select SONET O H CAPTURE as shown above 3 Choose the overhead type as required SOH Section Overhead LOH Line Overhead POH Path Overhead 4 Choose the Byte or bytes of overhead...
Страница 86: ...tate 5 Up to 16 records of overhead state are provided Each record will represent between 1 and 64 000 frames A capture is started by pressing CAPTURE and terminates when up to 16 records have been ca...
Страница 87: ...m steps using and or press for a pop up numerical keypad The amount of applied Frequency Offset can be varied while measurements are taking place If the value of the SONET line rate offset chosen is s...
Страница 88: ...required Errors can be added at preset rates and at USER programmable rate With the exception of ENTIRE FRAME A1A2 FRAME and BIT errors can be added at ERROR ALL rate If CV L errors are chosen errors...
Страница 89: ...T used to compensate for frequency and phase differences between STS n SPE channels and the outgoing SONET frames These pointer adjustments are byte wide and since they can occur randomly they may cau...
Страница 90: ...en adjustments is 4 multiframes 2 ms Choose ADJUST POINTER ON to add the chosen burst NEW POINTER You can choose any pointer value in thedefined range 0 to 782 For an STS 1 pointer with or without a N...
Страница 91: ...period and then run the chosen sequence This is selected using the START INIT softkey shown in the display on the previous page Initialized pointer sequences are made up of three periods the Initiali...
Страница 92: ...e same sequence as used for the subsequent measurement sequence If the product of the period T and the selected Optional background pattern 87 3 or 26 1 exceeds 60 seconds then the longer period is us...
Страница 93: ...burst test sequence All adjustments are of the same polarity which is selectable The interval between bursts is fixed at 30 seconds Each burst consists of 7 pointer movement The first 3 in each burst...
Страница 94: ...s adjustment is set to the minimum see Note 2 The time interval between pointer adjustments can be set see Note 1 Added adjustments occur every 30 seconds or every repeat of the 87 3 pattern whichever...
Страница 95: ...ttern whichever is longer GR 253 5 32 d PERIODIC CANCEL 26 1 pattern This selection is only available if you have selected VT1 5 mapping The sequence pattern is 26 pointer movements followed by 1 miss...
Страница 96: ...ADD 26 1 A5 PERIODIC CANCEL g 87 3 A5 PERIODIC CANCEL Continuous PERIODIC CANCEL 26 1 Pointer Sequences Available with Selected Mapping POINTER SEQUENCE MAPPING SPE VT6 VT2 VT1 5 SONET_Usr bk Page 93...
Страница 97: ...OW TO 1 Set up the receive SONET interface and payload as required See Setting Receive Interface page 70 2 On the RECEIVE Test Function page select then choose the CAPTURE INTERVAL required The captur...
Страница 98: ...ximate total capture window is as follows 1 SEC display window of approximately 5 minutes 5 SECS display window of approximately 25 minutes 20 SECS display window of approximately 1 hour 40 minutes 1...
Страница 99: ...the first three bytes of overhead byte 10 at 155 Mb s byte 37 at 622 Mb s and byte 145 at 2488 Mb s The remainder of the SPE will contain the signal structure and pattern as defined on the TRANSMITTE...
Страница 100: ...row of section overhead bytes ALL ONES a PRBS the first row of section overhead bytes ALL ZEROS a PRBS and the first row of section overhead bytes 2 If you choose ALL ONES or ALL ZEROS as the stressi...
Страница 101: ...the TOPOLOGY required 3 Choose the message to be transmitted If LINEAR topology is chosen choose the CHANNEL the BRIDGED CHANNEL NO the ARCHITECTURE and the RESERVED bits you require If RING topology...
Страница 102: ...e front panel of the Multirate Analyser module DCC INSERT is available on the display Select SONET then use the right cursor key to access DCC INSERT selection DCC DROP is available on the display Sel...
Страница 103: ...100 SONET_Usr bk Page 100 Wednesday December 13 2000 11 11 AM Artisan Technology Group Quality Instrumentation Guaranteed 888 88 SOURCE www artisantg com...
Страница 104: ...king Analysis Measurements page 106 Measuring Frequency page 107 Measuring Optical Power page 108 Performing a Tributary Scan page 109 Performing a SONET Alarm Scan page 113 SONET_Usr bk Page 101 Wedn...
Страница 105: ...eceive SDH SONET interface and payload as required See Setting Receive Interface on page 30 for SDH and page 70 for SONET 3 Choose the overhead byte to be tested on the display Use the right cursor ke...
Страница 106: ...usly If any error counts are not zero then these are displayed Up to 4 non zero error counts are displayed in priority order If all error counts are zero and any alarms are detected ALARMS DETECTED is...
Страница 107: ...ror Count Priority SDH SONET B1 BIP B2 BIP B3 BIP TU BIP FRAME CRC FAS2 DS3FR DS1FR MS REI HP REI HP IEC LP REI BIT CV S CV L CV P CV V FRAME CRC DS3FR DS1FR FAS2 REI L REI P CV IEC REI V BIT SONET_Us...
Страница 108: ...2 Set the SHORT TERM PERIOD to the timing required for short term results 3 Choose the type of TEST TIMING required For manual control with choose For a single timed measurement period started with c...
Страница 109: ...p the receive SDH SONET interface and payload required See Setting Receive Interface on page 30 for SDH and page 70 for SONET 2 If required set up the SDH SONET transmit interface and payload See Sett...
Страница 110: ...on the display NOTE 1 Frequency measurement is always available even if test timing is off 2 The result is only valid if a complete sweep of the highlighted bar has occurred since the input was applie...
Страница 111: ...erface module 2 Choose the received input signal rate on the or display 3 Select or as shown above NOTE 1 Optical power measurement is always available even if test timing is off 2 The green portion o...
Страница 112: ...ttern loss The example given below is applicable for both SONET and SDH applications Tributary Scan tests each tributary for error free operation and no occurrence of Pattern Loss A failure is indicat...
Страница 113: ...required TEST TIMING The value you choose is the test time for each individual tributary and not the total test time For example 28 VT 1 5 tributaries in an STS 1 SPE the time taken to complete the T...
Страница 114: ...payload is selected e g an STS 48c within an OC 48 then Tributary Scan is disabled NOTE The keyboard is locked during tributary scan SONET_Usr bk Page 111 Wednesday December 13 2000 11 11 AM Artisan...
Страница 115: ...ame TU AIS LP RDI TU LOP The SDH Alarm Scan display can be logged to the chosen logging device See Logging on Demand page 193 HOW TO 1 Set up the receive SDH interface and payload as required See Sett...
Страница 116: ...P RDI P AIS P VT LOP V AIS V RDI V TIP The SONET Alarm Scan display can be logged to the chosen logging device See Logging on Demand page 146 HOW TO 1 Set up the receive SONET interface and payload a...
Страница 117: ...ts Performing a SONET Alarm Scan 5 Choose to start the Alarm Scan START SONET_Usr bk Page 114 Wednesday December 13 2000 11 11 AM Artisan Technology Group Quality Instrumentation Guaranteed 888 88 SOU...
Страница 118: ...dding TCM errors page 120 Adding TCM Alarms page 121 Setting up the Receiver for TCM operation page 122 Detecting TCM APId messages page 123 Viewing TCM Errors and Alarms page 125 Tandem Connection Te...
Страница 119: ...performance analysis and fault location the ability to finger point TCM Test Capability in OmniBER The TCM test functionality in the OmniBER 718 complies with G 707 Annex D and Annex E Features includ...
Страница 120: ...Set up the Transmitter as required see Setting Transmit Interface page 60 4 Set the TCM PATH field to or as required The LOW ORDER selection is enabled when a TU mapping is selected TRANSMIT SDH MAIN...
Страница 121: ...ally calculated for all three message types HOWTO 1 Press the key and select 2 Select the folder 3 Set the TCM PATH field to or as required 4 Select the folder and set up the APId messages using one o...
Страница 122: ...d and choose 8 Set the N1 or N2 field as required from DEFAULT TEST or USER If you select USER use the edit keys at the bottom of the screen to set up your message POH SONET_Usr bk Page 119 Wednesday...
Страница 123: ...ss the key and select 2 Select the folder 3 Set the TCM PATH field to or as required 4 Select the folder as shown above 5 Set the TEST FUNCTION field to and select 6 Select the ERROR ADD TYPE field an...
Страница 124: ...going Defect Indicator HOWTO 1 Press the key and select 2 Select the folder 3 Set the TCM PATH field to or as required 4 Select the folder as shown above 5 Set the TEST FUNCTION field to and select 6...
Страница 125: ...p the Receiver as required see Setting Receive Interface page 70 4 Set the TCM PATH field to or as required The LOW ORDER selection is enabled when a TU mapping is selected RECEIVE SDH MAIN SETTINGS H...
Страница 126: ...ect 2 Select the folder 3 Set the TCM PATH field to or as required 4 Select the folder and set up the APId messages using one of the following two methods Method 1 5 Select the MONITOR field and choos...
Страница 127: ...7 To view the the N1 byte message set the TYPE field to or as required 8 To view the N2 byte message select the TYPE field and set as required POH VC 4 VC 3 SONET_Usr bk Page 124 Wednesday December 1...
Страница 128: ...s give the number of errors and counts which have occurred in total since the last time was pressed 5 errors give the number of errors and counts which have occurred in the last measurement interval T...
Страница 129: ...ng Viewing TCM Errors and Alarms 6 Select to view alarms see below ALARM SECONDS SONET_Usr bk Page 126 Wednesday December 13 2000 11 11 AM Artisan Technology Group Quality Instrumentation Guaranteed 8...
Страница 130: ...ntroduction The following procedure gives an example of testing a TCTE source which originates a VC 4 link over STM 1 In the procedure a valid SDH signal is sent from the OmniBER to the TCTE Source an...
Страница 131: ...rs confirms that TCM is configured correctly 6 Check for correct TC APId access point identifier as follows 7 Press and select 8 Select the folder 9 Set the Receiver settings to match those of your sy...
Страница 132: ...ect 14 Select the folder 15 Set the TEST FUNCTION field to and select 16 Select an ERROR ADD TYPE and RATE for this example we have chosen to add B3 BIP errors at a rate of 1E 5 as shown below 17 Pres...
Страница 133: ...o view results select and 20 Set the RESULT TYPE field to Alarms Testing Method Send an invalid VC 4 to the TCTE under test and check that the OmniBER Receiver registers an TC IAIS alarm 21 Press the...
Страница 134: ...SULTS folder an example is given below 24 Verify that the signal label in C2 or V5 is set to all ones which indicates a VC AIS 25 Press to end the test RUN STOP SONET_Usr bk Page 131 Wednesday Decembe...
Страница 135: ...IP errors without IEC errors or IEC errors without BIP errors gives rise to a non zero result when the TCTE calculates B3 IEC These errors are counted as TC errors that is errors occurring on the TCM...
Страница 136: ...Parallel Centronics Printer page 148 Logging Results to GPIB Printer page 149 Logging Results to Internal Printer page 150 Logging Results to RS 232 C Printer page 151 Logging Data to Disk page 152 Pr...
Страница 137: ...the ZOOM capability when viewing the bar graphs If 1 MIN is selected 1 MIN BAR 15 MINS BAR and 60 MINS BAR are available If 15 MINS is selected 15 MINS BAR and 60 MINS BAR are available If 1 HOUR is s...
Страница 138: ...APHICS on the FLOPPY DISK display See Recalling Graphics Results from Disk page 170 3 Choose if you wish to view the bar graphs The display will change to the bar graph display of the highlighted resu...
Страница 139: ...ored results Start Time The start time of the test which produced the stored results Test Duration The duration of the test which produced the stored results Store Use The percentage of the overall st...
Страница 140: ...and select to reduce the time axis to 15 MINS BAR This is only possible if the graphics results were stored with a STORAGE resolution of 1 SEC 1 MINS or 15 MINS For further reduction of the time axis...
Страница 141: ...of time and date controlled by and The cursor position changes in steps of 1 second 1 minute 15 minutes or 60 minutes dependent upon the ZOOM setting The cursor is physically located between the two g...
Страница 142: ...phs see Recalling Stored Graph Results page 135 3 To view the Alarms which have occurred during the measurement select 4 To view the Errors which have occurred during the measurement select The top ro...
Страница 143: ...art time and date of the test that produced the displayed results Stop The stop time and date of the test that produced the displayed results SONET_Usr bk Page 140 Wednesday December 13 2000 11 11 AM...
Страница 144: ...Log to an External Printer 1 Connect an external RS 232 C HP printer to the OmniBER 720 RS232 port See Logging Results to RS 232 C Printer page 151 or connect an external GPIB HP printer to the OmniB...
Страница 145: ...isplay See Logging Data to Disk page 152 3 To log the Error and Alarm summaries the displayed Bar graphs and the Alarm graph to the disk choose on the bar graph display 4 Choose to confirm or abort th...
Страница 146: ...d during the test are retained in memory until they are overwritten by the next set of results The results can be logged at any time during the test period and at the end of the test period The result...
Страница 147: ...played 5 Choose CONTENT allows you a choice of error results to be logged Error Results Analysis or Error and Analysis ER ANAL and Period Cumulative or Period and Cumulative PER CUMUL 6 If LOG ERROR S...
Страница 148: ...a to Disk page 152 If Option 602 Internal Printer is fitted and INTERNAL is chosen see Logging Results to Internal Printer page 150 SONET_Usr bk Page 145 Wednesday December 13 2000 11 11 AM Artisan Te...
Страница 149: ...AN SONET Alarm Scan display SELFTEST FAILS Last recorded selftest failures HOW TO 1 Choose LOG ON DEMAND to determine results to be logged when is pressed SCREEN DUMP allows you to log the selected di...
Страница 150: ...ta to Disk page 152 If Option 602 Internal Printer is fitted and INTERNAL is chosen see Logging Results to Internal Printer page 150 SONET_Usr bk Page 147 Wednesday December 13 2000 11 11 AM Artisan T...
Страница 151: ...erial connection is made to this port HOW TO 1 Connect the Parallel printer to the PARALLEL port See Connecting an HP Printer to a Parallel Port page 154 2 If a non HP printer is connected choose ALT...
Страница 152: ...o the GPIB port HOW TO 1 Connect an GPIB printer to the GPIB port NOTE Choosing GPIB external printer for logging prevents the use of GPIB remote control 2 Choose the LOGGING SETUP and set up the disp...
Страница 153: ...rnal Printer is fitted you can log the results and alarms to the in lid printer HOW TO 1 Choose the LOGGING SETUP and set up the display as required See Logging Results page 143 CONTROL SONET_Usr bk P...
Страница 154: ...RS232 external printer for logging prevents the use of RS 232 C remote control 2 If a non HP printer is connected choose ALT PRINTER Choose 80 character column width or 40 character column width accor...
Страница 155: ...e and use the pop up keypad The filename can contain up to 8 alphanumeric characters The filename extension is fixed as PRN 3 If you want to log data to a new file choose NONE If you wish to add the d...
Страница 156: ...iBER 720 and inserting it into a personal computer PC PC Instructions HOW TO Print from DOS Prompt copy b a filename printer name HOW TO Print from Windows 1 Choose the required file from Filemanager...
Страница 157: ...or an alternative suppliers printer via the PARALLEL port CAUTION Do not connect a serial printer e g RS 232 C or GPIB to the OmniBER 720 Parallel port as this will damage the interface HOW TO Connect...
Страница 158: ...r This releases the paper drive Remove any remaining paper from the front in the normal direction of operation 3 Lift out the spindle Adjust the paper width adaptor to the width of the paper being use...
Страница 159: ...the print mechanism When the front cover of the print mechanism is closed the printer should automatically feed the paper through until there is approximately 2 5 cm 1 in clear at the front of the pri...
Страница 160: ...incorrectly aligned raise the printer mechanism front cover to releases the paper drive and realign the paper LIFT TO ADJUST PAPER ALIGNMENT SONET_Usr bk Page 157 Wednesday December 13 2000 11 11 AM A...
Страница 161: ...inter Paper page 155 If printer paper is fitted remove it from the printer 2 Feed the cleaning paper into the top entry of the print mechanism with the rough black side which contains the cleaning mat...
Страница 162: ...raphical Results to Disk page 168 Recalling Graphics Results from Disk page 170 Copying Graphics Results from Instrument Store to Disk page 171 Configuration s Saving Copying and Recalling Saving Conf...
Страница 163: ...is used to set the instrument to a known state the FACTORY DEFAULT SETTINGS HOW TO 1 Set the OmniBER 720 to the configuration you wish to store 2 Choose the STORED SETTING NUMBER to receive the config...
Страница 164: ...hem an easily remembered title for identification at a later date HOW TO 1 Choose the STORED SETTING NUMBER which contains the stored configuration 2 Choose LOCK 3 Use and to title the settings OFF JU...
Страница 165: ...recall that configuration in the future HOW TO 1 Choose the STORED SETTING NUMBER which contains the stored configuration 2 Choose ACTION to recall the stored configuration The recall operation can be...
Страница 166: ...isk access error being displayed HOW TO 1 Press then select FLOPPY DISK 2 Choose DISK OPERATION 3 Insert the disk into the Disk drive 4 Choose to Format the disk A warning that this operation will era...
Страница 167: ...OPERATION 3 Label the Disk using or press and use the pop up keypad 4 Choose to confirm the label is correct The label is displayed at the bottom of the display to confirm the operation has taken pla...
Страница 168: ...line of the window it shows the current directory name and selected file types NEW To create a new file name move the highlighted cursor to this line then press Using the pop up keypad to enter the n...
Страница 169: ...in FILE TYPE step 2 will be displayed Select a file 7 Move the highlighted cursor up and down the display using and to select the required file or create a new file name see the Files Pop up Window F...
Страница 170: ...hical results at your convenience or re establish a specific instrument configuration If the instrument s own store has graphical results or configuration settings currently stored in it these too can...
Страница 171: ...o not enter a filename then the instrument automatically assigns a filename in the form meas001 Your Choice If you want to assign the filename you must enter it before you start the measurement Your c...
Страница 172: ...sk when the measurement is completed 7 If you wish to enter your own choice of filename move the highlighted cursor to NAME and enter the filename using or press twice and use the pop up keypad The fi...
Страница 173: ...be recalled See Accessing Directories and Selecting Files page 165 2 Choose DISK OPERATION FILE TYPE and enter your choice of filename using The filename can contain up to 8 alphanumeric characters T...
Страница 174: ...for viewing via a spreadsheet HOW TO 1 Choose the directory to receive the graphics file See Accessing Directories and Selecting Files page 165 2 Choose DISK OPERATION and enter the Instrument Store n...
Страница 175: ...ation from instrument to Disk choose If you have entered a filename which already exists a warning File exists are you sure you wish to continue is displayed If YES is selected the data on the Disk wi...
Страница 176: ...hoose DISK OPERATION FILE TYPE and enter the filename using or press twice and use the pop up keypad The filename extension is fixed as CNF The filename can contain up to 8 alphanumeric characters 4 C...
Страница 177: ...Selecting Files page 165 2 Choose DISK OPERATION FILE TYPE and enter your choice of filename using The filename can contain up to 8 alphanumeric characters The filename extension is fixed as CNF 3 To...
Страница 178: ...ERATION and enter the Instrument Store number using and or press and use the pop up keypad The Stored Settings description appears alongside the store number If required the description can be modifie...
Страница 179: ...tered a filename which already exists a warning File exists are you sure you wish to continue is displayed If YES is selected the data on the Disk will be overwritten If NO is selected the operation i...
Страница 180: ...K OPERATION and enter the Instrument Store number using and or press and use the pop up keypad Enter a description of the configuration using or press and use the pop up keypad The description can con...
Страница 181: ...nt store number which already contains a configuration a warning Are you sure you wish to continue is displayed If YES is selected the data in the instrument store will be overwritten If NO is selecte...
Страница 182: ...disk is moved to a PC Creating a Directory on Disk HOW TO 1 Press then select FLOPPY DISK 2 Choose DISK OPERATION 3 Enter the directory name using or press and use the pop up keypad The directory name...
Страница 183: ...ge 165 2 Choose DISK OPERATION 3 To delete the directory choose A warning Are you sure you wish to continue is displayed If YES is selected the directory is deleted If NO is selected the operation is...
Страница 184: ...appear on the display See Accessing Directories and Selecting Files page 165 5 Enter the TO filename using or press twice and use the pop up keypad The filename can contain up to 8 alphanumeric chara...
Страница 185: ...press highlight the file to be deleted on the file manager display and press The file name can contain up to 12 alphanumeric characters including the filename extension 5 To delete the file choose A w...
Страница 186: ...RATION and DISPLAY OPTION 3 Move the highlighted cursor to the FILE NAME DESCRIPTOR field Enter the file descriptor using or press highlight the file required on the file manager display and press 4 M...
Страница 187: ...184 SONET_Usr bk Page 184 Wednesday December 13 2000 11 11 AM Artisan Technology Group Quality Instrumentation Guaranteed 888 88 SOURCE www artisantg com...
Страница 188: ...Test on Signal Loss page 190 REI L MS REI Result Enable page 191 Graph Storage Resolution page 192 Setting Error Threshold Indication page 194 Setting Screen Brightness and Color page 195 Dumping Dis...
Страница 189: ...y settings change made on the transmit display will automatically occur on the receive display Any settings change made on the receive display will automatically occur on the transmit display This fun...
Страница 190: ...Error Seconds The capability to set the Time and Date is provided on the display HOW TO 1 Choose CLOCK MODE and set the Time and Date using and 2 Choose CLOCK MODE to complete the setting of Time and...
Страница 191: ...ected by Keyboard Lock Display keys cursor keys and The following display functions are not affected by Keyboard Lock RESULTS type on the display KEYBOARD LOCK on the display HOW TO Choose KEYBOARD LO...
Страница 192: ...rror which is particularly useful when the display on the test set is hidden from view This function is provided in the OmniBER 720 on the display HOW TO Choose BEEP ON RECEIVED ERROR OTHER MISCELLANE...
Страница 193: ...you can choose to suspend the test during periods of signal loss This function is available on the display HOW TO Choose SUSPEND TEST ON SIGNAL LOSS OTHER MISCELLANEOUS ON SONET_Usr bk Page 190 Wednes...
Страница 194: ...S AIS or REI L AIS L ENABLE or as required When set to OFF the MS REI and REI L measurements are suppressed Cumulative Short Term and Analysis measurements are affected alike The MS REI measurement is...
Страница 195: ...ion The total graphics store capacity is normally 20 000 events If GRAPH STORAGE RESOLUTION is selected the capacity reduces to 10 000 events FULL SONET_Usr bk Page 192 Wednesday December 13 2000 11 1...
Страница 196: ...d be inverted This will produce a longest string of n 1 consecutive zeros in a 2n 1 PRBS pattern Therefore selecting INVERT with an ITU T pattern will produce a longest string of n 1consecutive ones i...
Страница 197: ...nge from yellow to red of the bar on the display and the result on the display You can choose the thresholds at which the color change occurs The Count and Ratio selections are independent This functi...
Страница 198: ...o prolong the life of the screen If the brightness is set to FULL and there have been no key presses in the last hour then the screen automatically dims to the half brightness level and the status mes...
Страница 199: ...current display is stored on disk when is pressed HOW TO 1 Choose LOGGING SETUP and LOGGING PORT on the display 2 Choose LOGGING SETUP LOG ON DEMAND on the display 3 If compression is required to save...
Страница 200: ...ters The file extension is fixed as BMP The file name must satisfy DOS requirements that is there must be no spaces or other illegal characters 6 Move the highlighted cursor to NAME and enter the file...
Страница 201: ...Choose TEST TYPE on the display 2 Insert a formatted disk into the instrument disk drive 3 Connect Optical OUT to Optical IN via a 15 dB attenuator NOTE If any or all of these connections are not made...
Страница 202: ...the Self Test TEST STATUS RUNNING will be displayed The information pertaining to TEST TYPE TEST NUMBER and SUBTEST NUMBER will change as the Self Test progresses If the OmniBER 720 is functioning cor...
Страница 203: ...ist of the connections required move the highlighted cursor to CABLING INFO and press The Loopbacks list will appear on the display SET SONET_Usr bk Page 200 Wednesday December 13 2000 11 11 AM Artisa...
Страница 204: ...llowing tables list the background patterns available when selecting specific foregrounds SONET_Usr bk Page 201 Wednesday December 13 2000 11 11 AM Artisan Technology Group Quality Instrumentation Gua...
Страница 205: ...nformation bits TU 12 TU 11 Mapping or AU 3 Word 8 bit user programmable word TU 11 DS1 Unframed TU 11 structure D4 framed with 2E15 1 2E9 1 PRBS or 1100 Word pattern in other TU 11s TU 12 TU 11 Mappi...
Страница 206: ...ther TUG 3s STS 1 SPE Background Patterns Foreground Background choice in Foreground TUG 3 Background choice in other AU 3 STS 1 SPE VT 1 5 VT 2 Mapping or SPE Word 8 bit user programmable word VT 6 P...
Страница 207: ...VT 2 VT 1 5 Mapping or SPE Word 8 bit user programmable word STS 1 SPE Background Patterns continued Foreground Background choice in Foreground TUG 3 Background choice in other AU 3 SONET_Usr bk Page...
Страница 208: ...ANSI Terminology A table of ETSI terms with their ANSI equivalents SONET_Usr bk Page 205 Wednesday December 13 2000 11 11 AM Artisan Technology Group Quality Instrumentation Guaranteed 888 88 SOURCE...
Страница 209: ...d parity CV Code Violation High Order Path HP HO STS Path I n Intra Office n STM n level Intermediate Reach IR L n 1 or L n 2 long haul LR long reach Low Order Path LP LO VT Path LP REI REI V M S P A...
Страница 210: ...ion Overhead Section Overhead Remote Alarm Indicator RAI RS DCC Section DCC DCC S Section Overhead SOH Transport Overhead TOH S n 1 or S n 2 short haul Short Reach SR SOH TOH STM m OC n STS n where m...
Страница 211: ...roup 12 columns TUG3 VT Group 86 columns TU multiframe VT superframe TU PATH AIS VT AIS AIS V VC SPE VC4 STS3C SPE Virtual Container VC Synchronous Payload Envelope SPE ETSI Term ANSI Term SONET_Usr b...
Страница 212: ...Terms A brief explanation of terms and abbreviations used in the OmniBER 720 SONET_Usr bk Page 209 Wednesday December 13 2000 11 11 AM Artisan Technology Group Quality Instrumentation Guaranteed 888 8...
Страница 213: ...mal BER Bit Error Rate BERT Bit Error Rate Testing BIP Bit Interleaved Parity BPS Bits Per Second BPV Bipolar Violation C CAS Channel Associated Signaling CBR Constant Bit Rate CCITT Consultative Comm...
Страница 214: ...der HP IB Hewlett Packard Inter face Bus IEEE 488 HP PLM High Path Payload Label Mismatch HP RDI High Path Remote Defect Indication HP REI High Path Remote Error Indication HP TIM High Path Trace Iden...
Страница 215: ...verage Ratio PBX Private Branch Exchange PC Personal Computer PCM Pulse Code Modulation PCN Personal Communica tions Network PCR Peak Cell Rate PDH Plesiochronous Digital Hierarchy PES Percentage Erro...
Страница 216: ...STS Synchronous Transport Signal SUT System Under Test T TCM Tandem Connection Monitoring TDM Time Division Multi plexing TDMA Time Division Multiple Access TE Terminal Equipment TMN Telecommunicatio...
Страница 217: ...214 SONET_Usr bk Page 214 Wednesday December 13 2000 11 11 AM Artisan Technology Group Quality Instrumentation Guaranteed 888 88 SOURCE www artisantg com...
Страница 218: ...accessing a directory 165 accessing files 165 adding descriptors to files 183 copy configuration from instrument 175 copy configuration to instrument 177 copy graphics results from instrument 171 crea...
Страница 219: ...NET analysis 106 Monitor receive overhead 34 76 MSP messages generation 56 98 monitoring 35 77 test function 56 98 O Optical clock stress 54 96 power measurement 108 OPTICAL IN Connector 14 Optical In...
Страница 220: ...ping selection 22 61 MSP messages 56 98 optical clock stress 54 96 optical power measurement 108 overhead BER test 102 overhead capture 40 82 overhead monitor 34 76 overhead sequences 38 80 overhead t...
Страница 221: ...Viewing TCM Errors and Alarms 125 W warning symbols 14 SONET_Usr bk Page 218 Wednesday December 13 2000 11 11 AM Artisan Technology Group Quality Instrumentation Guaranteed 888 88 SOURCE www artisantg...
Страница 222: ...ffices An up to date list of Agilent Offices is available through the Agilent Technologies Website at URL http www agilent com Artisan Technology Group Quality Instrumentation Guaranteed 888 88 SOURCE...
Страница 223: ...User Guide Printed in U K 12 00 J1407 90011 In This Book This book tells you how to select and use the various instrument fuctions available Artisan Technology Group Quality Instrumentation Guarantee...
Страница 224: ...uipment Have surplus equipment taking up shelf space We ll give it a new home Learn more Visit us at artisantg com for more info on price quotes drivers technical specifications manuals and documentat...