background image

227

Appendix E. Cleaning Procedure

Preserving Connectors

Preserving Connectors

Listed below are some hints on how best to keep your connectors in
the best possible condition.
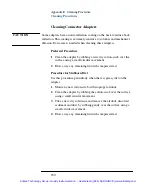
Making Connections

Before you make any connection you must ensure that all cables
and connectors are clean. If they are dirty, use the appropriate
cleaning procedure.

When inserting the ferrule of a patchcord into a connector or an
adapter, make sure that the fiber end does not touch the outside of
the mating connector or adapter. Otherwise you will rub the fiber
end against an unsuitable surface, producing scratches and dirt
deposits on the surface of your fiber.

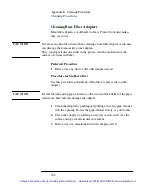
Dust Caps and Shutter Caps

Be careful when replacing dust caps after use. Do not press the
bottom of the cap onto the fiber as any dust in the cap can scratch or
dirty your fiber surface.

When you have finished cleaning, put the dust cap back on, or close
the shutter cap if the equipment is not going to be used
immediately.

Keep the caps on the equipment always when it is not in use.

All of Hewlett-Packard’s lightwave instruments and accessories are
shipped with either laser shutter caps or dust caps. If you need
additional or replacement dust caps, contact your Hewlett-Packard
sales office.

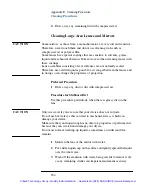
Immersion Oil and Other Index Matching Compounds

Where it is possible, do not use immersion oil or other index
matching compounds with your device. They are liable to impair
and dirty the surface of the device. In addition, the characteristics of
your device can be changed and your measurement results affected.

Artisan Technology Group - Quality Instrumentation ... Guaranteed | (888) 88-SOURCE | www.artisantg.com

Содержание HP E5574A

Страница 1: ...underutilized and idle equipment along with credit for buybacks and trade ins Custom engineering so your equipment works exactly as you specify Critical and expedited services Leasing Rentals Demos In...

Страница 2: ...support your product This manual provides the best information we could find It may be incomplete or contain dated information and the scan quality may not be ideal If we find a better copy in the fut...

Страница 3: ...HP E5574A Optical Loss Analyzer User s Guide Artisan Technology Group Quality Instrumentation Guaranteed 888 88 SOURCE www artisantg com...

Страница 4: ...ry HP warrants that its software and firmware designated by HP for use with an instrument will exe cute its programming instruc tions when properly installed on that instrument HP does not warrant tha...

Страница 5: ...HP E5574A Optical Loss Analyzer User s Guide Artisan Technology Group Quality Instrumentation Guaranteed 888 88 SOURCE www artisantg com...

Страница 6: ...e protective earth grounding will cause a potential shock hazard that could result in serious personal injury Whenever it is likely that the protection has been impaired the instrument must be made in...

Страница 7: ...ic shock Frame or chassis terminal Protective conductor terminal Hazardous laser radiation Electromagnetic interference EMI WARNING The WARNING sign denotes a hazard It calls attention to a procedure...

Страница 8: ...on the front panel of the instrument E5574A Laser Type FP Laser InGaAsP Laser Class According to IEC 825 Europe 3A According to 21 CFR 1040 10 Canada Japan USA 1 Output Power CW less than 500 W Beam W...

Страница 9: ...r modules to a HP Service Center for repair and calibration or have the repair and calibration performed on site by HP personnel The laser module has built in safety circuitry that disables the optica...

Страница 10: ...he optical output when the device is operational The laser radiation is not visible to the human eye but it can seriously damage your eyesight There is a safety circuit which monitors the average lase...

Страница 11: ...Artisan Technology Group Quality Instrumentation Guaranteed 888 88 SOURCE www artisantg com...

Страница 12: ...how to operate the instrument remotely via the HP IB in chapter 8 Additional information not required for routinely day to day use in the appendix Conventions used in this Manual Quoted terms like Pol...

Страница 13: ...OLA 29 1 5 Help is Available 30 1 6 Getting Started 31 Power On 31 General Instrument Settings 32 Zeroing the Heads 33 Storing the Reference Power 34 Checking the Stability 36 1 7 How to Obtain Exact...

Страница 14: ...the Measurement 49 Repeating the Measurement 49 Explanation of the Results 50 3 Taking Standard Loss Measurements 3 1 Measuring the Insertion Loss 55 Insertion Loss Measurement Setup 56 Starting the...

Страница 15: ...suring Absolute and Relative Power 75 Powermeter Measurement Setup 75 Starting the Measurement 76 Checking the Measurement Conditions 76 Storing a Reference Value 77 Setting the Measurement Mode 78 Me...

Страница 16: ...95 Setting the HP IB Address 96 Modes of Operation 96 OLA Specific Features 97 How the OLA Processes HP IB commands 98 Some Notes about Programming and Syntax Conventions 99 8 2 Command Summary 101 I...

Страница 17: ...eplacing the Fuse 168 Replacing the Battery 169 Environmental Specifications 170 Instrument Positioning and Cooling 171 Optical Output 171 HP IB Interface 172 Connector 172 HP IB Logic Levels 173 Clai...

Страница 18: ...ower 199 Test III CW Stability Short Term 200 Test IV Linearity and Accuracy 202 Test V PDL PDG uncertainty 020 only 206 Test VI Repeatability PDL PDG 208 Test VII Noise 210 Absolute PDCR Uncertainty...

Страница 19: ...Physical Contact Interfaces 236 Cleaning Recessed Lens Interfaces 237 Cleaning Fragile Optical Devices 238 Cleaning Metal Filters or Attenuator Gratings 239 F Error Messages Display Messages 243 Light...

Страница 20: ...Return Loss Calibration 59 3 4 Return Loss Settings Display 60 3 5 Return Loss Calibration Display 61 3 6 Setup for Return Loss Measurements 62 3 7 Return Loss Display 63 4 1 Setup for Coupler Test 6...

Страница 21: ...st Setup 198 D 2 Output Power Test Setup 199 D 3 CW Stability Short Term Test Setup 200 D 4 Accuracy Test Setup 202 D 5 Linearity Test Setup 204 D 6 PDL PDG Uncertainty Test Setup 206 D 7 Example Draw...

Страница 22: ...8 6 IL Specific Commands 104 8 7 PDL IL Specific Commands 104 8 8 Coupler Test Specific Commands 104 8 9 Return Loss Specific Commands 105 8 10 Powermeter Specific Commands 106 8 11 Min Max Applicati...

Страница 23: ...1 1 Introducing the HP E5574A Optical Loss Analyzer Artisan Technology Group Quality Instrumentation Guaranteed 888 88 SOURCE www artisantg com...

Страница 24: ...find basic information about the HP E5574A Optical Loss Analyzer OLA After reading this chapter you will know how the instrument works which applications it supports how it is operated Artisan Technol...

Страница 25: ...of polarization Figure 1 1 The OLA Components Head Input A Head Input B Optical Input Optical Output Head Input A Head Input B Optical Input Optical Output 3 dB Coupler Pol Ctrl Internal Source s Sign...

Страница 26: ...an Do With the OLA As one can see from Figure 1 1 the OLA has one output and three input ports It therefore supports a variety of applications Operational Modes You can set up the OLA to perform as fo...

Страница 27: ...OLA applications include the following measurements Insertion Loss IL You measure the power loss of passive optical components Polarization Dependent Loss PDL You measure the maximal power fluctuatio...

Страница 28: ...terface Bus See Chapter 8 HP IB Programming for details The front panel shows from left to right the power on off key four keys below the display the MORE key a numerical keypad with additional functi...

Страница 29: ...can thus provide more than four softkeys After selecting an application always press MORE to view any additional options provided by the application Press MORE once again to return to the first screen...

Страница 30: ...pply to all the measurements you take PRESET Use this key to check and to change the general instrument settings for the measurement sensitivity and for the display of measured values ATTENTION Pressi...

Страница 31: ...means of the softkeys Each application comes with its own set of softkeys For example The display shows not only the measured parameters and value s but also the current measurement conditions which...

Страница 32: ...t show the general instrument settings These can only be accessed by pressing the PRESET key ATTENTION The display may burn in if it remains unchanged for longer than 24 hours To avoid damaging the di...

Страница 33: ...ing the heads 4 Storing the reference power 5 Checking the stability Power On The OLA has been designed to measure even very small changes of optical power How to Obtain the Highest Accuracy 1 After s...

Страница 34: ...e OLA is used for screening examinations of optical components To change the setting press N DIGITS Mode The measurement and display mode affects all polarization dependent measurements The standard s...

Страница 35: ...applicable if you use the optical heads HP 81521B opt 001 You can change the standard setting to High sensitivity You get the maximal power range 80 dBm but less polarization sensitivity 0 012 dBpp PD...

Страница 36: ...can either disconnect the second head or repeat step one 5 Wait some seconds until a power value is shown again 6 Press APPL to terminate the Powermeter application After zeroing the instrument is rea...

Страница 37: ...ght source to the optical input press SOURCE ON OFF to turn the internal source off WARNING After connecting an external source to the optical input light eventually laser light will emerge from the o...

Страница 38: ...tors or the source you must measure and store the reference power anew Checking the Stability Mechanical and electrical stability are vital issues in the measurement of optical characteristics After w...

Страница 39: ...e measured results depend largely on your setup It must be mechanically stable and you must attach adequate heads and connectors Mechanical Stability The signal variations caused by polarization are u...

Страница 40: ...nector option please remember Due to their construction angled contact connectors usually exhibit a higher polarization dependent loss than straight contact connectors Every connector or patchcord may...

Страница 41: ...2 2 Taking Polarization Dependent Measurements Artisan Technology Group Quality Instrumentation Guaranteed 888 88 SOURCE www artisantg com...

Страница 42: ...cally the difference between the highest and lowest intensity caused by the continuously changing polarization and received by the optical head s The OLA uses a recursive algorithm which checks the PD...

Страница 43: ...asurement Setup The same setup can be used to measure the Insertion Loss 1 Connect the optical output to the input of the device under test DUT 2 Connect the optical head to the output of the DUT Figu...

Страница 44: ...tarting the Measurement 1 Press APPL to activate the Select Applications menu 2 Choose Pol Depend Loss 3 Wait until the result is displayed The OLA immediately starts to measure Depending on the PDL v...

Страница 45: ...ich you connected the DUT press HEAD A or HEAD B respectively Before you record the first PDL value on your test protocol it is important to check the stability of your setup Checking the Stability of...

Страница 46: ...tivate the Select Applications menu 2 Choose PDL Ins Loss The instrument immediately starts to measure Wait until the values are displayed Explanation of the Results The values are calculated accordin...

Страница 47: ...ications Insertion Loss or PDL Ins Loss respectively The reason is that the average insertion loss measured with PDL Ins Loss represents a PDL independent insertion loss value The value for Averaged I...

Страница 48: ...her parameters change with polarization PD Coupler Test Measurement Setup Two optical heads are required to measure the properties of optical couplers Figure 2 4 Setup for PD Coupler Test Coupler unde...

Страница 49: ...SOURCE ON OFF to turn the internal source off The source indicator lamp must be off Starting the Measurement 1 Press APPL to activate the Select Applications menu 2 Choose PD Coupler Test The first pa...

Страница 50: ...on page 31 Press PREVIOUS to return to the PD Coupler Test 2 Check the Head parameter on the display If you want to measure the other output of the coupler press HEAD A or HEAD B respectively Before y...

Страница 51: ...lication Page two shows the measured values for Polarization Dependent Loss PDL and Polarization Dependent Excess Loss PDEL 4 Press to return to the first page Repeating the Measurement If the display...

Страница 52: ...max CRA B min CRA B max Out1 2 max Out1 max Out2 max CRA B min Out1 2 min Out1 min Out2 min PDCRA B CRA B max CRA B min Since you are measuring variations only PDCRA is equal to PDCRB PDCRA B dB 10 l...

Страница 53: ...n PDSRA B dB 10 log SRA B max SRA B min Note that PDSRA is not equal to PDSRB while PDSRA dB is equal to PDSRB dB Polarization Dependent Loss PDLA B dB 10 log Out1 2 max Out1 2 min Polarization Depend...

Страница 54: ...2 Taking Polarization Dependent Measurements Measuring the Polarization Dependent Characteristics of Couplers Artisan Technology Group Quality Instrumentation Guaranteed 888 88 SOURCE www artisantg co...

Страница 55: ...3 3 Taking Standard Loss Measurements Artisan Technology Group Quality Instrumentation Guaranteed 888 88 SOURCE www artisantg com...

Страница 56: ...how to measure the Insertion Loss and the Return Loss of passive optical components This chapter is divided into two sections Measuring the Insertion Loss Measuring the Return Loss Artisan Technology...

Страница 57: ...arized light However you can measure the same averaged Insertion Loss as with an unpolarized source even with the internal source This is accomplished by using the application PDL Ins Loss see section...

Страница 58: ...internal light source press SOURCE ON OFF to turn the source on The source indicator lamp must be lit If you have connected an external light source to the optical input press SOURCE ON OFF to turn t...

Страница 59: ...splay If it does not show the head to which you have connected the DUT press HEAD A or HEAD B respectively Note that the same setting of T avg is used by the Powermeter application 3 Press SETTINGS to...

Страница 60: ...easuring the Return Loss This section explains how to measure the Return Loss i e the ratio of the optical power launched into a device to the power reflected back to the source The Return Loss can on...

Страница 61: ...2 The measurement of a reference reflection is required for calibration If your optical output is the fiber pigtail with FC PC connector leave it untouched and open ended If your instrument is equipp...

Страница 62: ...ameter on the display If it does not indicate the input to which you have connected the head press HEAD A or HEAD B respectively 5 Press SETTINGS If the refractive index of the fiber you are using dif...

Страница 63: ...the open end in seven tight loops around a pen This almost eliminates the reflection from the open fiber end The remaining optical power is caused by so called parasitic reflections within the test s...

Страница 64: ...its open end in seven tight loops around a pen This will virtually eliminate the backreflection from the open end Figure 3 6 Setup for Return Loss Measurements Head Input A Head Input B Optical Input...

Страница 65: ...ility value 4 Press PREVIOUS to return to the previous page and read the PDL Checking the Influence of Polarization 1 Press SETTINGS to view the current measurement conditions 2 Press POLC ON if you w...

Страница 66: ...eturn Loss Explanation of the Result The Return Loss is calculated according to the following formula Return Loss RLA B dB 10 log PA B P par P ref P par RL ref Artisan Technology Group Quality Instrum...

Страница 67: ...4 4 Testing Optical Couplers Artisan Technology Group Quality Instrumentation Guaranteed 888 88 SOURCE www artisantg com...

Страница 68: ...other Insertion Loss which means the ratio of the power at one output to the input power Excess Loss which means the ratio of the total power of both outputs to the input power Directivity which mean...

Страница 69: ...tical heads are required to measure the properties of optical couplers Figure 4 1 Setup for Coupler Test Coupler under Test Head Input A Head Input B Optical Input Optical Output Head Input A Head A H...

Страница 70: ...source indicator lamp must be lit If you have connected an external light source to the optical input press SOURCE ON OFF to turn the internal source off The source indicator lamp must be off Startin...

Страница 71: ...utput of the coupler press HEAD B or HEAD A respectively 3 Before recording the values of the Coupling Ratio and the Splitting Ratio on your test protocol it is advisable to check the stability of you...

Страница 72: ...ent 2 Press DB to change the measuring unit to dB 3 Press to view the second page of the application Page two shows the measured values for Insertion Loss IL and Excess Loss EL 4 Press to return to th...

Страница 73: ...ry input of the coupler 2 Check the Head parameter on the display If it does not show the head to which you have connected the secondary input press HEAD B or HEAD A respectively 3 Check the stability...

Страница 74: ...dB 10 Log Out1 2 Out1 Out2 Splitting Ratio SRA B Out1 2 Out2 1 SRA B dB 10 Log Out1 2 Out2 1 Insertion Loss ILA B dB 10 log Out1 2 P ref Excess Loss EL dB 10 log Out1 Out2 P ref Directivity DIRA B dB...

Страница 75: ...5 5 Measuring Power Artisan Technology Group Quality Instrumentation Guaranteed 888 88 SOURCE www artisantg com...

Страница 76: ...in dBm or W The ratio of the power presently received to a power measured previously The variation fluctuation of the power measured within a specified number of samples Using two optical heads you c...

Страница 77: ...ff 2 Attach the device s under test DUT to the optical head s Figure 5 1 Powermeter Setup Head Input A Head Input B Optical Input Optical Output Head Input A Head Input B Optical Input Optical Output...

Страница 78: ...1 6 Getting Started on page 31 Press PREVIOUS to return to the Powermeter screen 2 Press SETTINGS to check or change the measurement conditions The same setting of T avg is used by the Insertion Loss...

Страница 79: ...to set the new value press ENTER or ENTER to store Relative measurements are always displayed in dB Unit The Unit parameter shows the measuring unit for the optical power By pressing UNIT you can tog...

Страница 80: ...ured at head A divided by the stored reference value The B value can be the power measured at head B the power measured at head B divided by the power measured at head A or the power measured at head...

Страница 81: ...in a specified number of samples The Win Size parameter is not available in continuous mode Win Size The parameter Win Size shows the number of samples used to determine the highest and lowest power v...

Страница 82: ...t of samples Cont The window buffer is reduced to just two values From sample to sample the difference between the present and the previous power value is calculated and updated continuously 4 Press M...

Страница 83: ...6 6 Using the OLA as a Laser Source and Polarization Controller Artisan Technology Group Quality Instrumentation Guaranteed 888 88 SOURCE www artisantg com...

Страница 84: ...laser light source or as a controller to sweep or set the polarization of an external laser source The chapter is divided into two sections 1 How to use the OLA as a light source and 2 How to use the...

Страница 85: ...equipped with both lasers you can switch between these two options How to Activate the Internal Laser Pressing SOURCE ON OFF will turn the internal laser on or off respectively As long as the interna...

Страница 86: ...lit WARNING Although the source indicator lamp is off light eventually laser light will emerge from the optical output This happens even if the OLA is not connected to the mains or is switched off 6...

Страница 87: ...If you are using the Return Loss application press SETTINGS and POLC ON The automatic sweep will start as soon as you return to the measurement screen If you are using the Powermeter application press...

Страница 88: ...to set the new value and confirm with ENTER or ENTER How to Terminate the Automatic Sweep To stop the sweep do one of the following Suspend the current application e g by pressing APPL If you are usin...

Страница 89: ...ed The angular range of each paddle has been divided into 1000 equal steps 0 to 999 This yields an adjustment resolution of 0 18 You can thus compare measurements taken under equal conditions How to s...

Страница 90: ...88 Using the OLA as a Laser Source and Polarization Controller Using the OLA as a Polarization Controller Artisan Technology Group Quality Instrumentation Guaranteed 888 88 SOURCE www artisantg com...

Страница 91: ...7 7 Instrument Settings and Software Status Artisan Technology Group Quality Instrumentation Guaranteed 888 88 SOURCE www artisantg com...

Страница 92: ...n how to check or change the current system parameters and how to get information about the state of the software installed It mainly covers the functions of the SYST key and the AUX key Artisan Techn...

Страница 93: ...number of digits to be displayed the measurement and display mode and the sensitivity For a detailed description see section 1 6 Getting Started on page 31 7 2 Checking the System Configuration The OL...

Страница 94: ...ng 7 3 Checking the Software Status The OLA is software driven It can be upgraded by updating the software 1 Press AUX to display the version number of the software installed If you encounter any prob...

Страница 95: ...8 8 HP IB Programming Artisan Technology Group Quality Instrumentation Guaranteed 888 88 SOURCE www artisantg com...

Страница 96: ...the HP Interface Bus It is assumed that you are already familiar with programming the HP IB This chapter is divided into four main sections Introduction IEEE common commands OLA specific commands and...

Страница 97: ...ronic Engineers IEEE Standard 488 1 1987 IEEE Standard Digital Interface for Programmable Instrumentation The Institute of Electrical and Electronic Engineers IEEE Standard 488 2 1987 IEEE Standard Co...

Страница 98: ...m Configuration on page 91 The default HP IB address is 24 Modes of Operation The OLA has three modes of operation Table 8 1 HP IB Capabilities Mnemonic Function SH1 Complete source handshake capabili...

Страница 99: ...ng the OLA remotely please note The display reacts on changes of the instrument mode triggered via the HP IB Starting an application via the HP IB stops any other application it acts like pressing the...

Страница 100: ...commands which are described in this chapter can be executed Switching the power off causes all commands that are in the input queue to be lost The Output Queue The output queue is a buffer which con...

Страница 101: ...he error queue by issuing the SYST ERR query repeatedly Some Notes about Programming and Syntax Conventions The following are a few points about the commands and queries sent to the OLA Sending Messag...

Страница 102: ...at wsp white space The characters HT CR and space are treated as white space characters Others are described with the respective commands The characters between brackets show optional information that...

Страница 103: ...Event Status Register Query IDN string Identification Query OPC Operation Complete Command OPC value Operation Complete Query OPT string Options Query RCL location 0 9 Recall Instrument Setting RST R...

Страница 104: ...gister STAT OPER NTR Returns the NTRansition register contents STAT OPER PTR Sets the PTRansition register STAT OPER PTR Returns the PTRansition register contents STAT PRES Presets all enable register...

Страница 105: ...ement mode SENS POW OPT Optimizes the heads SENS POW OPT Returns the optimization status SOUR POW STAT Switches the source on off SOUR POW STAT Returns the source status SOUR POW WAV Switches the wave...

Страница 106: ...SENS DATA IL Returns the IL value SENS POW REF DISP Stores the reference power SENS POW REF DISP Returns the stored reference power Table 8 8 Coupler Test Specific Commands SENS DATA CR Returns the C...

Страница 107: ...Returns the Return Loss value SENS POW REF Sets RL ref SENS POW REF Returns the RL ref setting SENS POW REF DISP PREF Stores P ref SENS POW REF DISP PREF Returns P ref SENS POW REF DISP PPAR Stores th...

Страница 108: ...the Min Max application SENS POW ATIM Sets the average time SENS POW ATIM Returns the average time SENS POW WAV Sets the wavelength SENS POW WAV Returns the wavelength SENS POW UNIT Sets the unit to d...

Страница 109: ...Commands SENS DATA MINM Returns the Min Max value SENS POW WIND MOD Sets the measurement window mode SENS POW WIND MOD Returns the measurement window mode SENS POW WIND SIZ Sets the measurement window...

Страница 110: ...1 Common Status Registers 0 1 2 3 4 5 6 7 0 1 2 3 4 5 6 7 0 1 2 3 4 5 6 7 0 1 2 3 4 5 6 7 Operation Complete Operation Complete Request Control Request Control Query Error Query Error Device Dependan...

Страница 111: ...ted by the condition that caused the SRQ The serial poll command transfers the value of the Status Byte register to a variable Command Descriptions command CLS syntax CLS description The CLear Status...

Страница 112: ...s ESE example OUTPUT 724 ESE 21 command ESE syntax ESE description The Event Status Enable query ESE returns the contents of the Event Status Enable register response The bit value for the register 0...

Страница 113: ...DN is used to obtain the instrument s identification response The identification string Hewlett Packard E5574A xxxxxxxxxx y yy xxxxxxxxxx Serial number 10 digits y yy Firmware revision for instance 1...

Страница 114: ...wer on 2 Setting the interface to Device Clear Active state 3 CLS 4 RST related commands OPC example OUTPUT 724 OPC command OPC syntax OPC description The OPeration Complete query OPC causes all progr...

Страница 115: ...d Contact related commands IDN example DIM A 60 OUTPUT 724 OPT ENTER 724 A command RCL syntax RCL wsp location description The ReCaLl instrument setting command RCL changes the instrument setting to t...

Страница 116: ...RL ref to 14 7 dB sets the unit for power to Watt sets the unit for SR in CT and PDCT measurement to stops the automatic sweep of the polarization controller sets the scan rate of the polarization co...

Страница 117: ...nable command SRE sets bits in the Service Request Enable register Any logical 1 in the enable register enables the corresponding bit in the Status register The register is cleared at power on The RST...

Страница 118: ...RE ENTER 724 A command STB syntax STB description The STatus Byte query STB returns the contents of the Status Byte register The register is programmed via the Service Request Enable mask For setting...

Страница 119: ...self test the instrument returns to the setting that was active at the time the self test query was processed response A boolean value 0 if the polarization controller test was successful 1 if the pol...

Страница 120: ...ains the filtered status of the CONDition register This register is cleared when it is read The PTRansition register is one of the two filters controlling the EVENt register It puts when enabled a 1 i...

Страница 121: ...sition and ENAble registers Set the NTRansition PTRansition and ENAble registers The Bits Used by the OLA The following bits are used in the OPERation node registers The following bit is used in the Q...

Страница 122: ...r are used whether these bits contain information depends on the transition register configuration example OUTPUT 724 STAT OPER ENTER 724 A command STATus OPERation ENABle syntax STATus OPERation ENAB...

Страница 123: ...Dition register to set the bit in the EVENt register example OUTPUT 724 STAT OPER NTR 768 command STATus OPERation NTRansition syntax STATus OPERation NTRansition description This query returns the cu...

Страница 124: ...tion and QUEStionable nodes All the bits in the ENABle registers are set to 0 All the bits in the PTRansition registers are set to 1 All the bits in the NTRansition registers are set to 0 example OUTP...

Страница 125: ...ue description This command sets the bits in the ENABle register that enable the contents of the EVENt register to affect the Status Byte STB Setting a bit in this register to 1 enables the correspond...

Страница 126: ...r example OUTPUT 724 STAT QUES NTR ENTER 724 N command STATus QUEStionable PTRansition syntax STATus QUEStionable PTRansition wsp value description This command sets the bits in the PTRansition regist...

Страница 127: ...owermeter Min Max and Return Loss errors The message Wrong application for this command is returned if the present application is not Powermeter Powermeter Min Max or Return Loss example OUTPUT 724 AB...

Страница 128: ...ications Powermeter Powermeter Min Max and Return Loss Note This command is only executed when the automatic sweep is off see ABORt parameters 1 2 3 4 The number of the paddle which is to be set Defau...

Страница 129: ...which is to be returned Default is 1 response An integer number 0 value 999 For an explanation of the value returned see PADDle POSition errors The message Wrong application for this command is return...

Страница 130: ...xample OUTPUT 724 INIT SCAN RAT MAX command SCAN RATe syntax SCAN RATe wsp MIN MAX description The scan rate query returns either the present setting of the polarization controller s sweep speed or th...

Страница 131: ...returned if no application is active The message No head connected is returned if there is no optical head attached to the instrument related commands SENSe CORRection COLLect ZERo example OUTPUT 724...

Страница 132: ...rrors The message Wrong application for this command is returned if the present application is not Coupler Test or Polarization Dependent Coupler Test The message No head connected is returned if ther...

Страница 133: ...currently active It is only applicable to the applications Coupler Test and Polarization Dependent Coupler Test parameter 1 2 1 Reads head A 2 Reads head B Default is 1 response The measured value in...

Страница 134: ...on is not one of those listed above The message No head connected is returned if there is no optical head attached to the specified channel The message No valid result possible is returned if the valu...

Страница 135: ...ot MINMax The message No head connected is returned if there is no optical head attached to the specified channel The message No valid result possible is returned if the value cannot be measured examp...

Страница 136: ...only applicable to the Powermeter application parameter 1 2 1 Reads head A 2 Reads head B Default is 1 response You receive one of the following values If you choose head A A A B or A Ref If you choo...

Страница 137: ...the present application is not Return Loss The message No head connected is returned if there is no optical head attached to the specified channel The message No valid result possible is returned if t...

Страница 138: ...d not be measured example OUTPUT 724 SENS1 DATA SR ENTER 724 A command SENSe DATA STAB syntax SENSe 1 2 DATA wsp STAB description This query returns the stability value It is only applicable to the St...

Страница 139: ...d resets the database and restarts the measurement parameters 1 2 The channel parameter 1 or 2 may be present but is ignored ON The ON extension may be present but is ignored Application value You can...

Страница 140: ...The message Wrong application for this command is returned if you specify STAB and the present application is Powermeter Powermeter Min Max or none The same message is returned if you specify MINM and...

Страница 141: ...value description This query returns the present status of the specified application It can be used any time parameters 1 2 The channel parameter 1 or 2 may be present but is ignored Application value...

Страница 142: ...s parameters 1 2 The channel parameter 1 or 2 may be present but is ignored The setting affects both channels Unit s seconds ms milliseconds Default is s Value If unit is s or default Choice of 0 02 0...

Страница 143: ...W ATIM ENTER 724 A command SENSe POWer CALCulate MODe syntax SENSe 1 2 POWer CALCulate MODe wsp mode description This command sets the measurement and display mode for all polarization dependent measu...

Страница 144: ...OD ENTER 724 A command SENSe POWer HEAD syntax SENSe 1 2 POWer HEAD description This query returns information about the optical head connected to the specified channel It can be used any time paramet...

Страница 145: ...onding number If you choose head A ABS 0 Absolute power measurement REL1 1 Relative measurement A Ref REL2 2 Relative measurement A B If you choose head B ABS 0 Absolute power measurement REL1 1 Relat...

Страница 146: ...nd SENSe POWer OPTimize syntax SENSe 1 2 POWer OPTimize wsp mode description This command optimizes the optical heads attached to the OLA for PDL measurement or for high sensitivity Note This command...

Страница 147: ...A command SENSe POWer REFerence syntax SENSe 1 2 POWer REFerence wsp value description This command sets the reference reflection RL ref to the specified value It is only applicable to the Return Los...

Страница 148: ...After starting the application wait ca 2 s before issuing this command parameter 1 2 1 Reads head A 2 Reads head B Default is 1 errors The message Wrong application for this command is returned if th...

Страница 149: ...nsertion Loss PDL Insertion Loss Coupler Test Directivity and Powermeter parameter 1 2 1 Checks head A 2 Checks head B Default is 1 response A boolean value 0 The reference has been taken with the oth...

Страница 150: ...ence DISPlay PPAR SENSe POWer REFerence SENSe POWer REFerence DISPlay PREF example OUTPUT 724 SENS1 POW REF DISP PPAR command SENSe POWer REFerence DISPlay PPAR syntax SENSe 1 2 POWer REFerence DISPla...

Страница 151: ...DISPlay PREF SENSe POWer REFerence SENSe POWer REFerence DISPlay PPAR example OUTPUT 724 SENS1 POW REF DISP PREF command SENSe POWer REFerence DISPlay PREF syntax SENSe 1 2 POWer REFerence DISPlay PR...

Страница 152: ...ication is not one of those listed above The message No head connected is returned if the reference was not taken from the specified head related commands SENSe POWer REFerence DISPlay example OUTPUT...

Страница 153: ...y be present but is ignored The unit is valid for both channels Unit When the Powermeter application is active DBM W 0 1 You can enter either the mnemonic or the corresponding number DBM 0 Measurement...

Страница 154: ...2 POWer UNIT description This query returns the current setting of the measurement unit It is only applicable to the applications Coupler Test Polarization Dependent Coupler Test and Powermeter param...

Страница 155: ...e to the Powermeter application parameter 1 2 The channel parameter 1 or 2 may be present but is ignored The setting affects both channels Unit m meter mm millimeter um micrometer nm nanometer pm pico...

Страница 156: ...he measurement window used for calculating the Min Max value It is only applicable to the Powermeter Min Max application parameters 1 2 The channel parameter 1 or 2 may be present but is ignored The s...

Страница 157: ...t MINMax related commands SENSe POWer WINDow MODe example OUTPUT 724 SENS POW WIND MOD ENTER 724 A command SENSe POWer WINDow SIZe syntax SENSe 1 2 POWer WINDow SIZe wsp value description This command...

Страница 158: ...cts both channels response The number of samples which constitutes the window 50 100 500 or 1000 related commands SENSe POWer WINDow SIZe example OUTPUT 724 SENS POW WIND SIZ ENTER 724 A command SOURc...

Страница 159: ...t equipped with the dual source option It can be used any time It is ignored if the OLA has only a single source parameter Source You enter one of the following keywords LOWer Switches to 1310 nm UPPe...

Страница 160: ...ive error numbers are device dependent Negative error numbers are defined by the SCPI standard An error code of 0 indicates that there are no errors in the queue For a list of the error messages and e...

Страница 161: ...to the method of programming the instrument Example 1 Checking the Communication Function This program sends two queries and displays the responses Listing 10 20 30 HP E5574A OLA Programming Example 1...

Страница 162: ...OPT 310 ENTER OLA String 320 PRINT TABXY 10 13 Options String 330 340 END Example 2 Reading Power and Storing the Reference For this program to work you need an optical head attached to input A The op...

Страница 163: ...TPUT OLA SOURCE POW STAT ON 260 270 Activate Powermeter set measurement unit to dBm 280 290 OUTPUT OLA SENS FUNC MAIN 300 OUTPUT OLA SENS FUNC POW 310 OUTPUT OLA SENS POW UNIT DBM 320 330 Take measure...

Страница 164: ...162 HP IB Programming Programming Examples 470 OUTPUT OLA SENS1 POW REF DISP 480 490 END Artisan Technology Group Quality Instrumentation Guaranteed 888 88 SOURCE www artisantg com...

Страница 165: ...A A Installation and Maintenance Artisan Technology Group Quality Instrumentation Guaranteed 888 88 SOURCE www artisantg com...

Страница 166: ...installation instructions for the E5574A It also includes information about initial inspection and damage claims preparation for use packaging storage and shipment Artisan Technology Group Quality Ins...

Страница 167: ...the container or cushioning keep them until you have checked the contents of the shipment for completeness and verified the instrument both mechanically and electrically CAUTION Take care of the yello...

Страница 168: ...wire power cable When connected to an appropriate AC power receptacle this cable earths the instrument cabinet The type of power cable shipped with each instrument depends on the country of destinati...

Страница 169: ...not interrupt the protective earth connection intentionally The following work should be carried out by a qualified electrician All local electrical codes must be strictly observed If the plug on the...

Страница 170: ...o 2110 0304 The fuse holder is at the rear of the instrument beside the line power connector How to Replace the Fuse 1 Release the fuse holder use the blade of a flat headed screwdriver to depress the...

Страница 171: ...it until the catch clicks back into place Replacing the Battery This instrument contains a lithium battery Replacing the battery should be carried out only by a qualified electrician or by HP service...

Страница 172: ...ts NOTE Protect the instrument from temperature extremes and changes in temperature that may cause condensation within it AC line Voltage Requirements 100 240 V 50 60 Hz Maximum Power Requirements 100...

Страница 173: ...o provide adequate air clearance may result in excessive internal temperature reducing instrument reliability Optical Output CAUTION Make sure that you only use the correct cables with your chosen out...

Страница 174: ...ed on this network are as follows The total cable length cannot exceed 20 meters The maximum cable length per device is 2 meters No more than 15 devices may be interconnected on one bus Connector The...

Страница 175: ...tor lock screws Do not use a screwdriver HP IB Logic Levels The E5574A HP IB lines use standard TTL logic as follows True Low digital ground or 0 Vdc to 0 4 Vdc False High open or 2 5 Vdc to 5 Vdc All...

Страница 176: ...g material may be reusable but the Hewlett Packard Sales Service Office will provide information and recommendation on materials to be used if the original packing is no longer available or reusable G...

Страница 177: ...B B Accessories Artisan Technology Group Quality Instrumentation Guaranteed 888 88 SOURCE www artisantg com...

Страница 178: ...gle mode optical components It is available in various configurations for the best possible match to the most common applications This appendix provides information on the available options and access...

Страница 179: ...1310 nm Option 015 Fabry Perot Laser Source 1550 nm Option 135 Dual Wavelength Fabry Perot Laser Source 1310 1550 nm Option 020 Pigtail optical output connector A 9 125 m fiber pigtail with an FC PC c...

Страница 180: ...ors on the following cables and adapters Model No Description HP 10833A HP IB Cable 1 m 3 3 ft HP 10833B HP IB Cable 2 m 6 6 ft HP 10833C HP IB Cable 4 m 13 2 ft HP 10833D HP IB Cable 0 5 m 1 6 ft HP...

Страница 181: ...se insertion loss and may damage the optical input Pigtail Optical Output Connector The fiber pigtail optical output consists of a 9 125 m fiber pigtail with an FC PC connector attached Straight Conta...

Страница 182: ...Optical Heads You will need at least one connector adapter for each optical head HP 81000GI D4 HP 81000KI SC HP 81000SI DIN 47256 HP 81000VI ST HP 81000WI Biconic Model No Description Model No Descrip...

Страница 183: ...P 81000GA NEC D4 HP 81000KA SC HP 81000SA DIN 47256 4108 HP 81000VA ST HP 81000WA Biconic Model No Description Model No Description P N 5062 3988 Front Handle Kit P N 5062 3974 Rack Mount Flange Kit A...

Страница 184: ...182 Appendix B Accessories Connector Interfaces and Other Accessories Artisan Technology Group Quality Instrumentation Guaranteed 888 88 SOURCE www artisantg com...

Страница 185: ...C C Specifications Artisan Technology Group Quality Instrumentation Guaranteed 888 88 SOURCE www artisantg com...

Страница 186: ...184 Specifications Artisan Technology Group Quality Instrumentation Guaranteed 888 88 SOURCE www artisantg com...

Страница 187: ...pecified operating temperature and within a given time line voltage uninterrupted Center Wavelength The wavelength defined as wavelength in air and by the center of gravity of the spectral emission Th...

Страница 188: ...been covered The PDL PDG uncertainty includes all random and systematic uncertainties from the source the polarization controller and the optical power meter PDL is measured by applying random polariz...

Страница 189: ...aximum and minimum value of all differences Absolute PDCR uncertainty The PDCR uncertainty includes all random and systematic uncertainties from the source the polarization controller and the optical...

Страница 190: ...ns 1 At the following reference conditions Power level 10 W 20 dBm continuous wave CW Parallel beam 3mm spot diameter on detector Ambient temperature 23 C 5K At day of calibration add 0 3 for aging ov...

Страница 191: ...2 2 1000 1650 nm 2 2 1000 1600 nm 3 0 900 1600 nm Total uncertainty 2 4 50 pW 5 4 600 pW 6 1000 1650 nm 4 50 pW 1000 1650 nm 4 5 pW 1000 1600 nm 5 500 pW 900 1600 nm Linearity power 0 to 60 dBm 5 0 to...

Страница 192: ...Display resolution 0 001 dB Output power 1 10 dBm 8 dBm typ 10 dBm 8 dBm typ 10 dBm 8 dBm typ CW Stability 15 min T const 0 004 dB typ 0 004 dB typ 0 004 dB typ Backreflection sensitivity typ 0 001 d...

Страница 193: ...ainty 3 with higher insertion loss or source power 10 dBm PDL PDG PDCR values may be measured with increased uncertainty Central wavelength with internal source 1310 20 nm and or 1550 2 0nm Wavelength...

Страница 194: ...HP 8153A lightwave multimeter compliant command set where applicable HP IB Interface Function Code SH1 AH1 T6 L4 SR1 RL1 PP0 DC1 DT0 C0 Environmental Storage temperature 40 C to 70 C Operating temper...

Страница 195: ...D D Performance Test Artisan Technology Group Quality Instrumentation Guaranteed 888 88 SOURCE www artisantg com...

Страница 196: ...194 Performance Test Use the Performance Test to verify the instruments warranted performance Artisan Technology Group Quality Instrumentation Guaranteed 888 88 SOURCE www artisantg com...

Страница 197: ...HP 81553SM 1550nm Laser Source Module OR HP 81554SM 1310 1550nm Laser Source Module Wavelength Uncertainty 1 5 nm Wavelength Uncertainty 1 5 nm 1 1 1 1 1 1 1 1 1 Optical Attenuator HP 8156A Option 101...

Страница 198: ...and tests Test V PDL PDG uncertainty 020 only Test VI Repeatability PDL PDG using this head and OLA Head Input B If your OLA has only one HP 81521B 001 Head repeat tests Test V PDL PDG uncertainty 02...

Страница 199: ...ress INSTR 2 Select Source 3 Press 1310 NM or 1550 NM to get the desired wavelength 4 Press SOURCE ON OFF to enable the source Wavelengths for the Different Laser Options 013 set wavelength to 1310 nm...

Страница 200: ...r 3 To show the display on the OSA in linear mode a Press MENU b Select AMPT on the left side of the display c Press LINEAR on the right side of the display 4 To ensure interference free reading of th...

Страница 201: ...ed up and that the laser has settled 2 Zero the HP 8153A a Mount the protection cap on the head in order to keep the light out b Press MENU to change to Measure Mode c Press ZERO and wait while zeroin...

Страница 202: ...l the wavelength is displayed Use modify keys to edit the wavelength 4 Note the displayed power level in the test report Test III CW Stability Short Term 1 Set up and switch on the equipment a Connect...

Страница 203: ...Press PARAM until the averaging time is displayed Use the modify keys to change to 100ms c Select display in dB Press DB d Set wavelength to the actual wavelength Press PARAM until the wavelength is...

Страница 204: ...Note the displayed value in your test record Test IV Linearity and Accuracy The following steps describe the procedure for performing the accuracy test for the HP E5574A 81521B 001 Figure D 4 Accurac...

Страница 205: ...head connector adapters covered with plastic caps P N 5040 9361 or 5040 9351 5 First set the wavelength of the Laser Source to 1310 nm After performing the Linearity Accuracy test set the wavelength...

Страница 206: ...ess ZERO 3 Ensure that the Laser Source is enabled and enable the HP 8156A output 4 Set up the HP 8153A a Switch off autoranging Press AUTO b Select the 20 dBm range Use the UP and DOWN keys until 20...

Страница 207: ...splayed in dB as R1 in the test record 8 In the 10 dBm range a Set the display to show results in dBm b Alter the attenuation until the DUT displays 7 4 dBm c Press DISP REF then DB d Select the 0 dBm...

Страница 208: ...onnect the second HP 81521B 001 Head to Head Input B b Ensure that the instruments have warmed up and that the laser has settled 2 Set up the OLA a Optimize the OLA for PDL measurement Press PRESET an...

Страница 209: ...stable value after the window full marker is shown at the display in the test record 5 Move the fiber and the optical head to another position see Figure D 7 but don t move the equipment while measuri...

Страница 210: ...ser has settled 2 Set up the OLA a Optimize the OLA for PDL measurement Press PRESET and then press OPTIMIZE to change to PDL b Select Polarization Dependent Loss Application Press APPL select Pol Dep...

Страница 211: ...d Unmount the protection cap and connect the equipment as shown in Figure D 8 4 PDL Measurement a Press RESET b Note the first stable value after the window full marker is shown at the display in the...

Страница 212: ...is part of your OLA perform the test again with this Head b Ensure that the instruments have warmed up c Mount the protection cap on the head in order to keep the light out 2 Zero the HP 8153A a Pres...

Страница 213: ...the modify cursor keys c Set AUTODUMP OFF Press NEXT and use modify cursor keys to set autodump to off 5 Execute measurement a Press EDIT to get back to STABILITY b Press EXEC to execute datalogging c...

Страница 214: ...Uncertainty Repeatability for PDCR It is guaranteed by design that PDCR performance uncertainty and repeatability directly relates to the performance of the two optical sensors used in PDCR measuremen...

Страница 215: ...rformance Test Form Sheets Performance Test Form Sheets Please use copies of the following 6 form sheets for your individual performance tests Artisan Technology Group Quality Instrumentation Guarante...

Страница 216: ...______________ Hz Test equipment used Description 1 Optical Spectrum Analyzer 2 Attenuator 3 Std Lightwave Multimeter 4 Std Optical Head Interface 5 Std Optical Head 6 Lightwave Multimeter 7 Optical H...

Страница 217: ..._________ _________ nm 1330 00 1570 00 __________ nm II Output Power fiber type 9 125 m SM performed at 1310 nm performed at 1550 nm dBm 10 00 8 00 typ 10 00 8 00 typ dBm _________ _________ dBm n a n...

Страница 218: ...y Test Accuracy 9 75 W _______ W 10 25 W ________ W Linearity Range Power dBm dB 10 dBm 20 dBm 0 dBm 10 dBm 20 dBm 30 dBm 30 dBm 40 dBm 17 4 7 4 27 4 37 4 Disp Ref Disp Ref Disp Ref Disp Ref ______ R1...

Страница 219: ...t 6 measurement 7 measurement 8 measurement 9 measurement 10 measurement 11 measurement 12 measurement 13 measurement 14 measurement 15 measurement 16 measurement 17 measurement 18 measurement 19 meas...

Страница 220: ...8 measurement 9 measurement 10 measurement 11 measurement 12 measurement 13 measurement 14 measurement 15 measurement 16 measurement 17 measurement 18 measurement 19 measurement 20 measurement Repeat...

Страница 221: ...Spec Result Maximum Spec Measurement Uncertainty VII Noise fiber type 9 125 m SM 30 seconds T constant DIFF Level variation peak to peak Optional Noise test with second HP 81521B 001 Head as part of...

Страница 222: ...220 Appendix D Performance Test Performance Test Form Sheets Artisan Technology Group Quality Instrumentation Guaranteed 888 88 SOURCE www artisantg com...

Страница 223: ...E E Cleaning Procedure Artisan Technology Group Quality Instrumentation Guaranteed 888 88 SOURCE www artisantg com...

Страница 224: ...into the end of an optical cable attached to the optical output when the device is operational The laser radiation is not visible to the human eye but it can seriously damage your eyesight WARNING To...

Страница 225: ...ndness or other serious damage to your health Cotton swabs Use swabs such as Q tips or other cotton swabs These are typically available from local distributors of medical or hygiene products such as s...

Страница 226: ...r pipe cleaner carefully and never reuse them as dust and dirt from the air or from previous cleaning can scratch and dirty your optical device Compressed Air This is available from laboratory supplie...

Страница 227: ...r optical device is scratched Ultrasonic bath These are typically available from photographic stores or laboratory suppliers An ultrasonic bath very gently removes greasy and other stubborn dirt from...

Страница 228: ...ning extremely sensitive devices such as mirrors Infrared sensor card This is typically available from laboratory suppliers With this card you can qualitatively check the uniformity of your emitted la...

Страница 229: ...ot press the bottom of the cap onto the fiber as any dust in the cap can scratch or dirty your fiber surface When you have finished cleaning put the dust cap back on or close the shutter cap if the eq...

Страница 230: ...vice first Cleaning Cable Connectors Cleaning connectors is difficult as the core diameter of a singlemode fiber is only about 9 m This generally means you cannot see streaks or scratches on the surfa...

Страница 231: ...h isopropyl alcohol 2 Clean the connector by rubbing the cotton swab over the surface using a small circular movement 3 Take a new dry soft tissue and remove the alcohol dissolved sediment and dust by...

Страница 232: ...cular movement 2 Blow away any remaining lint with compressed air Procedure for Stubborn Dirt Use this procedure particularly when there is greasy dirt on the adapter 1 Moisten a new cotton swab with...

Страница 233: ...ace using a small circular movement 3 Blow away any remaining lint with compressed air Procedure for Stubborn Dirt Use this procedure particularly when there is greasy dirt on the interface 1 Moisten...

Страница 234: ...or dirt with compressed air Procedure for Stubborn Dirt Use this procedure particularly when there is greasy dirt on the adapter CAUTION Be careful when using pipe cleaners as the core and the bristl...

Страница 235: ...Take extra care when cleaning lenses with these coatings Lens assemblies consisting of several lenses are not normally sealed Therefore use as little alcohol as possible as it can get between the len...

Страница 236: ...Preferred Procedure 1 Blow away any dust or dirt with compressed air Procedure for Stubborn Dirt Use this procedure particularly when there is greasy dirt on the lens CAUTION Only use water if you ar...

Страница 237: ...2 Take a new dry soft tissue and remove the alcohol dissolved sediment and dust by rubbing gently over the surface using a small circular movement 3 Blow away remaining lint with compressed air Clean...

Страница 238: ...it has been removed after cleaning you need a microscope WARNING Never look into an optical output because this can seriously damage your eye sight To assess the projection of the emitted light beam y...

Страница 239: ...ubborn Dirt Use this procedure particularly when there is greasy dirt on the interface and using the procedure for light dirt is not sufficient Using isopropyl alcohol should be your last choice for r...

Страница 240: ...film This procedure is time consuming but you avoid scratching or destroying the surface 1 Put the film on the surface and wait at least 30 minutes to make sure that the film has had enough time to d...

Страница 241: ...ed by becoming mechanically distorted Preferred Procedure 1 Use compressed air at a distance and with low pressure to remove any dust or lint Procedure for Stubborn Dirt Do not use an ultrasonic bath...

Страница 242: ...240 Appendix E Cleaning Procedure Cleaning Procedures Artisan Technology Group Quality Instrumentation Guaranteed 888 88 SOURCE www artisantg com...

Страница 243: ...F F Error Messages Artisan Technology Group Quality Instrumentation Guaranteed 888 88 SOURCE www artisantg com...

Страница 244: ...ituations when the OLA does not know what to do If this occurs the instrument will question you This appendix provides information on these questions Artisan Technology Group Quality Instrumentation G...

Страница 245: ...ted and you start the applications Coupler Test or PD Coupler Test respectively P P par You may encounter this message when measuring Return Loss It appears whenever the optical power which is current...

Страница 246: ...199 These are error messages in the range 100 to 199 They show that a syntax error has been detected by the parser in a command such as incorrect data incorrect commands or misspelled or mistyped com...

Страница 247: ...arameters were received for a command than were expected 109 Missing parameter Fewer parameters were received than the command requires 110 Command header error A command header is the mnemonic part o...

Страница 248: ...aracter in a decimal data or a 9 in octal data 123 Exponent too large The exponent must be less than 32 000 124 Too many digits The mantissa of a decimal number can have a maximum of 255 digits leadin...

Страница 249: ...allowed 150 String data error This error shows that the parser has found an error in string data but cannot be more specific 151 Invalid string data The string data is incorrect for example an END me...

Страница 250: ...e in local This command is invalid because in conflicts with the configuration under local control 202 Settings lost due to rtl A local setting was lost when the instrument was changing from remote to...

Страница 251: ...xecuted because of missing instrument hardware Device Specific Errors 300 to 399 These are error messages in the range 300 to 399 or between 1 and 32767 They show that an error has been detected that...

Страница 252: ...00 to 499 They show that an error has been detected by the output queue control A query error is signalled by the query error bit bit 2 in the event status register 400 Query error This shows that a q...

Страница 253: ...output buffer are full and the device cannot continue 440 Query unterminated after indefinite response Two queries were received in the same message The error occurs on the second query if the first...

Страница 254: ...252 Appendix F Error Messages HP IB Messages Artisan Technology Group Quality Instrumentation Guaranteed 888 88 SOURCE www artisantg com...

Страница 255: ...components of the OLA 23 connector adapters for optical heads 180 interfaces 179 to HP IB 172 cooling the instrument 171 coupler test application 66 parameters 66 coupling ratio 66 72 measurement spe...

Страница 256: ...nstructions 164 INSTR key 28 instrument positioning 171 instrument specific errors 244 internal laser 83 K keypad 27 keys on the front panel 26 knob 29 L laser source external 84 internal 83 safety in...

Страница 257: ...8 CW stability short term 200 equipment 195 form sheets 213 linearity and accura cy 202 noise 210 output power 199 PDL PDG uncertain ty 020 on ly 206 repeatability PDL PDG 208 setup and perform ance 1...

Страница 258: ...eturn loss application 58 RL 58 64 rotary knob 29 RST 114 S safety considerations 165 safety information for laser source 6 Safety Summary 4 Safety Symbols 5 SAV 115 SCAN commands 127 scan rate change...

Страница 259: ...traight contact connector 179 sweeping through all states of polarization 85 SYST key 91 SYSTem commands 158 system configuration 91 T technical data 188 termination of the automat ic sweep 86 test eq...

Страница 260: ...uipment Have surplus equipment taking up shelf space We ll give it a new home Learn more Visit us at artisantg com for more info on price quotes drivers technical specifications manuals and documentat...

Отзывы: