


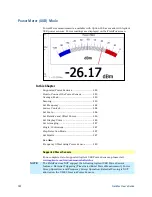


Power Meter (USB) Mode
145
How to set Source Control and Power Level
Press
Freq/Dist
Then
Advanced
NOTE
When Option 208 (FOPS) is enabled, to access Source Control, press
Sweep 3
Then
Power Setup
Learn more about FOPS beginning on page 149.
Then
Source Enable
o
ON
Turn ON the internal source
o
OFF
Turn OFF the internal source
Optionally set the power level.
Press
Src Nom Power
(-15 dBm default setting) Set output power to an
arbitrary value at the displayed CW frequency.
Then enter a value using the numeric keypad, the
▲
|
▼
arrows, or the rotary
knob.
Press
Enter
Scale
The scale of the Power Meter display can be set manually or automatically. The
major and minor ticks are set automatically and can NOT be changed. Although
the scale settings are limited, you can view measurements beyond these settings
by performing Autoscale.
How to Scale the Power Meter display
Manually:
Press
Scale / Amptd
.
Then choose from the following:
o
Scale Min
Sets the low power level of the power meter display. Type a
number and select the units or press
Enter
. This value is limited to –100
dBm.
o
Scale Max
Sets the high power level of the power meter display. Type a
number and select the units or press
Enter
. This value is limited to 100
dBm.
Autoscale:
Using Autoscale, the current reading is used for the center of the scale, and Min
and Max values are set accordingly.
Press
Scale / Amptd
.
Then
More
.
Then
Autoscale
.


