background image


R01.43


22.10.2018


Page 85 


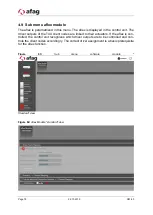
  In order for the bootloader to become active, the control unit must be re-

started. In the "aflexConfigurator", execute a restart of the control unit via the 
"Restart Controller" button.  

  The bootloader is active, the three status LEDs flash in the same clock.  

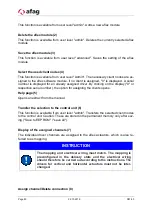
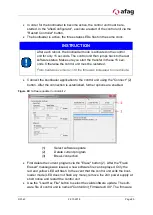
INSTRUCTION 


After each reboot, the bootloader mode is activated in the control 
unit for only 15 seconds. The control unit then jumps back to the last 
software status. Make sure you start the transfer in these 15 sec-
onds. Otherwise the control unit must be restarted. 

From hardware version v1.30 the time was increased to one minute.


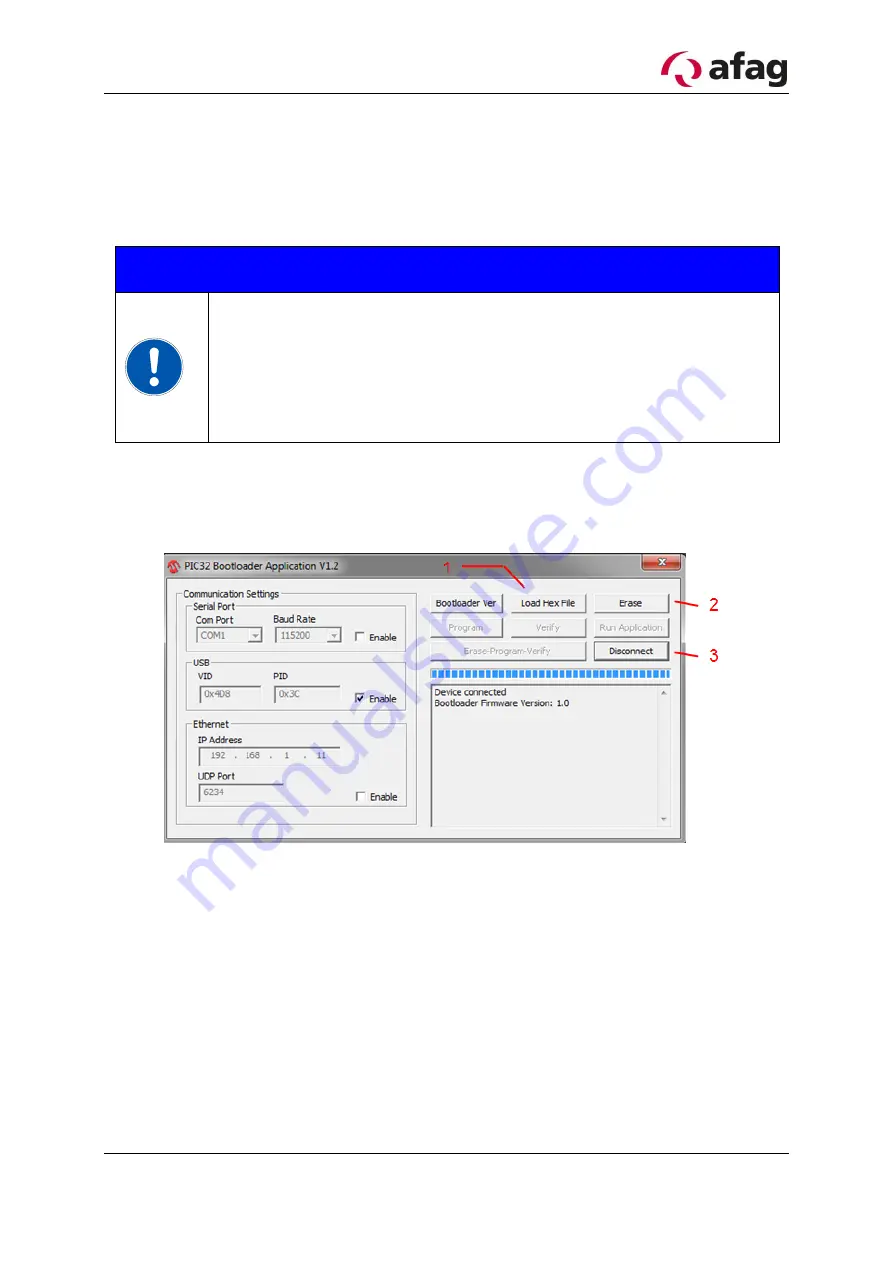
  Connect the bootloader application to the control unit using the "Connect" (2) 

button. After the connection is established, further options are enabled.  

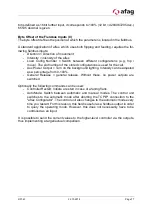
Figure 69: Software update ControlUnit 2 


(1) 

Select software update 

(2) 

Delete current program 

(3) 

Break connection 


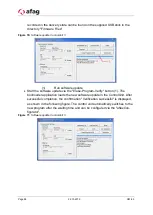
  First delete the current program via the "Erase" button (2). After the "Flash 

Erased" message was issued, a new software file can be played. Only the 
red and yellow LED will flash. In the event that the control unit exits the boot-
loader mode (LED does not flash any more), remove the 24V power supply at 
short notice and restart the control unit.  

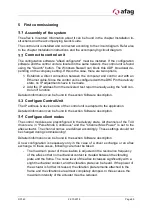
  Use the "Load Hex File" button to select the valid software update. The soft-

ware file of control unit is named "ContorlUnit_FirmwarevXXX". The firmware 

Содержание aflex 150 qc

Страница 1: ...Flexible feeding system aflex 150 qc aflex 200 qc Operating or assembly instructions Copyright by Afag GmbH ...

Страница 2: ...ial 50473406 Black POM FDA plate for transported material 50473407 aflex 200 qc Basis with red back light 50473404 Basis with white back light 50473405 White POM FDA plate for transported material 50473410 Black POM FDA plate for transported material 50473411 Type Order number aflex Control Standard Digital I O 50473414 Profibus extension 50441875 Ethercat extension 50473417 Profinet extension 504...

Страница 3: ...EtherCAT inter face R01 3 Documentation of the Profinet interface R01 4 Documentation of ControlUnit Firmware v1 40 Improved direction control when using digital inputs Changes the user authorization of the MAC filter on the connection page R01 41 Minor additions of Profinet description R01 42 Minor additions of technical plan R01 43 Warning notice of point 1 3 intended use modified Temperature ra...

Страница 4: ...the device 19 3 2 1 Drilling picture for assembly 19 3 2 2 Dimensions of the base plate 19 3 2 3 Assembly on base plate 20 3 2 4 Dismantling the funnel plate 20 3 2 5 Tighten Flex sockets 21 3 2 6 Remove transport safety 22 3 2 7 Install funnel plate 22 Connection of the device 23 Power supply 24 Connection of the control 24 3 5 1 Building the control module 25 3 5 2 Electrical Connection 26 4 Sof...

Страница 5: ...are update 84 4 10 1 The Bootloader 84 4 10 2 Software update ControlUnit 84 4 10 3 Software update Client Node 87 5 First commissioning 89 Assembly of the system 89 Connect to control unit 89 Configure ControlUnit 89 Configure client nodes 89 Configure software modules 90 Integration with higher control 90 5 6 1 Development of transfer values 92 5 6 2 Digital input output 93 5 6 3 Telnet Server 1...

Страница 6: ...rect potential danger When the information is not followed it can lead to death or sever body injuries disability WARNING Indicates a possible threatening situation When the information is not followed it can lead to death or sever body injuries disability CAUTION Indicates a possible dangerous situation When the information is not followed it can lead to property dam age and mild or indirect body...

Страница 7: ...uired activities and thus identify possible dangers and can avoid them Definition for specialists according to IEC 364 Disturbances that impair the safety of personnel of aflex or other material assets must be eliminated immediately The following instructions serve not only for the personal safety of the operating per sonnel as well as the safety of the described products and the devices connected...

Страница 8: ...ual as well as observing all safety instructions WARNING The aflex must not be used a In humid and wet areas b At temperatures below 10 C or above 45 C c In areas with easily flammable media d In areas with explosive media e In heavily polluted or dusty environments f In an aggressive environment e g saline atmosphere Obligations of the operator A safety related condition and use of the aflex is t...

Страница 9: ...e equipment PPE for activities with in creased risk of injury Pinpoint the responsibilities according to the various tasks installation commission ing and operation You must immediately notify your supervisor personally of any occurring and recog nizable malfunctions ...

Страница 10: ...aflex outside the physical application limits de scribed in chapter Commissioning Operation c Improper assembly commissioning and operation of the aflex d Changing the control software without prior consultation with the manufacturer e Operating the aflex at or with obvious faults and or defects f Cleaning work without observing the safety precautions for aflex work on site g Improper assembly com...

Страница 11: ...e component with handling system is removed to the further stations An as efficient as possible cycle time implementation of the aflex consists of the fol lowing features 1 The aflex is driven with the least possible drive time This should be long enough to re orient the component The flipp configuration is used for that purpose It is more effective to isolate a little many times and take camera p...

Страница 12: ...Dimensions A mm 210 295 B mm 160 240 C mm 150 220 D mm 100 165 E mm 83 3 106 8 F mm 21 21 G mm 18 18 H mm 12 12 I mm 4 4 J mm 74 93 K mm 17 22 Max size of the parts Max weight of the parts See 2 3 1 2 3 2 Voltage supply V 24V 24V Total current max A 10 A 10 A Recommended fuse C10A 10A GL T C10A 10A GL T Relative duty cycle of the actuator 15 15 ...

Страница 13: ...cription Unit aflex150 qc aflex200 qc Dimensions A mm 210 295 B mm 160 240 C mm 100 165 D mm 150 220 E mm 21 30 F mm 16 9 26 G mm 12 8 20 30 H mm 16 20 I mm 176 255 J mm 126 200 Weight g 253 854 Table 3 Technical data of the background lighting Description Symbol Unit Evaluation Min Type Max Working voltage DC smoothed VCC V 23 0 24 0 25 0 Input current aflex 150 IG A 0 4 0 5 0 7 colouring white K...

Страница 14: ...24 0 30 0 Input current Digital output IDI mA 10 10 1 10 5 Reverse polarity protection Digi tal input output Yes PWM Power output VOUT V VCC 0 5 VCC VCC 0 5 Pulse width Power output 0 100 Frequency power output FOUT kHz 39 7 40 40 3 Output current Power output IOUT A 4 Reverse polarity protection Power output No Operation Storage temperature C 0 40 C 0 85 C Relative humidity max 40 without conden ...

Страница 15: ...orking voltage DC smoothed VCC V 23 0 DC 24 0 DC 25 0 DC Input current IG A 0 050 0 080 0 120 Reverse polarity protection Voltage supply Yes Operation Storage temperature C 0 40 C 0 85 C Relative humidity max 40 without conden sation Protection class IP 30 Table 7 Technical data of the EtherCAT and the Profinet modules Description Symbol Unit Evaluation Min Type Max Working voltage DC smoothed VCC...

Страница 16: ... of 2 3 2 3 2 Maximum part weight A fixed specification of the maximum part weight cannot be given The limiting weight depends on the component geometry and the material If the components are too heavy they cannot be reoriented reliably for the process Components should always be tested in advance for suitability A non binding reference to the part size and part weight Guidelines for hexagonal nut...

Страница 17: ...ors PB Node Optional field bus interface EtherCAT Node Optional field bus interface Profinet Node Optional field bus interface All control modules communicate via a BackSideBus which is mounted in a standard 35x7 5mm DIN rail DIN rail and BackSideBus are included in the scope of supply INSTRUCTION For reasons of copyright protection it is not permitted to copy modify decompile and or decompile the...

Страница 18: ...state care must be taken to en sure a free of play packaging Otherwise there is a risk that the control modules will come off the bus rails during transport and carry permanent damage The transport packaging supplied must be used WARNING Improper use of transport equipment floor conveyors indoor crane help aids slings etc can lead to bruises and other inju ries Required behaviour Observe and compl...

Страница 19: ... installed in immediate proximity to one another care must be taken that the mounting plates have the stated minimum mass as well as a vibration decoupling from each other This decoupling is also applicable if vibrations or shocks are to be expected by other components of the application For vibration decoupling we recommend detachable damping elements which can compensate for movements in X Y Z d...

Страница 20: ... the funnel plate In order to fix the aflex on the base plate the flex bushings must be tightened Disman tle the funnel plate with the provided plastic wedge INSTRUCTION Please use only the dismantling wedges for the dismantling pro cess of the funnel plate Insert the wedges into the gap between the white and the red plate First press the two wedges together to tilt them outwards in a rotary movem...

Страница 21: ...sembly wedges Figure 6 Remove funnel plate 3 2 5 Tighten Flex sockets The Flex sockets should have been tightened using the supplied 5mm wrench socket a torque wrench and corresponding to the sequence shown below Figure 7 Tighten Flex sockets 1 2 3 1 0 9 Nm 2 0 9 Nm 3 0 9 Nm 4 0 9 Nm ...

Страница 22: ... 17 mm 3 2 6 Remove transport safety Remove the transport safety using a metallic object Figure 8 Remove transport safety 3 2 7 Install funnel plate Re install the funnel plate from top of the aflex Observe the different openings on the funnel plate or on the aflex itself during this Figure 9 Install funnel plate ...

Страница 23: ...in can be found in the supplied circuit plan The aflex qc can be connector either sideways or from below The non connected side must be covered since it could lead to short circuits Figure 8 sideways connection Figure 9 Connection from bottom CAUTION The non connected plug connector on the aflex must be compul sorily covered Otherwise it could lead to short circuits ...

Страница 24: ...vailable in the chapter 2 3 Technical data The assembly may only be carried out by a qualified personnel Connection of the control All modules of the control are mounted on a profile rail with BackSideBus The modules are fixed via end terminals and the terminating resistors of the BackSide Bus are thus protected Below is a drawing of the controller The profile rail is delivered with a length of 14...

Страница 25: ...the bus circuit board using the corresponding circuit board cover Now place the individual control modules on the profile rail Make sure that the housings are not jammed and the con tacts to the BackSideBus are not bent Mount the profile rail end brackets TS35 so that the terminat ing resistors of the bus rail are protected and the control mod ules are fixed ...

Страница 26: ... the aflex cable in the best case to the con trol modules via a terminal strip Supply the aflex back light according to the circuit diagram with 24V DC and connect the CAN signals to the ControlUnit INSTRUCTION It is possible to separate the screw terminals of the modules from the housing via the clip lock in order to connect the lines How ever do not interchange the individual terminals circuit d...

Страница 27: ...ptional fieldbus interfaces according to the circuit diagram Connect the aflex via one of the two connectors Cover the unused of the two connectors with the sup plied cover plate The cover plate is mounted in the delivery condition on the side or ...

Страница 28: ...p and preconfigured to the desired application via this Windows application The aflexConfigurator is used to set the aflex on the components to be fed Figure 11 aflexConfigurator Start page Installation of the Software Install the software included in the scope of delivery To do this run the setup exe and follow the installation instructions After the aflexConfigurator is successfully installed st...

Страница 29: ...ndard Basic functions for manual operation of the aflex system o Can not make permanent changes saving is deactivated o Can load configurations and test their function User Advanced Contains extended rights against the standard user This user group is used for com missioning the aflex system o Has the right to change and save configurations o Can change general settings and save them o Has access ...

Страница 30: ...dules and change basic settings This user is only to be used when exchanging modules The admin user is password protected The password should be determined from the manufacturer INSTRUCTION The user admin has full access rights In case of improper op eration the function of the aflex system is impaired or lost ...

Страница 31: ...evices in the network 4 Display the control unit In order to establish a connection to the control unit of the aflex controller this must be connected to the computer via Ethernet interface Connect the controller to the computer s network User switching 1 User change for extended display of options For more information on user groups see 4 2 Help page 2 Display the corresponding extract from the o...

Страница 32: ...described below Figure 15 Display ControlUnit 1 ControlUnit Name 2 Remove ControlUnit from lists 3 IP Address 4 Series number 5 Network status Subnet 6 Ping Status 7 Ping reply 8 Save ControlUnit 9 Establish connection ControlUnit Name 1 The name of the ControlUnit can be changed in the aflexConfigurator and the applica tion can be adjusted This facilitates the identification while using more afle...

Страница 33: ...re visualized in this line Save control unit 8 Once detected control unit s can be stored for later use in a local file If the aflexCon figurator is closed all control unit s with the status remember connection are saved These are loaded when the program is restarted and added to the display To prevent older control unit s to display automatically the checkbox remember connection has to be removed...

Страница 34: ...work connection has been interrupted Figure 18 Control unit ready for connection set up The control unit delivers a valid ping response The response time is displayed The connection set up is started via the connect button The Configurator is not connected to the device it is located in the same subnet but no connection to the device can be established Possible Cause The device is offline or there...

Страница 35: ...In admin mode a control unit can also be added via a button The IP address is speci fied here As soon as the aflexConfigurator finds a control unit with this IP address the data will be loaded and displayed Figure 21 Control unit Display advanced The display of the control unit is extended in the advanced mode by the MAC address of the device Each ping is checked via the MAC filter This determines...

Страница 36: ...Page 36 22 10 2019 R01 43 ...

Страница 37: ...he control unit is read out Figure 22 Connection set up If another aflexConfigurator is already connected to the control unit no TCP IP con nection is established The connection attempt is terminated after expiry of the time out time Main menu After successful connection the menu control interface is displayed Figure 23 Control interface ...

Страница 38: ...tus The sliding button can be used to toggle between automatic manual modes Automatic operation In automatic mode the aflex control responds to commands from the higher level con troller These are transmitted via the fieldbus interface As long as the automatic mode is active no commands can be executed from the aflexConfigurator The aflexCon figurator generates an error message in this case After ...

Страница 39: ...ors are switched off The current release is displayed by the status 1 If a release exists this is displayed with released otherwise with inhibit Control interface 3 The menu control interface provides all functions for the manual operation of the aflex These are described4 5 in more detail in the section Controller menu 4 Settings of the control unit are made here These are for example network set...

Страница 40: ...r Switching 1 User change for extended display of options Further information on the user groups can be found in the section4 2 Return to home page 2 Deletes the connection to the current control unit and returns to the start page ...

Страница 41: ... mode manual is a prerequisite for controlling the aflex via aflexConfigurator 4 5 1 Aflex control panel The aflex control panel is used to manually control and configure the aflex control panel Figure 27 aflex control panel 1 aflex Control Pad 2 Display Direction Intensity 3 Help page 4 horizontal primary phase 5 horizontal inverted phase 5 6 7 8 2 2 3 1 1 ...

Страница 42: ...ry and the inverted phase The actuator in whose direction the components are to be con veyed is controlled as a primary phase If for example the aflex is controlled with a directional specification of 180 X the actuator X is controlled as a horizontal primary phase and the actuator X as a horizontal inverted phase All phases are de fined in percentage This is the percentage distribution of a perio...

Страница 43: ...flex In addition the frequency can be finely adjusted using the buttons 1 1 and 0 1 0 1 The vibration fre quency has a decisive influence on the behaviour of the components on the aflex To separate the components the resonance frequency of the vibrating plate is selected For the conveying of components this not suitable This feed frequency must be de termined empirically by the component 4 5 1 1 A...

Страница 44: ... horizontal primary phase The horizon tal inverted phase is controlled as a short pulse at the end of the horizontal primary phase 2 3 Diagram vertical phase 4 The vertical actuators are steered timely to the horizontal actuators The components are excited by the vertical vibrations of the plate 4 5 2 Aflex configurations In order to enable different components or movement sequences to be used on ...

Страница 45: ...ration 3 Help page 4 Import Export of Configurations 5 Select configuration number 6 Configuration name Input 7 Save configuration 8 Delete configuration Available configurations 1 Display saved configurations Display of configuration number and name Load configuration 2 Load the bottom 1 selected configuration Help page 3 Display the corresponding extract from the operating manual 2 4 3 3 6 7 7 8...

Страница 46: ...From user level advanced visible Entry of the configuration name should be saved Maximum of 21 characters Save configuration 7 From user level advanced visible Saves the current aflex parameters under the se lected configuration number 5 and the entered configuration name 6 Delete configuration 8 Visible from user level advanced Deletes the selected configuration 1 Configura tion numbers 1 2 can n...

Страница 47: ...nd imported Figure 33 simulate external machine standard view Figure 34 simulate external machine advanced view 1 Select a simulation 2 Help page 3 Start Stop of the selected demo 4 Create a new simulation 5 Editing the selected simulation 6 Delete the selected demo Selection of a simulation 1 Display of saved available simulations Help page 2 Display the corresponding extract from the operating m...

Страница 48: ...From user level advanced visible Deletes the currently selected simulation 4 5 4 1 Demo Configurator The demo configurator is used to configure simulations The individual functions are described in more detail below Figure 35 demo configurator 1 Select configuration 2 Select direction 3 Select intensity 4 Select duration 5 Pause time 6 Demo Name 7 Description 8 Export 9 Import 10 Save 11 Cancel 1 ...

Страница 49: ...00ms in case of false entry the value is not accepted Pause time 5 A pause time in which the intensity is set to 0 Entry is possible via slider or textbox Valid values 0 20000ms in case of false entry the value is not accepted In order to avoid over heating of the aflex it should be controlled by a relative switching duration 15 If the pause time is too low a warning and the necessary pause durati...

Страница 50: ...n the controller menu The TCP IP connection is configured the telnet server is activated and backups are saved or imported Figure 36 Sub menu controller user Standard Figure 37 Sub menu controller user Advanced 1 Display ControlUnit information 2 Interrupt connection 3 Restart ControlUnit 4 Set the general release 5 Status display Operating voltage of the ControlUnit 6 Help page 7 Activation of th...

Страница 51: ...splay the voltage supply of the control unit Help page 6 Opens an extract from the manual Bootloader Mode 7 This function is visible from user level advanced The Bootloader Mode is used when running software updates on the control unit If the Bootloader mode is active there is no communication between the control unit and the control modules The aflex is not functional until the bootloader mode is...

Страница 52: ... freely defined in the Fieldbus Configuration menu The specifications of the digital interface can be found under Technical data Help page Digital IO 2 Opens an extract from the operating manual Help page PowerOuptut 3 Opens an extract from the manual Power Output 4 If there is an aflex qc with integrated Backlight controlled by the ControlUnit this Output is not used Otherwise this 24V PWM output...

Страница 53: ... configuration of the aflex controller The assigned device name is displayed in the Device List New settings are transferred to the control unit with Set new settings 3 These are activated after a restart of the control unit Restart the control unit with the Restart control unit button The connection to the aflexConfigurator is interrupted if neces sary the IP address of the computer has to be adj...

Страница 54: ...red on the control unit To back up these settings you can create a complete backup of the EEPROM The Load Configuration to File area 1 is used to create this backup After the EEPROM has been read the backup file will be created using the Save to File button The backup file can be loaded in the Restore Config uration From File area 2 and transferred to the EEPROM To enable this data the control uni...

Страница 55: ...el control The server is activated in the aflexConfigurator More detailed information about the Telnet protocol can be found in the section Telnet Server Activate Telnet Server 1 Activate the Telnet server Telnet Port 2 Port via which the telnet server is addressed Console for Telnet Control 3 The console is used to simulate a superior control and to test the Telnet connection quickly After the co...

Страница 56: ...nding the command line 7 Sending the command line A brief description of the protocol structure is stored in the expander command overview Delete the saving 8 Delete the receiving buffer Sub menu clients The sub menu client nodes is opened via the main menu In this all control modules that communicate with the control unit via the BackSideBus are displayed Clicking on the individual clients opens ...

Страница 57: ... the client and this can be used with all functions Bootloader 3 The bootloader is used to transfer firmware upgrades to the clients If the client is in the boot loader no firmware is active and all client functions are disabled This notifi cation is also displayed when you click on this client It is also possible to leave the boot loader directly via the go back to firmware button Figure 43 Bootl...

Страница 58: ...he control unit It is possible to register the client with a mouse click The client switches to the connected or bootloader status and the corresponding functions become available The registration must be saved in order to retrieve you after a restart The Save to EEPROM function is used for this purpose This is described in the following chapter Figure 45 unregistered node ...

Страница 59: ...t Node Functions Advanced View Figure 48 Client Node Functions Admin View 1 Reboot 2 Activate Bootloader 3 Save to EEPROM 4 Add Client Node 5 Change Client Node 6 Delete Client Node Reboot 1 Restart the client node Activate Bootloader 2 This function is available from the user level advanced Enables bootloader mode and restarts the client node When the bootloader is activated the client node chang...

Страница 60: ... is available from user level admin and is used to exchange client nodes The serial number of the new client node is entered in the text field All settings of the currently selected client node are transferred to the new one The current client node is then deleted If the client node is used in an aflex module these settings are also accepted Figure 50 Exchange Client Node Delete Client Node 5 Avai...

Страница 61: ...nd firmware version this information must be specified for a support request Under this information the individual channels of the T4X Node are displayed The user level standard has no access rights to it This is visualized via the prohibition signs Figure 52 T4X Client Node Advanced view 1 Status Release From the user level advanced the T4X channels will be enabled All settings exclusive min max ...

Страница 62: ...2 The control frequency of the T4X channel At this frequency the PWM output is pulsed Channel Phase 3 The PWM output is not controlled permanently but pulsed This pulsing causes the vibration of the aflex system The pulse duration is set via the phase setting Channel phase 3 It defines the period during which the output with appropriate duty cycle 1 is controlled within a frequency period 2 The ma...

Страница 63: ... setting can be set individually for each channel INSTRUCTION The min max power of the individual channels is already pre set in the delivery state and should only be adapted when an aflex exchange is used Pulse Mode 2 An aflex is always controlled with the Pulse Mode Continuous during operation In this mode each actuator is pulsed with the set frequency and channel phase Alternatively the mode Pu...

Страница 64: ...ut the client node is displayed in the client node information line 1 The serial number hardware version and firmware version this information must be specified for a support request The temperature display 2 shows the current temperature on the back light board in the aflex Figure 56 Backlit intensity 1 Set light intensity The user standard has only the possibility to adjust the light intensity o...

Страница 65: ...off 255 maxi mum brightness The clusters are pre set and calibrated in the delivery state This set ting is not for the brightness setting which is set in the expander Backlit Node light Intensity The calibration should only be adjusted if necessary in case of inhomoge neous tapping surface Set LED Intensity 2 Enter the new intensity of the channel in the text box The new value is transferred with ...

Страница 66: ...th of the fieldbus inputs 4 Data width of the fieldbus outputs 5 Transfer new settings 6 Re initialize Profibus Node The Profibus address 2 and the data width of the fieldbus node are defined in the client configuration 3 4 The settings can be adjusted from the user level advanced The settings are transmitted by means of the send settings 5 button The reinitial ize button 6 initializes the Profibu...

Страница 67: ...hown The serial number hardware version and firmware version this information must be specified for a support re quest Client Node Driver State 2 Status of the EtherCAT driver in the client node DRV_RUNNING Driver active normal operating condition STOP Drivers stopped Restart via reboot or reinitialize possible Client Node Sync State 3 The fieldbus configuration between EtherCAT Node and control u...

Страница 68: ...the fieldbus connection WAIT_PROCESS Client Node is connected to the network PROCESS_ACTIVE There is a connection to the PLC the data exchange is active IDLE PLC is in STOP mode ERROR Network errors e g cable break Reinitialize Client Node 5 Reinitialize the client node ...

Страница 69: ...Client Node Information Line 2 Client Node Driver State 3 Client Node Sync State 4 Fieldbus Device State 5 actual IP address 6 actiaö station name 7 Reinitialize Client Node 8 Tool IPconfig Client Node Informations Line 1 General information about the client node is shown The serial number hardware version and firmware version this information must be specified for a support re quest Client Node D...

Страница 70: ... the PLC the data exchange is active IDLE PLC is in STOP mode ERROR Network errors e g cable break Actual IP address 5 Shows the actual IP address of the Profinet Modul Is only actualized by clicking the button refresh You can t set the IP address from the aflexConfigurator but you can use the Tool IP Config to do this Actual station name 6 Shows the actual station Name of the Profinet Modul Is on...

Страница 71: ...r of the outputs if IOPS Bad State changes to IDLE The network is informed that the I O data of the sub module with IOPS BAD is substituted with zeros clear Behavior of the outputs if connection is aborted State change to WAIT_PROCESS The network is informed that the I O data of all sub modules is substituted with zeros clear Behavior of the outputs at power on The network is informed that the I O...

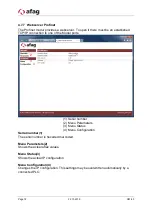
Страница 72: ... the Modul ports 1 Serial number 2 Menu Parameters 3 Menu Status 4 Menu Configuration Serial number 1 The serial number is hexadecimal coded Menu Parameters 2 Shows the actual aflex values Menu Status 3 Shows the actual IP configuration Menu Configuration 4 Changes the IP configuration This settings may be overwritten automatically by a connected PLC 1 4 2 3 ...

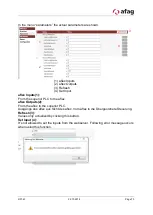
Страница 73: ...rom the superior PLC to the aflex aflex Outputs 2 From the aflex to the superior PLC Ausgänge des aflex aus Sicht des aflex Vom aflex in die Übergeordnete Steuerung Refresh 3 Values only actualized by clicking this button Set Input 4 It s not allowed to set the Inputs from the webserver Following error message occurs when using this function 1 2 3 4 ...

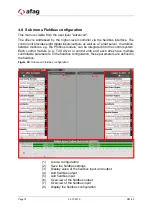
Страница 74: ...an be integrated into the control system Each control module e g T4X driver or control unit and each aflex have multiple controllable parameters In the fieldbus configuration these parameters are defined in the fieldbus Figure 60 Sub menu Fieldbus configuration 1 Load a configuration 2 Save the fieldbus settings 3 Display value of the fieldbus input and output 4 Add fieldbus output 5 Add fieldbus ...

Страница 75: ...eldbus settings 2 Saves the current fieldbus settings Display value of the fieldbus input and output 3 When the checkbox is activated the values of the fieldbus inputs and outputs are dis played These must be updated via the refresh button The checkbox for the display and the button refresh activate or update both the inputs and the outputs The values of the fieldbus interface are shown No current...

Страница 76: ...eldbus Device 1 The fieldbus interface defines the interface via which the higher level control is com municated Parameter Target Field 2 Defines which parameter is described via the fieldbus input Addressed control module Target device 3 Defines the control module software module whose parameter is changed In this ex ample the direction of the aflex software module is changed with the serial numb...

Страница 77: ...he background lighting Intensity can be adjusted as a percentage from 0 100 General Release general release Without these no power outputs are switched Optionally the following commands can be used Controller Restart Initiate a restart in case of a falling flank AutoMode Switch between automatic and manual modes The control unit switches to the automatic mode after aborting the TCP IP connection t...

Страница 78: ...the T4X client nodes are linked to their actuators If the aflex is con trolled the control unit recognizes which driver outputs are to be controlled and con trols the client nodes accordingly The correct driver assignment is a basic prerequisite for the aflex function Figure 63 Sub menu software module Standard view Figure 64 aflex Module standard view ...

Страница 79: ... level admin Figure 65 aflex Module admin view 1 Add an aflex module 2 Delete the aflex module 3 Save the aflex module 4 Select the used client nodes 5 Help page 6 Transfer the selection to the control unit 7 Display of the assigned channels 8 Assign channel disconnect 9 Help page 10 Unassigned channels 11 Transfer the assignments to the control unit Add an aflex module 1 1 2 2 10 5 4 4 6 11 7 7 ...

Страница 80: ...y 0 or respective serial number the option for assigning the clients opens Help page 5 Opens an extract from the manual Transfer the selection to the control unit 6 This function is available from user level admin Transfers the selected client nodes to the control unit Caution These are stored in the permanent memory only after sav ing Save to EEPROM save all Display of the assigned channels 7 The...

Страница 81: ...nual Unassigned channels 10 The available channels not assigned yet For the proper function of the aflex all driver channels must be assigned and must match the electrical wiring Transfer the assignment to the ControlUnit 11 Transmits all current assignments to the control unit These settings must be trans ferred to the non volatile memory using the Save to EEPROM function or the save all function...

Страница 82: ...check wiring Not Tested No test has been carried out since the Software start CH wire connection fault The control signal does not come in the aflex The channel wire is open Interchanged or CH fault The wires of the channel are interchanged or the channel wire is open clientNode connection fault An aflex Linked ClientNode is offline or not availa ble General Release is missing General release must...

Страница 83: ...l actuators The vertical actuators then drop continuously and the vibrating plate moves slowed into the rest position The vibrations of the system are thus dampened Setting options Figure 66 Soft Release 1 Activate the Soft release mode 2 Help page 3 Set Hold intensity 4 Set Hold time 5 Set Release time Activate the Soft release mode 1 Activate Deactivate the check box Caution Since the aflex cycl...

Страница 84: ...on directory control unit Bootloader The software update of the control unit differs from that of the client nodes It is per formed using the application control unit Bootloader installed with the aflexConfigu rator The application can be found in the Afag GmbH folder via the start menu Pro ceed as follows Start the application Control unit Bootloader Figure 68 Software update ControlUnit 1 1 Esta...

Страница 85: ...e time was increased to one minute Connect the bootloader application to the control unit using the Connect 2 button After the connection is established further options are enabled Figure 69 Software update ControlUnit 2 1 Select software update 2 Delete current program 3 Break connection First delete the current program via the Erase button 2 After the Flash Erased message was issued a new softwa...

Страница 86: ...e update via the Erase Program Verify button 1 The bootloader application loads the new software update in the ControlUnit After successful completion the confirmation Verification successful is displayed as shown in the following figure The control unit automatically switches to the new program after the waiting time and can be configured via the aflexCon figurator Figure 71 Software update Contr...

Страница 87: ...ware update is the active bootloader mode of the client node To activate it the activate Bootloader function must be executed This activates the bootloader and restarts the client node When restarting this does not change into the firmware but starts the boot loader program If the client node is in the bootloader mode the functions shown below are displayed Figure 73 Software update Client Node 1 ...

Страница 88: ...ansfer is released By clicking on this the flash memory of the client node is deleted and then the new firmware file is transferred 3 Start firmware 4 As soon as the firmware file has been transferred fully the button for starting the firmware is released Clicking on this activates the firmware of the client node It is displayed as connected and the normal client node functions are available INSTR...

Страница 89: ... can be found in the section Software description Configure ControlUnit The IP address device name of the control unit is adapted to the application Detailed information can be found in the section Software description Configure client nodes The control modules are preconfigured in the delivery state All channels of the T4X drivers are in Pulse Mode Continuous and the Channel Max Power is set to t...

Страница 90: ...standard fieldbus configurations are stored in the aflexConfigurator It is rec ommended to use these for the control Delivered configuration files for e g the device description file for EtherCAT are created for this configuration The following com mands are included in the standard configurations Table 9 important commands for controlling aflex Command name Description Load Config Number Load cor...

Страница 91: ...s can be changed This may be of big advantage for e g in the case of a change of variants or an alternative component handling a change from separating to conveying As soon as a new configuration number is transferred to the aflex input the control unit switches the parameters As a rule a distinction is made between a conveyor configuration and a flip configura tion during the control A different ...

Страница 92: ...value can be calculated using the following formula 𝑀𝑎𝑥 𝑉𝑎𝑙𝑢𝑒 8𝐵𝑖𝑡 255 𝑀𝑎𝑥 𝑉𝑎𝑙𝑢𝑒 16𝐵𝑖𝑡 65535 𝑀𝑎𝑥 𝑉𝑎𝑙𝑢𝑒 32𝐵𝑖𝑡 4294967295 𝑉𝑎𝑙𝑢𝑒 𝑀𝑎𝑥 𝑉𝑎𝑙𝑢𝑒 100 𝑡𝑎𝑟𝑔𝑒𝑡 𝑝𝑒𝑟𝑐𝑒𝑛𝑡𝑎𝑔𝑒 If the intensity defined as 16Bit wide is set to 75 the value 49151 must be trans mitted A special case is the vibration frequency which is transmitted in heart Hz by a factor of 10 Thus a frequency of 56 4 Hz corresponds to a value of 564 Fo...

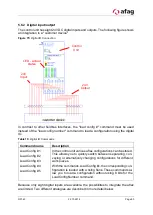
Страница 93: ...ig 2 Load Config 3 Load Config 4 Load Config 5 In the control unit various aflex configurations can be stored This allows you to quickly switch between separating con veying or alternatively changing configurations for different work pieces With the commands Load Config x the corresponding con figuration is loaded with a rising flank These commands al low you to load a configuration without using ...

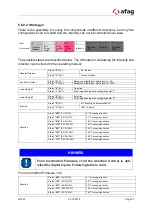
Страница 94: ...n be adjusted from 0 to 100 in several steps HINWEIS From ControlUnit Firmware v1 40 the Direction Control is im proved for digital In Outputs From this Version strategy 3 is pos sible Calculation of the direction value when using digital In Outputs from ControlU nit Firmware v1 40 𝐷𝑖𝑟𝑒𝑐𝑡𝑖𝑜𝑛 𝑉𝑎𝑙𝑢𝑒 𝑀𝑎𝑥 𝑉𝑎𝑙𝑢𝑒 1 360 𝑡𝑎𝑟𝑔𝑒𝑡 𝑑𝑖𝑟𝑒𝑐𝑡𝑖𝑜𝑛 INSTRUCTION In 90 of the applications it is sufficient to separate t...

Страница 95: ...nt release Aux Power Output Status 0 0V Background lighting off light intensity 0 Status 1 24V Background lighting on light intensity 100 Load Config 1 Status 0 0V No action Status 1 24V With rising flank load the configuration slot 1 Load Config 2 Status 0 0V No action Status 1 24V With rising flank load the configuration slot 2 Load Config 3 Status 0 0V No action Status 1 24V With rising flank l...

Страница 96: ... this strategy it is important to set the Horizontal Max Power to 0 In this way the configuration is independent of the direction since the horizontal actuators are deactivated The following figure shows the corresponding slider from the sub menu control interface Figure 77 Digital IO Typ1 horizontal max power setting ...

Страница 97: ...the configuration slot 1 Load Config 2 Status 0 0V No action Status 1 24V With rising flank load the configuration slot 2 Intensity Status 0 0V 0 Intensity aflex switched off Status 1 24V 100 Intensity Direction Status 000 0V 0V 0V 0 Conveying direction Status 100 24V 0V 0V 51 Conveying direction Status 010 0V 24V 0V 102 Conveying direction Status 110 24V 24V 0V 154 Conveying direction Status 001 ...

Страница 98: ...irection Status 111 24V 24V 24V 315 Conveying direction In the aflexConfigurator you must configure the fieldbus interface as shown in the fol lowing figure By configuring the outputs equal to the inputs you get a response about the current values of the aflex system Figure 78 Fieldbus Configuration IO Type 2 ...

Страница 99: ...irection can be found in the operating manual General Release Status 0 0V No release Status 1 24V Present release Aux Power Output Status 0 0V Background lighting off light intensity 0 Status 1 24V Background lighting on light intensity 100 Load Config 1 Status 0 0V No action Status 1 24V With rising flank load the configuration slot 1 Load Config 2 Status 0 0V No action Status 1 24V With rising f...

Страница 100: ...Page 100 22 10 2019 R01 43 Figure 79 Fieldbus Konfiguration IO Typ 3 ...

Страница 101: ...via the connect login button the heartbeat shows the existing connection A brief description of the Telnet protocol is stored in the command overview Telnet Protocol The Telnet protocol based on the ASCII code An empty space 0x20 is used as a separator At the end of each command a Carriage Return 0x0D Line Feed 0x0A is necessary Login To log on to the Telnet server a user name and password must be...

Страница 102: ...ule Serial 10 00 00 00 00 Bit address 40 byte address 5 0 Bit width 32 bits The aflex is to be controlled with an intensity of 80 This corresponds to a value of 32 bit width of 3435973836 The following command must be passed via telnet SI 40 3435973836 r n The telnet server reports the following acknowledge AK 40 3435973836 r n Get Output GO An output of the aflex system is queried via the Get Out...

Страница 103: ...a heartbeat during an existing connection If this is not received by the client the Telnet server will terminate the connection The Heart beat is built as follows HBT 1 HBT 0 The bit is changed between 1 and 0 for each Heartbeat In this case no CR and LF are sent Overview of Telnet commands Table 13 Overview Telnet commands Command Description Reaction SI Set Input An input is set ACK message of t...

Страница 104: ...ion of an optional Profibus interface This is offered by your Profibus module Like the two T4X driver modules this module is connected to the control unit via the back side bus The Profibus module has a 9 pole SUB D socket for communication with the master Figure 81 Profibus module It is recommended to use the predefined standard Profibus Fieldbus configuration for the control This is loaded via t...

Страница 105: ...put data These settings must match the settings of the Profibus master Figure 83 Profibus module Settings The aflex is integrated into the higher level control via the supplied GSD file As in the aflexConfigurator the corresponding input and output range must be defined Various input module or output module or input output modules are available for this purpose In this example two 16 byte DIO modu...

Страница 106: ...nds are addressed with the following addresses and command lengths Address Command lengths Command 200 1 Byte Load Config Number 201 2 Byte Aux Power Output 203 1 Byte Controller Restart 204 1 Byte AutoMode 205 1 Byte General Release 206 2 Byte Direction 208 2 Byte Intensity ...

Страница 107: ...rt X3 Figure 85 EtherCAT Module With the current aflexConfigurator software the EtherCAT module can only be oper ated with the standard EtherCAT configuration A flexible configuration of the in puts outputs is currently not available The device description file for EtherCAT sup plied on the USB stick only works with the standard EtherCAT configuration This con figuration is loaded and activated vi...

Страница 108: ...d into the folder C Twin CAT 3 1 Config Io EtherCAT 2 Create connection between SOS and EtherCAT interfaces 3 In TwinCAT3 E A Device EtherCATMaster right click Scan INSTRUCTION The device description file can be used together only with the standard EtherCAT Fieldbus configuration See chapter Sub menu Fieldbus configuration In addition to the standard inputs outputs described in the previous sectio...

Страница 109: ...odules this module is connected to the control unit via the back side bus The Profinet module has two ports X2 and X3 to communicate with the Profinet system Figure 88 Profinet Modul The GSDML device description file descripts the standard Profinet Configuration This Configuraiton is loaded in the submenu fieldbus menu with the function load standard configurations Figure 89 Profinet FieldbusConfi...

Страница 110: ...Client Node menu you can see the actual device states There is de tailed description in chapter 4 7 6 Figure 90 Profinet Client Node Anzeige INSTRUCTION The device description file can only used with the standard Profinet fieldbus configuration ...

Страница 111: ...Configurator Auto matic mode Parameters can only be changed via the fieldbus interface If the Configurator is connected the operating mode can not be switched via the fieldbus 1 Bit Control Unit General Release Release for the control of aflex If the release is not available no power outputs are switched 1 Bit Control Unit Load Con fig Number Load a saved configuration 8 Bit Control Unit Load Con ...

Страница 112: ...ase shifts of individ ual driver outputs 32 Bit T4X Driver Channel2 Phase On Separate setting of the phase shifts of individ ual driver outputs 32 Bit T4X Driver Channel3 Phase On Separate setting of the phase shifts of individ ual driver outputs 32 Bit T4X Driver Channel4 Phase On Separate setting of the phase shifts of individ ual driver outputs 32 Bit T4X Driver Channel1 Phase Off Separate sett...

Страница 113: ...t Control Unit Load Config Number Current loaded configuration 8 Bit Control Unit Load Config Number 1 Status if configuration 1 is loaded 1 Bit Control Unit Load Config Number 2 Status if configuration 2 is loaded 1 Bit Control Unit Load Config Number 3 Status if configuration 3 is loaded 1 Bit Control Unit Load Config Number 4 Status if configuration 4 is loaded 1 Bit Control Unit Load Config Nu...

Страница 114: ...er Channel2 Phase On Status of the phase shifts of driver out put 32 Bit T4X Driver Channel3 Phase On Display of the phase shifts of driver out put 32 Bit T4X Driver Channel4 Phase On Status of the phase shifts of driver out put 32 Bit T4X Driver Channel1 Phase Off Status of the phase shifts of driver out put 32 Bit T4X Driver Channel2 Phase Off Status of the phase shifts of driver out put 32 Bit ...

Страница 115: ...y be particularly vulnerable to EMF Persons with active medical implants are not allowed to stay in the danger area LED Display The LED status of the control modules must be monitored in case of error The follow ing is a list of possible messages Picture Legend LED On LED Off LED Blinking X Without im portance Control Unit Table 16 LED Displays Control Unit con err pwr Reporting Power supply IO co...

Страница 116: ... Reporting Power supply IO connected to control modules Power supply IO no connection to further control mod ules X Fault occurred during operation X Bootloader mode is active X Bootloader mode active no executable program avail able EtherCAT Node Table 19 EtherCAT Node con err pwr fbdata Reporting Power supply IO connection to control modules estab lished FB data are exchanged Power supply IO no ...

Страница 117: ...X Fault occurred during operation X Bootloader mode is active X Bootloader mode active no executable program avail able LED Reporting from INIT State or no voltage green stays on OPERATIONAL State blinking green PRE OPERATIONAL State flashing green SAVE OPERATIONAL State flickering green BOOT state red off No existing error blinking red Incorrect configuration red on Internal errors LED Reporting ...

Страница 118: ...ed on Internal error Unexpected internal error red flashes once error station name No station name assigned red flashes twice error IP address No ip address assigned red flashes thrice Error communi cation Expected configuration differs to actual config uration Tabelle 24 Profinet X2 X3 X2 X3 LED description comment off No link X2 X3 not connected No communication on Link Ethernet connected no tra...

Страница 119: ...s afag com www afag com Switzerland Afag Automation AG Zuführtechnik Fiechtenstrasse 32 CH 4950 Huttwil Tel 41 0 62 959 86 86 Fax 41 0 62 959 87 87 9 Disposal Devices which are no longer usable should be dismantled and recycled not as a whole unit but in individual parts and according to type of materials Non recyclable compo nents must be disposed of appropriately ...

Отзывы: