background image

26 


With the frequency information entered, and the sweep rate 

selected, it’s time to calibrate the 

instrument.  

To do this, requires three reference standards: An OPEN, a SHORT, and a reference LOAD. For 
most applications, especially for frequencies of less than 200MHz or so, the OPEN is not too critical 
and many users do not use anything for this. The SHORT is always required, should be as close to 
0Ω as possible, using a high-quality connector. The 50Ω LOAD is critical, and inaccuracies originating 
here become more apparent at higher frequencies. The 

DC resistance should be as close to 50Ω as 

possible, with good frequency characteristics (the Termination Standards AEA supplies are rated to 
3GHz). 


S11 Single-Port Operation 

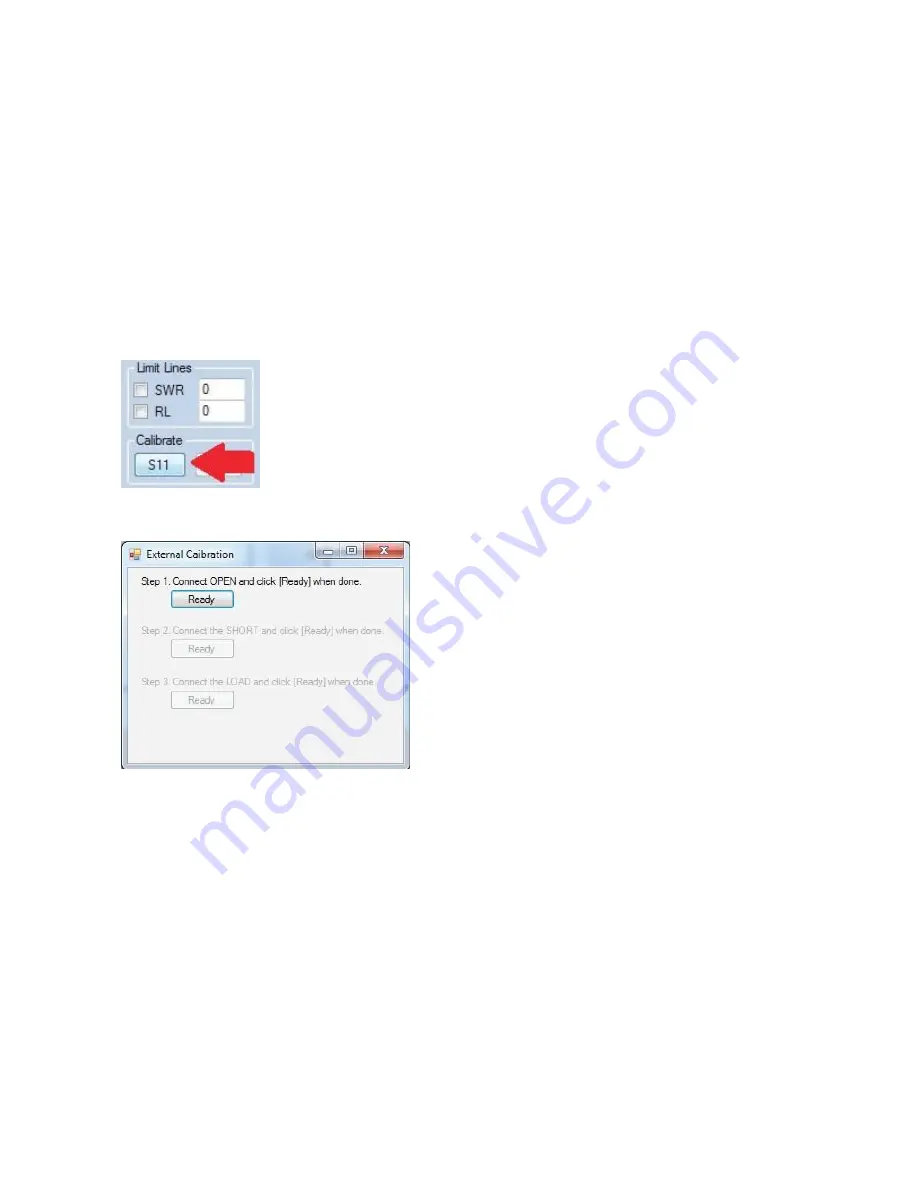
At this time, press the S11 button in the ‘Calibrate’ section of the PC Vision screen, shown here: 


The Calibration process dialog box will appear as shown here: 


Attach the (optional) OPEN standard to the Bravo EX2 (or attached cable)

, and press the ‘Ready’ 

button for step one. The PC Vision Program will assume control over the instrument, and begin the 
calibration process. When t

he ‘OPEN’ part of the calibration is complete, the second ‘Ready’ button 

will become active; prompting you to attach the SHORT standard to the instrument. When you’ve 
done that, press the second ‘Ready’ button to continue the calibration process.  When the ‘SHORT’ 
part o

f the procedure is completed, the third ‘Ready’ button will become active, prompting you to 

atta

ch the 50Ω load. When attached, press the third ‘Ready’ button, and the calibration process will 

complete. 

Once the calibration process is complete, the PC Vision application, along with the Bravo EX2, is 
ready to make measurements. Bear in mind that the calibration is only valid for as long as the 
frequencies are NOT changed. If any of the frequencies (start, stop, center or span) are changed, you 
must repeat the calibration process again before you can make measurements. 

To begin the measurement process, press the PLOT button, shown here.... 


Содержание Bravo EX2

Страница 1: ...Operation Manual Liberator Series Bravo EX2 Analyzer Testing Made Simple _ Technology Inc...

Страница 2: ...his document and all software or firmware designed by AEA Technology Inc is copyrighted and may not be copied or altered in any way without the written consent from AEA Technology Inc The AEA Logos ar...

Страница 3: ...EX2 Analyzer when in its Belt Case is splash resistant and designed to work for relatively long periods in rain depending on intensity It is not designed to be immersed in water See Cleaning Instructi...

Страница 4: ...ery a few times 4 After they have been removed from equipment store Ni MH batteries in a dry place and within the recommended storage temperature range Electrostatic Discharge ESD Precautions The SWR...

Страница 5: ...keypad menus and measurement screens 2 Provides user instructions in more detail than the Quick Start Guide including a section on Measurement Information and Helpful Tips 3 Provides specifications tr...

Страница 6: ...the sweep parameters may be necessary iii BRAVO EX2 Literature Introduction iv NOTES iv EX2 Analyzer Description 1 General 1 Instrument Front Panel Layout 1 Screen Layouts 2 General 2 VNA Screen 2 SW...

Страница 7: ...n Sequence Screens 16 BRAVO EX2 VNA Measurements 17 General Information 17 S11 VNA SCREEN 17 S21 Two Port VNA Screen 18 Calibration Measurement Information and Helpful Tips 18 Calibration Processes 18...

Страница 8: ...ntenance 37 Battery Replacement Instructions 37 Cleaning 38 Instrument Troubleshooting Guide 39 Factory Reset 39 Used to recover any program faults and then restores the factory defaults 39 Appendix A...

Страница 9: ...ind resonant frequency and response curve 5 CW signal generator 6 Two plots may be simultaneously viewed on the same graph The BRAVO EX2 communicates with your PC via the PC Vision application softwar...

Страница 10: ...here Shown below is the VNA screen layout VNA Screen Features of interest are as follows Left Right Scale indicators These labels in the upper corners of the chart area indicate which measurement tha...

Страница 11: ...e cursor is moved this frequency value is updated Left Right Scale Cursor Values Immediately to the right of the cursor frequency are the Scale Cursor Values These are the measurements for the frequen...

Страница 12: ...ne second later This power down sequence saves all the settings for resuming testing on the next Normal Power On press The BATTERY SAVER Auto Power Down is a normal power down and saves all the settin...

Страница 13: ...e SWR RL key to directly access SWR RL Once there pressing SWR RL will alternate between SWR and Return Loss modes See section 3 Measurement Screens for information on cycling modes setup and scales V...

Страница 14: ...ursor with data on screen Cursor A LED lit Use the left right arrow key to move the cursor Readings will automatically update to cursor s position A B Press the CRSR key a second time to add the B cur...

Страница 15: ...lot B When in any alpha numeric settings FREQ date time Memory save etc it changes digit position for character entries C In the menus it changes the options horizontal menu for highlighted items in t...

Страница 16: ...st 3 Use the ENTER key as indicated to enter a sub menu of selections These will be labeled in the right column with ENTER Navigation in sub menus works the same 4 When selections are completed use th...

Страница 17: ...s ensures that the instruments menus will always be visible KEYPAD BEEP ON or OFF Press to make a selection UNITS FEET or METERS Press to make a selection BATTERY MENU Press ENTER to open sub menu Sel...

Страница 18: ...etc DATE TIME Press ENTER to open sub menu to set date time see below Press ESC to exit the Meter Menu SET DATE TIIME screen Selecting DATE TIME from the Meter menu will bring up the date time set sc...

Страница 19: ...Frequency Specific below FREQUENCY SPECIFIC This calibration mode will require recalibration with any change in frequency or bandwidth Span In this mode the BRAVO EX2 will automatically go to the cal...

Страница 20: ...able values can range from but are not limited to 15 to 300 GRID LINES Pressing ENTER with this menu item selected will change the number of grid lines on the graph You can select between 2x2 2X4 and...

Страница 21: ...ch circuit model to use SWEEP ENABLE Press ENTER to re enable the sweep When the sweep is running the LED above the SWEEP CW button will flash This option is available as the EX2 PC Vision software ma...

Страница 22: ...and Load Terminators followed by using ENTER to process calibration data for each terminator After processing for the Load Terminator is complete the calibration process is completed and the BRAVO EX...

Страница 23: ...own the LEFT RIGHT arrow keys will increase the cursor movement speed NOTE When the cursors are active if you move them past either end of the displayed trace the trace will scroll to reveal data poin...

Страница 24: ...series of screens to Calibrate the attached test lead antenna feed line and or any adapters along with the instrument to remove them from the measurements It can also be used to perform an instrument...

Страница 25: ...of virtually any single ended device Keep in mind that the instrument must be calibrated either broadband or frequency specific as when doing RL and SWR measurements The calibration process is identic...

Страница 26: ...ill be used to attach the UUT to the instrument This loop is attached to the S11 port of the instrument on one end and the instruments S21 port on the other end Press ENTER to calibrate the THROUGH Th...

Страница 27: ...o attach OPEN As said previously the open N connector adapter or test lead will suffice Using an OPEN Terminator is optional at user s discretion 5 Press ENTER to continue 6 Second prompt will be to a...

Страница 28: ...ached press ENTER to continue 10 Last prompt will be to attach the LOAD Normally this will be a 50 load supplied with the instrument or purchased locally 11 When attached press ENTER to continue and e...

Страница 29: ...ips 1 When taking SWR measurements on a new system measure the components separately first and document each item s SWR Then measure the antenna system as a whole and document that measurement This wi...

Страница 30: ...e the usable frequency range clearly between the Cursors from low to high frequency SWR and Return Loss Measurement Steps SWR or Return Loss Measuring 1 Connect the test lead and any adapter if they a...

Страница 31: ...inent user data downloads traces etc will be stored there Running PC Vision Start the PC Vision Application by either clicking on the icon on your desktop or by selecting it from the start menu When t...

Страница 32: ...ct Comm Port Mgr Com Port from the dropdown menu at the top to open this dialog box Please Note You must ONLY change the COM port number DO NOT adjust any of the other settings Click on the drop down...

Страница 33: ...e of the instrument AFTER you ve set the frequency range you want to test Please note that this menu is for compatibility with earlier versions the S11 Calibrate button will do the same thing Basic Op...

Страница 34: ...optional OPEN standard to the Bravo EX2 or attached cable and press the Ready button for step one The PC Vision Program will assume control over the instrument and begin the calibration process When...

Страница 35: ...27 if calibration has not already been completed you will be prompted to do so and the measured results of the UUT unit under test will be drawn on the graphs as shown here...

Страница 36: ...ency scale along the bottom in MHz and the vertical scale control top left While the frequency scale is fixed it s determined by the frequency range you chose when you calibrated the instrument you ca...

Страница 37: ...est viewing Smith Chart The Smith Chart display allows you to easily visualize the UUT s S Parameter characteristics Unlike the other displays in this application you move the cursors using the slide...

Страница 38: ...ote that the cursor is at a point on the trace where the value in this case the SWR is at or below the limit line Note also that the limit line is GREEN If the cursor is at a place where the trace is...

Страница 39: ...port measurement Enter the frequency using the Frequency Settings box as shown on page 25 Select S21 in the Sweep Type box Click the S11 Button in the calibrate box apply the Open short load same as f...

Страница 40: ...ble clicking on the title you wish to change and this dialog will pop up allowing you to make whatever changes you want If you have more than one chart displayed you will be given the opportunity to c...

Страница 41: ...rmats such as jpg gif or pdf To save a trace click on the File menu at the top left of PC Vision s menu bar and select Save trace File This will bring up a file save dialog box Select the format to sa...

Страница 42: ...munication has been established If the PC Vision s communication link with your Analyzer is active you will get a message box like this one You may also be requested by service or support personnel to...

Страница 43: ...g instrument setups but those aren t relevant to this discussion Any of these trace files can be loaded and displayed by PC Vision Select the files you wish to download holding down Ctrl Shift or both...

Страница 44: ...le management window shown earlier select the file s you wish to delete and click Delete CAUTION there is no UNDELETE function all saved test results and setups deletes are permanent The selected file...

Страница 45: ...ent other than the battery compartment as this can void the warranty If the instrument is not performing or charging correctly refer to Troubleshooting Guides at the end of this section or contact AEA...

Страница 46: ...be removed use a mild detergent see recommended cleaners listed below sprayed on the cloth first Rinse with a clean soft damp cloth moistened in water only Do NOT spray detergents or water directly on...

Страница 47: ...uctions Instrument will not turn off Firmware has faulted Power down with 10 second hold of ON OFF key This will load PRIOR good settings NOT current settings See page 5 for more help and Soft Reset i...

Страница 48: ...0 to 2K Resolution 1 Z Angle Range 180 Resolution 1 General Power requirement 12 18 VDC 650 mA min or 8 AA Batteries AC Adapter Included 110 240 VAC 50 60Hz 0 4A Output 15 VDC 1 2A Memory 100 Plots or...

Страница 49: ...r N to BNC Adapter 0070 1190 N to TNC Adapter 0070 1134 N to SO239 HF Adapter 0070 1139 N to SMA Adapters and Terminators Set 6025 0260 N type male 3 Way Termination Set Open Short and 50 load 6025 02...

Страница 50: ...42 User s Notes...

Страница 51: ...43 5933 Sea Lion Place Suite 112 Carlsbad California 92010 Tel 1 800 258 7805 or 1 760 931 8979 Fax 1 760 931 8969 www aeatechnology com...

Отзывы: