


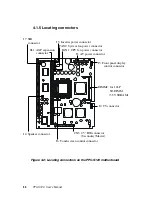


Chapter 4 Jumper Settings and Connectors
37
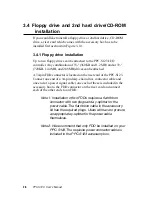
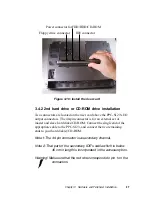
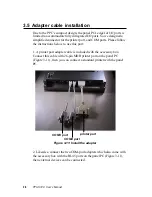
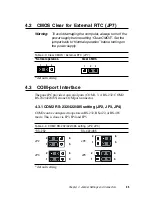
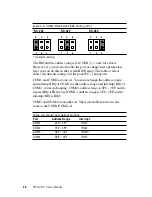
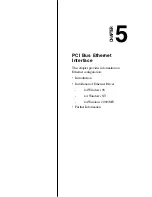
4.3.2 COM3 / COM4 pin 9 output type setting (JP5)
Table 4-7: COM3/COM4 pin 9 setting (JP5)
*Normal operation
+5 V output
+12 V output
* default setting
Note:
Pins 1, 3 and 5 are for COM3.
Pins 2, 4 and 6 are for COM4.
4.4
VGA Interface
The panel PC's AGP VGA interface can drive conventional CRT
displays. It is also capable of driving a wide range of flat panel
displays, including electroluminescent (EL), gas plasma, passive LCD
and active LCD displays.
4.4.1 LCD panel power setting
The panel PC's AGP SVGA interface supports 5 V and 3.3 V LCD
displays. The LCD cable already has a built-in default setting. You do
not need to adjust any jumper or switch to select the panel power.
5
3
1
6
4
2
5
3
1
6
4
2
5
3
1
6
4
2
Содержание PPC-S123
Страница 1: ...PPC S123 UltraSlim Pentium III processor based 12 1 panel PC User sManual ...
Страница 20: ...8 PPC S123 User s Manual 1 4 Dimensions Figure 1 1 Dimensions of the PPC S123 Unit mm ...
Страница 28: ...16 PPC S123 User s Manual ...
Страница 35: ...Chapter 3 Hardware and Peripheral Installation 23 Figure 3 7 CPU installation ...
Страница 68: ...56 PPC S123 User s Manual ...
Страница 76: ...64 PPC S123 User s Manual ...
Страница 77: ...Award BIOS Setup This chapter describes how to set BIOS configuration data CHAPTER 8 ...
Страница 96: ...84 PPC S123 User s Manual ...
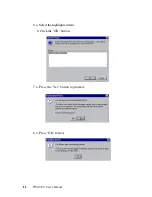
Страница 101: ...Chapter 9 Touchscreen 89 3 Click Yes to accept the agreement 4 Click Next 5 Choose the directory then click Next ...
Страница 102: ...9 0 PPC S123 User s Manual 6 Click Next 7 Click Next ...
Страница 103: ...Chapter 9 Touchscreen 91 8 Click Finish to complete the installation Then follow the instruction to reboot the computer ...
Страница 105: ...Chapter 9 Touchscreen 93 3 Click Yes to accept the agreement 4 Click Next ...
Страница 106: ...9 4 PPC S123 User s Manual 5 Choose the directory then click Next 6 Click Next ...
Страница 107: ...Chapter 9 Touchscreen 95 7 Click Finish 8 Click Finish to complete the installation ...
Страница 110: ...9 8 PPC S123 User s Manual 3 Click Next to accept agreement 4 Click Install to start the installation ...
Страница 112: ...100 PPC S123 User s Manual ...
Страница 116: ...104 PPC S123 User s Manual ...
Страница 117: ...Full Disassembly Procedures APPENDIX B ...
Страница 122: ...110 PPC S123 User s Manual ...
Страница 123: ...I O Pin Assignments C APPENDIX ...
Страница 128: ...116 PPC S123 User s Manual ...


