3 6
PPC-S123 User's Manual
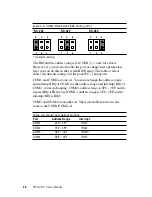
Table 4-5: COM2 RS-232/422/485 setting (JP4)
*RS-232
RS-422
RS-485
* default setting
The IRQ and the address ranges for COM1, 2, 3, and 4 are fixed.
However, if you wish to disable the port or change these parameters
later you can do this in the system BIOS setup. The table overleaf
shows the default settings for the panel PC’s serial ports.
COM1 and COM2 are one set. You can exchange the address range
and interrupt IRQ of COM1 for the address range and interrupt IRQ of
COM2. After exchanging, COM2's address range is 3F8 ~ 3FF and its
request IRQ is IRQ4: and COM1's address range is 2F8 ~ 2FF and its
interrupt IRQ is IRQ3.
COM3 and COM4 are another set. Their selectable function is the
same as the COM1/COM2 set.
Table 4-6: Serial port default settings
Port
Address Range
Interrupt
COM1
2F8 ~ 2FF
IRQ3
COM2
3F8 ~ 3FF
IRQ4
COM3
3E8 ~ 3EF
IRQ10
COM4
2E8 ~ 2EF
IRQ5
2
4
6
1
3
5
2
4
6
1
3
5
2
4
6
1
3
5
Содержание PPC-S123
Страница 1: ...PPC S123 UltraSlim Pentium III processor based 12 1 panel PC User sManual ...
Страница 20: ...8 PPC S123 User s Manual 1 4 Dimensions Figure 1 1 Dimensions of the PPC S123 Unit mm ...
Страница 28: ...16 PPC S123 User s Manual ...
Страница 35: ...Chapter 3 Hardware and Peripheral Installation 23 Figure 3 7 CPU installation ...
Страница 68: ...56 PPC S123 User s Manual ...
Страница 76: ...64 PPC S123 User s Manual ...
Страница 77: ...Award BIOS Setup This chapter describes how to set BIOS configuration data CHAPTER 8 ...
Страница 96: ...84 PPC S123 User s Manual ...
Страница 101: ...Chapter 9 Touchscreen 89 3 Click Yes to accept the agreement 4 Click Next 5 Choose the directory then click Next ...
Страница 102: ...9 0 PPC S123 User s Manual 6 Click Next 7 Click Next ...
Страница 103: ...Chapter 9 Touchscreen 91 8 Click Finish to complete the installation Then follow the instruction to reboot the computer ...
Страница 105: ...Chapter 9 Touchscreen 93 3 Click Yes to accept the agreement 4 Click Next ...
Страница 106: ...9 4 PPC S123 User s Manual 5 Choose the directory then click Next 6 Click Next ...
Страница 107: ...Chapter 9 Touchscreen 95 7 Click Finish 8 Click Finish to complete the installation ...
Страница 110: ...9 8 PPC S123 User s Manual 3 Click Next to accept agreement 4 Click Install to start the installation ...
Страница 112: ...100 PPC S123 User s Manual ...
Страница 116: ...104 PPC S123 User s Manual ...
Страница 117: ...Full Disassembly Procedures APPENDIX B ...
Страница 122: ...110 PPC S123 User s Manual ...
Страница 123: ...I O Pin Assignments C APPENDIX ...
Страница 128: ...116 PPC S123 User s Manual ...

