


PPC-L126 User’s Manual
54
Chapter 7 Audio Setup
7.1 Introduction
The PPC-L126's on-board audio interface provides high-quality stereo
sound and FM music synthesis (ESFM) by using the VIA VT82C686
audio controller from VIA. The audio interface can record, compress, and
play back voice, sound, and music with built-in mixer control.
The PPC-L126 on board audio interface also supports the Plug and Play
(PnP) standard and provides PnP configuration for the audio, FM, and
MPU-104 logical devices. It is compatible with Sound Blaster™; Sound
Blaster Pro™ version 3.01, voice and music functions. The ESFM syn-
thesizer is register compatible with the OPL3 and has extended capabili-
ties.
7.2 Installation of the Audio Driver
Before installing the audio driver, please take note of the procedures
detailed below. You must know which operating system you are using in
your PPC-L126, and then refer to the corresponding installation flow
chart. Just follow the steps in the flow chart. You can quickly and suc-
cessfully complete the installation, even though you are not familiar with
instructions for Windows.
Notes:
1. The windows illustrations in this chapter are
intended as examples only. Please follow the
listed steps, and pay attention to the instructions
which appear on your screen.
2. For convenience, the CD-ROM drive is desig-
nated as "D" throughout this chapter.
3. <Enter> means pressing the “Enter” key on
the keyboard.
Содержание PPC-L126
Страница 1: ...PPC L126 VIA Eden Processor based Fanless Panel PC with 12 1 TFT LCD Users Manual...
Страница 8: ...PPC L126 User s Manual viii...
Страница 19: ...7 Chapter1 1 4 Dimensions Figure 1 1 Dimensions of PPC L126...
Страница 20: ...PPC L126 User s Manual 8...
Страница 28: ...PPC L126 User s Manual 16...
Страница 37: ...25 Chapter4 Figure 4 2 Connectors on the PPC L126 motherboard...
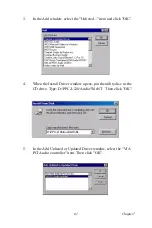
Страница 47: ...35 Chapter5 5 a Select Network Adaptors b Click Next 6 a Click Have Disk...
Страница 49: ...37 Chapter5 9 a Choose Next 10 a Click Finish...
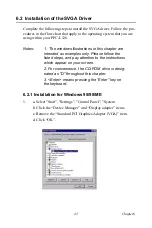
Страница 56: ...PPC L126 User s Manual 44 2 a Choose the Driver label b Click Update Driver 3 Click Next...
Страница 57: ...45 Chapter6 4 Click Next 5 Click Have Disk 6 a Type D PPC L126 VGA Win9x_ME b Click OK D PPC L126 VGA Win9x_ME...
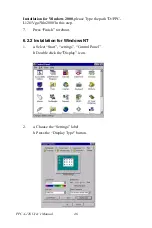
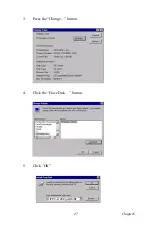
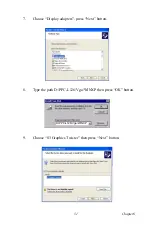
Страница 59: ...47 Chapter6 3 Press the Change button 4 Click the Have Disk button 5 Click OK D PPC L126 Vga WinNT...
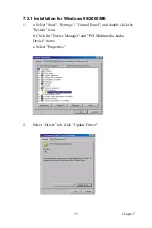
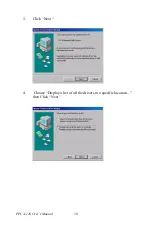
Страница 69: ...57 Chapter7 5 choose Sound video and game controllers click Next 6 Click Have Disk...
Страница 71: ...59 Chapter7 9 Click Next 10 Click Finish...
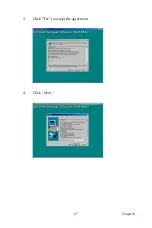
Страница 79: ...67 Chapter8 3 Click Yes to accept the agreement 4 Click Next...
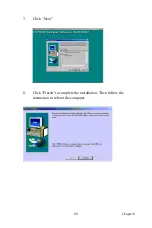
Страница 80: ...PPC L126 User s Manual 68 5 Choose the directory then click Next 6 Click Next...
Страница 83: ...71 Chapter8 3 Click Yes to accept the agreement 4 Click Next...
Страница 84: ...PPC L126 User s Manual 72 5 Choose the directory then click Next 6 Click Next...
Страница 85: ...73 Chapter8 7 Click Finish 8 Click Finish to complete the installation...
Страница 88: ...PPC L126 User s Manual 76 3 Click Next to accept the agreement 4 Click Install to start the installation...
Страница 97: ...CHAPTER 9 Award BIOS Setup This chapter describes how to set BIOS configuration data...
Страница 110: ...PPC L126 User s Manual 98...
Страница 114: ...PPC L126 User s Manual 102...
Страница 115: ...Appendix B I O Pin Assignments...
Страница 121: ...109 AppendixB B 9 PCI ISA Bus connector Slot 1 Figure B 1 PCI ISA connector Side View...
Страница 126: ...PPC L126 User s Manual 114...
Страница 128: ......


