PPC-L126 User’s Manual
100
Appendix A Programming the Watchdog
Timer
A.1 Programming the Watchdog Timer
To program the watchdog timer, you must write a program which writes I/
O port address 443 (hex). The output data is a time interval value. The
value range is from 01 (hex) to 3E (hex), and the related time interval is
from 1 sec. to 62 sec.
Data Time Interval
01
1 sec.
02
2 sec.
03
3 sec.
04
4 sec.
•
•
•
•
•
•
3E
62 sec.
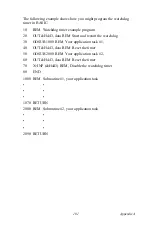
After data entry, your program must refresh the watchdog timer by rewrit-
ing the I/O port 443 (hex) while simultaneously setting it. When you want
to disable the watchdog timer, your program should read I/O port 443
(hex).
Содержание PPC-L126
Страница 1: ...PPC L126 VIA Eden Processor based Fanless Panel PC with 12 1 TFT LCD Users Manual...
Страница 8: ...PPC L126 User s Manual viii...
Страница 19: ...7 Chapter1 1 4 Dimensions Figure 1 1 Dimensions of PPC L126...
Страница 20: ...PPC L126 User s Manual 8...
Страница 28: ...PPC L126 User s Manual 16...
Страница 37: ...25 Chapter4 Figure 4 2 Connectors on the PPC L126 motherboard...
Страница 47: ...35 Chapter5 5 a Select Network Adaptors b Click Next 6 a Click Have Disk...
Страница 49: ...37 Chapter5 9 a Choose Next 10 a Click Finish...
Страница 56: ...PPC L126 User s Manual 44 2 a Choose the Driver label b Click Update Driver 3 Click Next...
Страница 57: ...45 Chapter6 4 Click Next 5 Click Have Disk 6 a Type D PPC L126 VGA Win9x_ME b Click OK D PPC L126 VGA Win9x_ME...
Страница 59: ...47 Chapter6 3 Press the Change button 4 Click the Have Disk button 5 Click OK D PPC L126 Vga WinNT...
Страница 69: ...57 Chapter7 5 choose Sound video and game controllers click Next 6 Click Have Disk...
Страница 71: ...59 Chapter7 9 Click Next 10 Click Finish...
Страница 79: ...67 Chapter8 3 Click Yes to accept the agreement 4 Click Next...
Страница 80: ...PPC L126 User s Manual 68 5 Choose the directory then click Next 6 Click Next...
Страница 83: ...71 Chapter8 3 Click Yes to accept the agreement 4 Click Next...
Страница 84: ...PPC L126 User s Manual 72 5 Choose the directory then click Next 6 Click Next...
Страница 85: ...73 Chapter8 7 Click Finish 8 Click Finish to complete the installation...
Страница 88: ...PPC L126 User s Manual 76 3 Click Next to accept the agreement 4 Click Install to start the installation...
Страница 97: ...CHAPTER 9 Award BIOS Setup This chapter describes how to set BIOS configuration data...
Страница 110: ...PPC L126 User s Manual 98...
Страница 114: ...PPC L126 User s Manual 102...
Страница 115: ...Appendix B I O Pin Assignments...
Страница 121: ...109 AppendixB B 9 PCI ISA Bus connector Slot 1 Figure B 1 PCI ISA connector Side View...
Страница 126: ...PPC L126 User s Manual 114...
Страница 128: ......

