


95
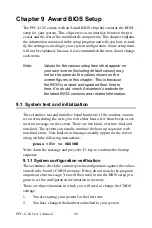
Chapter 9
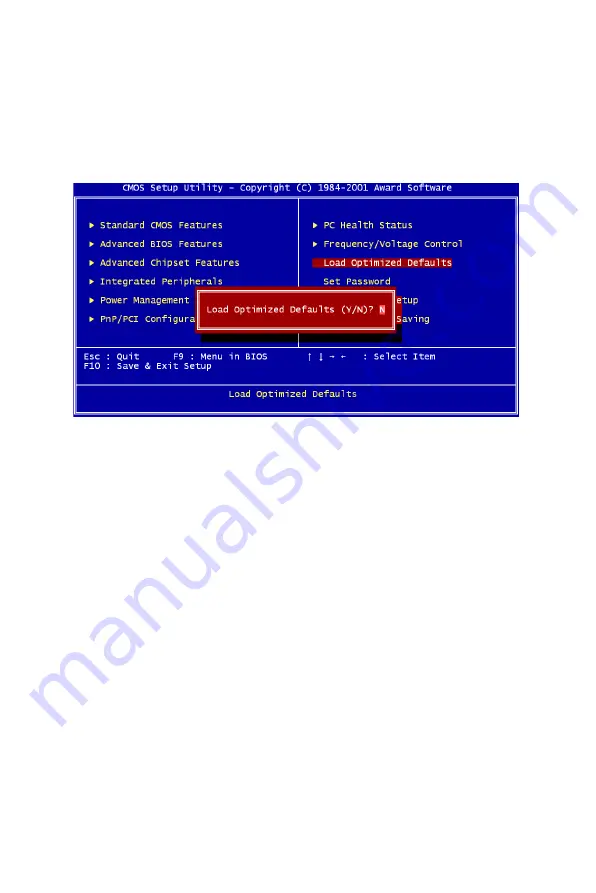
9.2.10 Load Optimized Defaults
Load Optimized Defaults loads the default system values directly from
ROM. If the stored record created by the Setup program should ever
become corrupted (and therefore unusable), these defaults will load auto-
matically when you turn the PPC-L126 system on.
9.2.11 Set Password
To Establish Password
1.
Choose the Set Password option from the CMOS Setup Utility
main menu and press <Enter>.
2.
When you see “Enter Password,” enter the desired password and
press <Enter>.
Figure 9.10: Load BIOS defaults screen
Note
To enable this feature, you should first go to the
Advanced BIOS Features menu, choose the
Security Option, and select either Setup or Sys-
tem, depending on which aspect you want pass-
word protected. Setup requires a password only
to enter Setup. System requires the password
either to enter Setup or to boot the system.
A password may be at most 8 characters long.
Содержание PPC-L126
Страница 1: ...PPC L126 VIA Eden Processor based Fanless Panel PC with 12 1 TFT LCD Users Manual...
Страница 8: ...PPC L126 User s Manual viii...
Страница 19: ...7 Chapter1 1 4 Dimensions Figure 1 1 Dimensions of PPC L126...
Страница 20: ...PPC L126 User s Manual 8...
Страница 28: ...PPC L126 User s Manual 16...
Страница 37: ...25 Chapter4 Figure 4 2 Connectors on the PPC L126 motherboard...
Страница 47: ...35 Chapter5 5 a Select Network Adaptors b Click Next 6 a Click Have Disk...
Страница 49: ...37 Chapter5 9 a Choose Next 10 a Click Finish...
Страница 56: ...PPC L126 User s Manual 44 2 a Choose the Driver label b Click Update Driver 3 Click Next...
Страница 57: ...45 Chapter6 4 Click Next 5 Click Have Disk 6 a Type D PPC L126 VGA Win9x_ME b Click OK D PPC L126 VGA Win9x_ME...
Страница 59: ...47 Chapter6 3 Press the Change button 4 Click the Have Disk button 5 Click OK D PPC L126 Vga WinNT...
Страница 69: ...57 Chapter7 5 choose Sound video and game controllers click Next 6 Click Have Disk...
Страница 71: ...59 Chapter7 9 Click Next 10 Click Finish...
Страница 79: ...67 Chapter8 3 Click Yes to accept the agreement 4 Click Next...
Страница 80: ...PPC L126 User s Manual 68 5 Choose the directory then click Next 6 Click Next...
Страница 83: ...71 Chapter8 3 Click Yes to accept the agreement 4 Click Next...
Страница 84: ...PPC L126 User s Manual 72 5 Choose the directory then click Next 6 Click Next...
Страница 85: ...73 Chapter8 7 Click Finish 8 Click Finish to complete the installation...
Страница 88: ...PPC L126 User s Manual 76 3 Click Next to accept the agreement 4 Click Install to start the installation...
Страница 97: ...CHAPTER 9 Award BIOS Setup This chapter describes how to set BIOS configuration data...
Страница 110: ...PPC L126 User s Manual 98...
Страница 114: ...PPC L126 User s Manual 102...
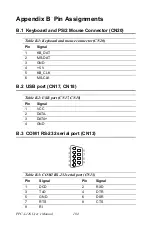
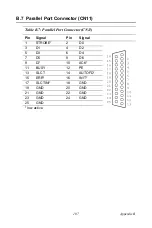
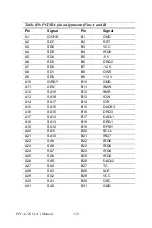
Страница 115: ...Appendix B I O Pin Assignments...
Страница 121: ...109 AppendixB B 9 PCI ISA Bus connector Slot 1 Figure B 1 PCI ISA connector Side View...
Страница 126: ...PPC L126 User s Manual 114...
Страница 128: ......


