


45
3.
At the “Confirm Password” prompt, retype the desired password,
then press <Enter>.
4.
Select Save to CMOS and EXIT, type <Y>, then <Enter>.
To Change Password
1.
Choose the Set Password option from the CMOS Setup Utility
main menu and press <Enter>.
2.
When you see “Enter Password,” enter the existing password and
press <Enter>.
3.
You will see “Confirm Password.” Type it again, and press
<Enter>.
4.
Select Set Password again, and at the “Enter Password” prompt,
enter the new password and press <Enter>.
5.
At the “Confirm Password” prompt, retype the new password, and
press <Enter>.
6.
Select Save to CMOS and EXIT, type <Y>, then <Enter>.
To Disable Password
1.
Choose the Set Password option from the CMOS Setup Utility
main menu and press <Enter>.
2.
When you see “Enter Password,” enter the existing password and
press <Enter>.
3.
You will see “Confirm Password.” Type it again, and press
<Enter>.
4.
Select Set Password again, and at the “Enter Password” prompt,
don’t enter anything; just press <Enter>.
5.
At the “Confirm Password” prompt, again don’t type in anything;
just press <Enter>.
6.
Select Save to CMOS and EXIT, type <Y>, then <Enter>.
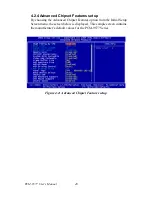
4.2.12 Save & Exit Setup
If you select this option and press <Y> then <Enter>, the values entered
in the setup utilities will be recorded in the chipset’s CMOS memory. The
microprocessor will check this every time you turn your system on and
use the settings to configure the system. This record is required for the
system to operate.
Содержание PCM-9577
Страница 1: ...i PCM 9577 Socket 370 Celeron Pentium III SBC with LCD LVDS Ethernet Audio USB 2 0 Users Manual...
Страница 10: ...PCM 9577 User s Manual x...
Страница 16: ...PCM 9577 User s Manual 6 1 4 Board layout dimensions Figure 1 1 Board layout dimensions PCM 9577 REV A1...
Страница 20: ...PCM 9577 User s Manual 10 2 3 Locating jumpers Figure 2 1 Jumper locations PCM 9577 REV A1...
Страница 21: ...11 Chapter2 2 4 Locating Connectors Figure 2 2 Connectors component side PCM 9577 REV A1...
Страница 38: ...PCM 9577 User s Manual 28...
Страница 44: ...PCM 9577 User s Manual 34...
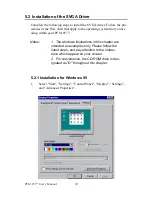
Страница 61: ...51 Chapter5 2 Choose the Adapter tab then press the Change button 3 Press the Have Disk button...
Страница 65: ...55 Chapter5 2 Select Adapter then Change...
Страница 66: ...PCM 9577 User s Manual 56 3 Press Next then Display a list 4 Press the Have disk button...
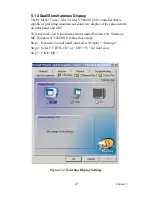
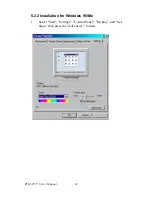
Страница 70: ...PCM 9577 User s Manual 60 2 Choose the Settings tab and press the Display Type button...
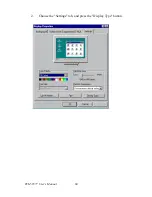
Страница 71: ...61 Chapter5 3 Press the Change button...
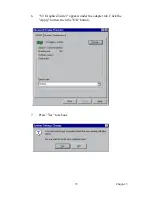
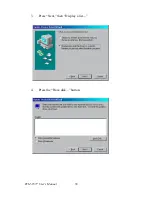
Страница 72: ...PCM 9577 User s Manual 62 4 Click the Have Disk button 5 Type the path D Biscuit VGA WinNT Press the OK button...
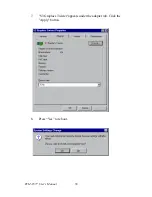
Страница 73: ...63 Chapter5 6 Select the highlighted item and click the OK button 7 Press Yes to proceed 8 Press OK to reboot...
Страница 75: ...65 Chapter5 2 Choose the Video Controller VGA Compatible button...
Страница 76: ...PCM 9577 User s Manual 66 3 Choose the Drive button press Update Driver button...
Страница 77: ...67 Chapter5 4 Choose Display a list of then press Next button 5 Choose Display adapters press Next button...
Страница 80: ...PCM 9577 User s Manual 70 2 Choose Hardware and Device Manager press OK button...
Страница 81: ...71 Chapter5 3 Choose Video Controller VGA Compatible press OK button...
Страница 82: ...PCM 9577 User s Manual 72 4 Choose Driver Update Driver press OK button 5 Choose Install from a list press Next...
Страница 83: ...73 Chapter5 6 Choose Don t search I will press Next button 7 Choose Display adapters press Next button...
Страница 86: ...PCM 9577 User s Manual 76...
Страница 101: ...91 Chapter6 3 Choose Driver button press Update Driver button 4 Choose Sound video and game controllers press Next...
Страница 103: ...93 Chapter6 8 Press Next button 9 Press Finish to reboot...
Страница 104: ...PCM 9577 User s Manual 94...
Страница 110: ...PCM 9577 User s Manual 100 7 2 3 Installation for Windows 2000 1 Open Device Manager...
Страница 111: ...101 Chapter7 2...
Страница 112: ...PCM 9577 User s Manual 102 3 4...
Страница 113: ...103 Chapter7 5 6...
Страница 114: ...PCM 9577 User s Manual 104 7 8...
Страница 115: ...105 Chapter7 9 7 2 4 Installation for Windows NT 1 a Select Start Settings Control Panel b Double click Network...
Страница 116: ...PCM 9577 User s Manual 106 2 a Choose type of network b Click Next 3 a Click Select from list...
Страница 118: ...PCM 9577 User s Manual 108 6 Check the highlighted item and click OK...
Страница 119: ...109 Chapter7 7 Click Next to continue setup 8 Choose the networking protocols then click Next...
Страница 120: ...PCM 9577 User s Manual 110 9 Select the correct Network Services then click Next 10 Click Next to continue setup...
Страница 122: ...PCM 9577 User s Manual 112...
Страница 126: ...PCM 9577 User s Manual 116...
Страница 127: ...Appendix B Installing PC 104 Modules This appendix gives instructions for installing PC 104 modules...
Страница 129: ...119 AppendixB Figure B 1 PC 104 module mounting diagram...
Страница 130: ...PCM 9577 User s Manual 120 Figure B 2 PC 104 module dimensions mm 0 1...
Страница 156: ...PCM 9577 User s Manual 146...
Страница 161: ...Appendix E Optional Extras for the PCM 9577...
Страница 165: ...Appendix F Mechanical Drawings...
Страница 167: ...157 AppendixF Figure F 2 PCM 9577 Mechanical Drawing solder side PCM 9577 REV A1...
Страница 168: ...PCM 9577 User s Manual 158...


