149
Appendix D
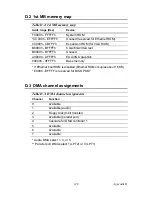
D.2 1st MB memory map
D.3 DMA channel assignments
Table D.2: 1st MB memory map
Addr. range (Hex)
Device
F0000h - FFFFFh
System ROM
*CC000h - EFFFFh
Unused (reserved for Ethernet ROM)
C0000h - CBFFFh
Expansion ROM (for VGA BIOS)
B8000h - BFFFFh
CGA/EGA/VGA text
B0000h - B7FFFh
Unused
A0000h - AFFFFh
EGA/VGA graphics
00000h - 9FFFFh
Base memory
* If Ethernet boot ROM is disabled (Ethernet ROM occupies about 16 KB)
* E0000 - EFFFF is reserved for BIOS POST
Table D.3: DMA channel assignments
Channel
Function
0
Available
1
Available (audio)
2
Floppy disk (8-bit transfer)
3
Available (parallel port)
4
Cascade for DMA controller 1
5
Available
6
Available
7
Available
* Audio DMA select 1, 3, or 5
** Parallel port DMA select 1 (LPT2) or 3 (LPT1)
Содержание PCM-9577
Страница 1: ...i PCM 9577 Socket 370 Celeron Pentium III SBC with LCD LVDS Ethernet Audio USB 2 0 Users Manual...
Страница 10: ...PCM 9577 User s Manual x...
Страница 16: ...PCM 9577 User s Manual 6 1 4 Board layout dimensions Figure 1 1 Board layout dimensions PCM 9577 REV A1...
Страница 20: ...PCM 9577 User s Manual 10 2 3 Locating jumpers Figure 2 1 Jumper locations PCM 9577 REV A1...
Страница 21: ...11 Chapter2 2 4 Locating Connectors Figure 2 2 Connectors component side PCM 9577 REV A1...
Страница 38: ...PCM 9577 User s Manual 28...
Страница 44: ...PCM 9577 User s Manual 34...
Страница 61: ...51 Chapter5 2 Choose the Adapter tab then press the Change button 3 Press the Have Disk button...
Страница 65: ...55 Chapter5 2 Select Adapter then Change...
Страница 66: ...PCM 9577 User s Manual 56 3 Press Next then Display a list 4 Press the Have disk button...
Страница 70: ...PCM 9577 User s Manual 60 2 Choose the Settings tab and press the Display Type button...
Страница 71: ...61 Chapter5 3 Press the Change button...
Страница 72: ...PCM 9577 User s Manual 62 4 Click the Have Disk button 5 Type the path D Biscuit VGA WinNT Press the OK button...
Страница 73: ...63 Chapter5 6 Select the highlighted item and click the OK button 7 Press Yes to proceed 8 Press OK to reboot...
Страница 75: ...65 Chapter5 2 Choose the Video Controller VGA Compatible button...
Страница 76: ...PCM 9577 User s Manual 66 3 Choose the Drive button press Update Driver button...
Страница 77: ...67 Chapter5 4 Choose Display a list of then press Next button 5 Choose Display adapters press Next button...
Страница 80: ...PCM 9577 User s Manual 70 2 Choose Hardware and Device Manager press OK button...
Страница 81: ...71 Chapter5 3 Choose Video Controller VGA Compatible press OK button...
Страница 82: ...PCM 9577 User s Manual 72 4 Choose Driver Update Driver press OK button 5 Choose Install from a list press Next...
Страница 83: ...73 Chapter5 6 Choose Don t search I will press Next button 7 Choose Display adapters press Next button...
Страница 86: ...PCM 9577 User s Manual 76...
Страница 101: ...91 Chapter6 3 Choose Driver button press Update Driver button 4 Choose Sound video and game controllers press Next...
Страница 103: ...93 Chapter6 8 Press Next button 9 Press Finish to reboot...
Страница 104: ...PCM 9577 User s Manual 94...
Страница 110: ...PCM 9577 User s Manual 100 7 2 3 Installation for Windows 2000 1 Open Device Manager...
Страница 111: ...101 Chapter7 2...
Страница 112: ...PCM 9577 User s Manual 102 3 4...
Страница 113: ...103 Chapter7 5 6...
Страница 114: ...PCM 9577 User s Manual 104 7 8...
Страница 115: ...105 Chapter7 9 7 2 4 Installation for Windows NT 1 a Select Start Settings Control Panel b Double click Network...
Страница 116: ...PCM 9577 User s Manual 106 2 a Choose type of network b Click Next 3 a Click Select from list...
Страница 118: ...PCM 9577 User s Manual 108 6 Check the highlighted item and click OK...
Страница 119: ...109 Chapter7 7 Click Next to continue setup 8 Choose the networking protocols then click Next...
Страница 120: ...PCM 9577 User s Manual 110 9 Select the correct Network Services then click Next 10 Click Next to continue setup...
Страница 122: ...PCM 9577 User s Manual 112...
Страница 126: ...PCM 9577 User s Manual 116...
Страница 127: ...Appendix B Installing PC 104 Modules This appendix gives instructions for installing PC 104 modules...
Страница 129: ...119 AppendixB Figure B 1 PC 104 module mounting diagram...
Страница 130: ...PCM 9577 User s Manual 120 Figure B 2 PC 104 module dimensions mm 0 1...
Страница 156: ...PCM 9577 User s Manual 146...
Страница 161: ...Appendix E Optional Extras for the PCM 9577...
Страница 165: ...Appendix F Mechanical Drawings...
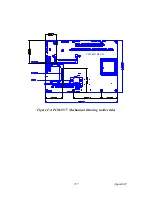
Страница 167: ...157 AppendixF Figure F 2 PCM 9577 Mechanical Drawing solder side PCM 9577 REV A1...
Страница 168: ...PCM 9577 User s Manual 158...


