


19
Chapter 2
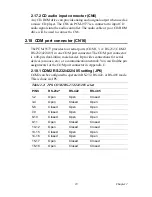
2.17.2 CD audio input connector (CN6)
Any CD-ROM drive can provide analog audio signal output when used as
a music CD player. The CN6 on PCM-9577 is a connector to input CD
audio signals into the audio controller. The audio cable of your CD-ROM
drive will be used to connect to CN6.
2.18 COM port connector (CN16)
The PCM-9577 provides four serial ports (COM1, 3, 4: RS-232; COM2:
RS-232/422/485) in one COM port connector. The COM port connector
is a 40-pin, dual-inline, male header. It provides connections for serial
devices (a mouse, etc.) or a communication network. You can find the pin
assignments for the COM port connector in Appendix C.
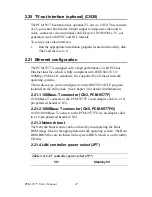
2.18.1 COM2 RS-232/422/485 setting (JP6)
COM2 can be configured to operate in RS-232, RS-422, or RS-485 mode.
This is done via JP6
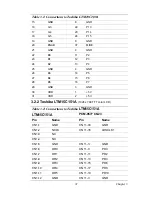
Table 2.4: JP6: COM2 RS-232/422/485 select
PINS
RS-232*
RS-422
RS-485
1-2
Open
Open
Closed
3-4
Open
Closed
Open
5-6
Closed
Open
Open
7-9
Closed
Open
Open
8-10
Closed
Open
Open
9-11
Open
Closed
Closed
10-12
Open
Closed
Closed
13-15
Closed
Open
Open
14-16
Closed
Open
Open
15-17
Open
Closed
Closed
16-18
Open
Closed
Closed
Содержание PCM-9577
Страница 1: ...i PCM 9577 Socket 370 Celeron Pentium III SBC with LCD LVDS Ethernet Audio USB 2 0 Users Manual...
Страница 10: ...PCM 9577 User s Manual x...
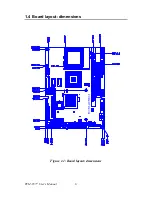
Страница 16: ...PCM 9577 User s Manual 6 1 4 Board layout dimensions Figure 1 1 Board layout dimensions PCM 9577 REV A1...
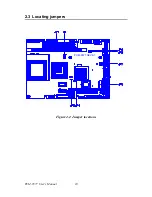
Страница 20: ...PCM 9577 User s Manual 10 2 3 Locating jumpers Figure 2 1 Jumper locations PCM 9577 REV A1...
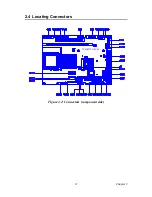
Страница 21: ...11 Chapter2 2 4 Locating Connectors Figure 2 2 Connectors component side PCM 9577 REV A1...
Страница 38: ...PCM 9577 User s Manual 28...
Страница 44: ...PCM 9577 User s Manual 34...
Страница 61: ...51 Chapter5 2 Choose the Adapter tab then press the Change button 3 Press the Have Disk button...
Страница 65: ...55 Chapter5 2 Select Adapter then Change...
Страница 66: ...PCM 9577 User s Manual 56 3 Press Next then Display a list 4 Press the Have disk button...
Страница 70: ...PCM 9577 User s Manual 60 2 Choose the Settings tab and press the Display Type button...
Страница 71: ...61 Chapter5 3 Press the Change button...
Страница 72: ...PCM 9577 User s Manual 62 4 Click the Have Disk button 5 Type the path D Biscuit VGA WinNT Press the OK button...
Страница 73: ...63 Chapter5 6 Select the highlighted item and click the OK button 7 Press Yes to proceed 8 Press OK to reboot...
Страница 75: ...65 Chapter5 2 Choose the Video Controller VGA Compatible button...
Страница 76: ...PCM 9577 User s Manual 66 3 Choose the Drive button press Update Driver button...
Страница 77: ...67 Chapter5 4 Choose Display a list of then press Next button 5 Choose Display adapters press Next button...
Страница 80: ...PCM 9577 User s Manual 70 2 Choose Hardware and Device Manager press OK button...
Страница 81: ...71 Chapter5 3 Choose Video Controller VGA Compatible press OK button...
Страница 82: ...PCM 9577 User s Manual 72 4 Choose Driver Update Driver press OK button 5 Choose Install from a list press Next...
Страница 83: ...73 Chapter5 6 Choose Don t search I will press Next button 7 Choose Display adapters press Next button...
Страница 86: ...PCM 9577 User s Manual 76...
Страница 101: ...91 Chapter6 3 Choose Driver button press Update Driver button 4 Choose Sound video and game controllers press Next...
Страница 103: ...93 Chapter6 8 Press Next button 9 Press Finish to reboot...
Страница 104: ...PCM 9577 User s Manual 94...
Страница 110: ...PCM 9577 User s Manual 100 7 2 3 Installation for Windows 2000 1 Open Device Manager...
Страница 111: ...101 Chapter7 2...
Страница 112: ...PCM 9577 User s Manual 102 3 4...
Страница 113: ...103 Chapter7 5 6...
Страница 114: ...PCM 9577 User s Manual 104 7 8...
Страница 115: ...105 Chapter7 9 7 2 4 Installation for Windows NT 1 a Select Start Settings Control Panel b Double click Network...
Страница 116: ...PCM 9577 User s Manual 106 2 a Choose type of network b Click Next 3 a Click Select from list...
Страница 118: ...PCM 9577 User s Manual 108 6 Check the highlighted item and click OK...
Страница 119: ...109 Chapter7 7 Click Next to continue setup 8 Choose the networking protocols then click Next...
Страница 120: ...PCM 9577 User s Manual 110 9 Select the correct Network Services then click Next 10 Click Next to continue setup...
Страница 122: ...PCM 9577 User s Manual 112...
Страница 126: ...PCM 9577 User s Manual 116...
Страница 127: ...Appendix B Installing PC 104 Modules This appendix gives instructions for installing PC 104 modules...
Страница 129: ...119 AppendixB Figure B 1 PC 104 module mounting diagram...
Страница 130: ...PCM 9577 User s Manual 120 Figure B 2 PC 104 module dimensions mm 0 1...
Страница 156: ...PCM 9577 User s Manual 146...
Страница 161: ...Appendix E Optional Extras for the PCM 9577...
Страница 165: ...Appendix F Mechanical Drawings...
Страница 167: ...157 AppendixF Figure F 2 PCM 9577 Mechanical Drawing solder side PCM 9577 REV A1...
Страница 168: ...PCM 9577 User s Manual 158...


