IntelliPack Series 892M/894M Computation Transmitter User's Manual DC Voltage/Current Input
___________________________________________________________________________________________
- 5 -
Jumper Installation (Voltage Output)
For voltage output, a short jumper must be installed between
the output “I+” and “JMP” terminals. A jumper wire is included
with the unit and has already been installed between the output
“I+” and “JMP” terminals as shipped from the factory. Verify the
position of this jumper if your application requires output voltage.
Remove this jumper for current output applications. Refer to the
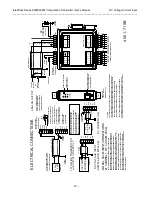
Electrical Connections Drawing 4501-719.
Mounting
Refer to Enclosure Dimensions Drawing 4501-720 for
mounting and clearance dimensions.
DIN Rail Mounting:
This module can be mounted on "T"
type DIN rails. Use suitable fastening hardware to secure the
DIN rail to the mounting surface. Units may be mounted
side-by-side on 1-inch centers for limited space applications.
"T" Rail (35mm), Type EN50022:
To attach a module to this
style of DIN rail, angle the top of the unit towards the rail and
locate the top groove of the adapter over the upper lip of the
rail. Firmly push the unit towards the rail until it snaps solidly
into place. To remove a module, first separate the input
terminal block(s) from the bottom side of the module to
create a clearance to the DIN mounting area. Next, insert a
screwdriver into the lower arm of the DIN rail connector and
use it as a lever to force the connector down until the unit
disengages from the rail.
Electrical Connections
Terminals can accommodate wire from 14-24 AWG (stranded
or solid copper). Strip back wire insulation 1/4-inch on each lead
before installing into the terminal block. Input wiring should be
shielded twisted-pair. Since common mode voltages can exist on
signal wiring, adequate wire insulation should be used and proper
wiring practices followed. It is recommended that transmitter
output and power wiring be separated from the input signal wiring
for safety, as well as for low noise pickup. Note that input, power,
and output terminal blocks are a plug-in type and can be easily
removed to facilitate module removal or replacement without
removing individual wires. If your application requires voltage
output, you must install a jumper between the output “I+” and
“JMP” terminals (pre-installed from the factory). Remove this
jumper for current output applications. If your input is process
current, you must also install a short jumper wire between the
input “I+” and “V+” terminals to complete the input circuit. Be
sure to remove power and/or disable the load before unplugging
the terminals to uninstall the module, installing or removing
jumpers, or before attempting service. All connections must be
made with power removed.
IMPORTANT
: Power, input, and output I/O wiring must be in
accordance with Class 1 Division 2 wiring methods, Article 501-
4(b) of the National Electrical Code, NFPA 70, for installations in
the U.S., or as specified in Section 18-1J2 of the Canadian
Electrical Code for installations within Canada and in accordance
with the authority having jurisdiction.
This equipment is suitable for use in Class I, Division 2,
Groups A, B, C, and D, or non-hazardous locations only.
CAUTION:
Risk of Electric Shock - More than one disconnect
switch may be required to de-energize the equipment before
servicing.
WARNING:
Explosion Hazard - Substitution of any
components may impair suitability for Class 1 Division 2.
WARNING:
Explosion Hazard - Do not disconnect equipment
unless power has been switched off or the area is known to be
non-hazardous.
1.
Power:
Refer to Electrical Connections Drawing 4501-719.
Variations in power supply voltage within rated limits has
negligible effect on module accuracy. For supply
connections, use No. 14 AWG wires rated for at least 75
C.
The power terminal is diode-coupled for reverse polarity
protection. Choose a power supply capable of providing the
maximum steady state current draw of the module, plus the
peak inrush current that is required when power is first
switched on, or startup problems may occur. As a general
rule, the peak current approaches twice the maximum steady
state current. Peak currents are reduced with higher supply
voltages.
2.
DC Voltage/Current Inputs:
Connect input(s) per Drawing
4501-719. Observe proper polarity (see label for input type).
An excitation supply is provided at the input for powering two-
wire transmitters. For process curren
t input, the input “I+”
must be jumpered to the input “V+” terminal. Place a short
jumper between these terminals to complete the input circuit
for current inputs only. Voltage is delivered to the “V+” input
directly with this jumper removed.
Optional HOLD Wiring:
A TTL or open collector/drain signal
may be wired to the HOLD and common (COM) terminals of
the module to
hold
the transmitter output at the last
computed value while HOLD is asserted low. HOLD is
pulled-up internally (deasserted) and is part of the input
circuit which is isolated from the output. HOLD common
(COM) and input return (RTN) are not equivalent potentials
and should never be tied together. Make sure that common
is not inadvertently tied to ground which may be connected to
input return.
3.
Analog Output Connections
: Wire outputs as shown in
Electrical Connections Drawing 4501-719. For voltage
output, you must also install a jumper between the output “I+”
and “JMP” terminals (pre-installed from the factory). Remove
this jumper for current output. Current is delivered directly
from the “I+” output with the jumper removed.
4.
Grounding:
See Electrical Connections Drawing 4501-719.
The module housing is plastic and does not require an earth
ground connection. However, there are mounting positions at
the output terminals to connect a cable shield, plus earth
ground. These connections are isolated from the internal
circuit and are recommended to minimize noise and help
protect the unit from damaging I/O transients.
WARNING:
For compliance to applicable safety and
performance standards, the use of shielded cable is
recommended as shown in Drawing 4501-719. Further, the
application of earth ground must be in place as shown in
Drawing 4501-719. Failure to adhere to sound wiring and
grounding practices may compromise safety & performance.

