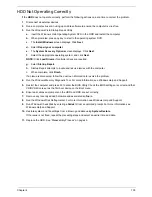
Chapter 4
137
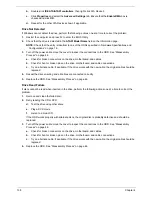
a.
Double-click
lDE ATA/ATAPI controllers
. If a device displays a down arrow, right-click on the device
and click
Enable
.
b.
Double-click
DVD/CD-ROM drives
. If the device displays a down arrow, right-click on the device and
click
Enable
.
c.
Check that there are no yellow exclamation marks against the items in
lDE ATA/ATAPI controllers
. If
a device has an exclamation mark, right-click on the device and uninstall and reinstall the driver.
d.
Check that there are no yellow exclamation marks against the items in
DVD/CD-ROM drives
. If a
device has an exclamation mark, right-click on the device and uninstall and reinstall the driver.
e.
If the exclamation marker is not removed from the item in the lists, try removing any recently installed
software and retrying the operation.
Discs Do Not Play
If discs do not play when inserted in the drive, perform the following actions one at a time to correct the
problem.
1.
Check that the disc is correctly seated in the drive tray and that the label on the disc is visible.
2.
Check that the media is clean and scratch free.
3.
Try an alternate disc in the drive.
4.
Ensure that
AutoPlay
is enabled:
a.
Navigate to
Start
´
Control
Panel
´
Hardware and Sound
´
AutoPlay
.
b.
Select
Use AutoPlay for all media and devices
.
c.
In the Audio CD and DVD Movie fields, select the desired player from the drop down menu.
5.
Check that the Regional Code is correct for the selected media:
IMPORTANT:
Region can only be changed a limited number of times. After Changes remaining reaches zero,
the region cannot be changed even Windows is reinstalled or the drive is moved to another computer.
a.
Navigate to
Start
´
Control
Panel
´
System
and
Maintenance
´
System
´
Device
Manager
.
b.
Double-click
DVD/CD-ROM drives
.
c.
Right-click
DVD drive
and click
Properties
, then click the
DVD Region
tab.
d.
Select the region suitable for the media inserted in the drive.
Discs Do Not Burn Properly
If discs can not be burned, perform the following actions one at a time to correct the problem.
1.
Ensure that the default drive is record enabled:
a.
Navigate to
Start
´
Computer
and right-click the writable ODD icon. Click
Properties
.
b.
Select the
Recording
tab. In the
Desktop disc recording
panel, select the writable ODD from the
drop down list.
c.
Click
OK
.
2.
Ensure that the software used for burning discs is the factory default. If using different software, refer to
the software's user manual.
Playback is Choppy
If playback is choppy or jumps, perform the following actions one at a time to correct the problem.
1.
Check that system resources are not running low:
a.
Try closing some applications.
b.
Reboot and try the operation again.
2.
Check that the ODD controller transfer mode is set to DMA:
a.
Navigate to
Start
´
Control
Panel
´
System
and
Maintenance
´
System
´
Device
Manager
.
Содержание Aspire 5935 Series
Страница 6: ...VI ...
Страница 10: ...X Table of Contents ...
Страница 14: ...4 Chapter 1 System Block Diagram ...
Страница 47: ...Chapter 2 37 ...
Страница 54: ...44 Chapter 2 ...
Страница 81: ...Chapter 3 71 5 Using both hands lift the Speaker Module upward to remove it from the Upper Cover ...
Страница 83: ...Chapter 3 73 5 Disconnect the cable from the Power Saving Board as shown ...
Страница 88: ...78 Chapter 3 8 Remove the FInger Print Reader from the bracket as shown ...
Страница 98: ...88 Chapter 3 4 Lift the right side Saddle clear of the Lower Cover as shown ...
Страница 102: ...92 Chapter 3 5 Disconnect the cable from the Bluetooth Module ...
Страница 109: ...Chapter 3 99 5 Using both hands lift the Thermal Module clear of the Mainboard ...
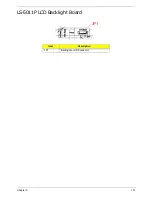
Страница 161: ...Chapter 5 151 LS 5011P LCD Backlight Board Item Description JP1 Backlight on off Connector ...
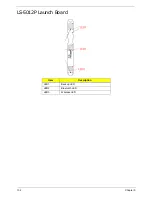
Страница 162: ...152 Chapter 5 LS 5012P Launch Board Item Description LED1 Backup LED LED2 Bluetooth LED LED3 Wireless LED ...
Страница 164: ...154 Chapter 5 LS 5014P VR Board Item Description SW1 VR SWITCH ...
Страница 165: ...Chapter 5 155 LS 5015P Finger printer Board Item Description U2 LTT SS801U 13_LGA28 ...
Страница 170: ...160 Chapter 5 LS 501AP HDMI Board Item Description U1 CH7318A BF TR_QFN48_7X7 ...
Страница 175: ...Chapter 6 165 Base Assembly No Description Acer P N 1 HDD Memory Door 2 WLAN Door 3 Lower Cover 1 2 3 ...
Страница 183: ...Chapter 6 173 ...
Страница 212: ...Appendix A 202 ...
Страница 218: ...208 Appendix B ...
Страница 220: ...210 Appendix C ...
Страница 224: ...214 ...

