background image

89

5

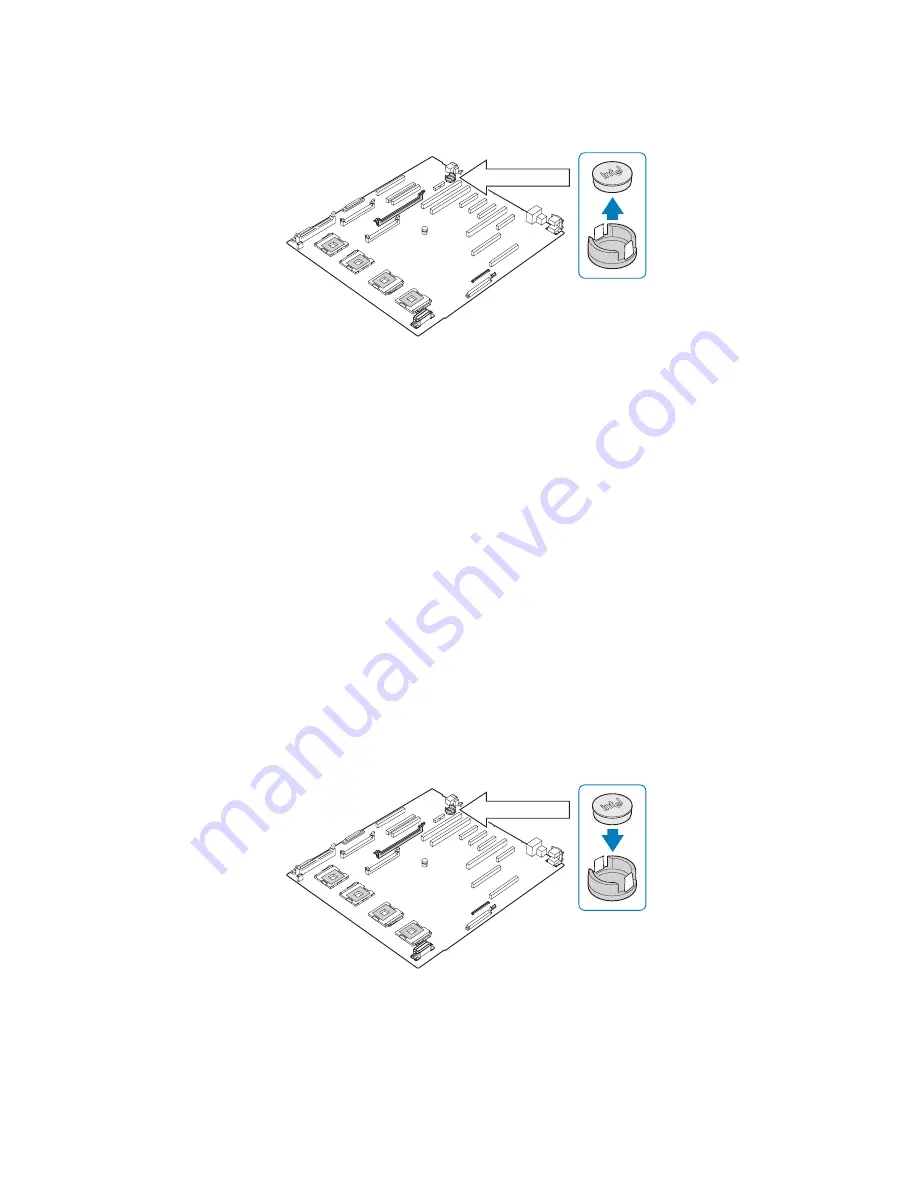
Gently push down to detach the activation key. 

6

Store the activation key in an anti-static bag. 

7

Replace the memory board air baffle. 

8

Replace the PCI card.

9

Observe the post-installation instructions described on page 38.

Installing the RAID activation key

1

Observe the ESD precautions and pre-installation instructions 
described on page 37.

2

Remove the memory boards or memory air baffles from DIMM 
slots C and D. See “Cold Removal of Memory Board” on page 75 
and “Removing a memory board air baffle” on page 46. 

3

If a PCI card is installed in PCI-X Slot 7, remove the card. For 
instructions on removing a PCI card, see page 81. 

4

Remove the RAID activation key from its protective packaging. 

5

Align then insert the activation key into the RAID activation key 
connector on the mainboard. .

6

Replace the memory board air baffle. 

7

Replace the PCI card.

8

Observe the post-installation instructions described on page 38.

Содержание ALTOS R910 Series

Страница 1: ...Acer Altos R910 Series User s Guide ...

Страница 2: ...ow The serial number and model number are recorded on the label affixed to your server All correspondence concerning your unit should include the serial number model number and purchase information No part of this publication may be reproduced stored in a retrieval system or transmitted in any form or by any means electronic mechanical photocopy recording or otherwise without the prior written per...

Страница 3: ...in a particular installation If this device does cause harmful interference to radio or television reception which can be determined by turning the device off and on the user is encouraged to try to correct the interference by one or more of the following measures Reorient or relocate the receiving antenna Increase the separation between the device and receiver Connect the device into an outlet on...

Страница 4: ...ept any interference received including interference that may cause undesired operation Notice Canadian users This device does not exceed the Class A limits for radio noise emissions from digital apparatus set out in the interference causing equipment standard entitled Digital Apparatus ICES 003 of the Canadian Deparmment of Communications Laser compliance statement The DVD ROM drive in this serve...

Страница 5: ...king label If you are not sure of the type of power available consult your dealer or local power company 7 Do not allow anything to rest on the power cord Do not locate this product where persons will walk on the cord 8 If an extension cord is used with this product make sure that the total ampere rating of the equipment plugged into the extension cord does not exceed the extension cord ampere rat...

Страница 6: ...k of fire or explosion Refer battery replacement to a qualified service technician 13 Warning Batteries may explode if not handled properly Do not disassemble or dispose of them in fire Keep them away from children and dispose of used batteries promptly 14 Use only the proper type of power supply cord set provided in your accessories box for this unit It should meet the following criteria An IEC 3...

Страница 7: ...ystem 29 Pre installation requirements 29 Connecting peripherals 30 Turning on the system 31 Power on problems 32 Configuring the system OS 33 Turning off the system 34 3 System upgrade 35 Installation precautions 37 ESD precautions 37 Pre installation instructions 37 Post installation instructions 38 Opening the server 39 Removing the front bezel 39 Installing the front bezel 40 Removing the top ...

Страница 8: ...module 82 ARMC 3 or BMC module 84 SAS RAID adapter 86 Configuring the integrated hardware RAID components 88 SCSI hardware RAID components 88 SAS hardware RAID components 94 4 BIOS setup 101 Introduction 103 System options menu 104 BIOS setup 110 Using the BIOS menus 112 Main 112 Processor 114 Memory 117 Devices 123 Server Management 131 Security 136 Save Restore Exit 138 Upgrading the BIOS 139 5 ...

Страница 9: ... the rack 161 Appendix B Memory configuration options 169 Introduction 171 Installation and population order 172 Memory board installation order 172 DIMM module installation order 172 DIMM module population order 173 Memory modes 177 Maximum compatibility 178 Maximum performance 180 Memory sparing 182 Memory RAID 184 Memory mirroring 186 Appendix C RAID configuration utilities 189 Overview 191 SCS...

Страница 10: ...x ...

Страница 11: ...1 System tour ...

Страница 12: ...tworking hot plug PCI slots standard based server management and server oriented embedded I O Remote monitoring and management functions are also included providing a new level of user tools for server administration This chapter provides a brief overview of the system hardware including illustrations and component identification ...

Страница 13: ...or hardware support of security features Chipset Intel E8501 chipset north bridge Support dual front side bus Support for hot plug memory Intel IOP332 storage I O processor Includes Intel XScale Technology works in conjunction with the LSI Logic 53C1030 Ultra320 SCSI controller to support optional integrated SCSI hardware RAID Intel 81801EB I O Controller Hub 5 south bridge Memory subsystem Suppor...

Страница 14: ...ces internal SAS controller SAS model LSI SAS 1068 SAS controller Integrated hardware RAID optional Supports RAID levels 0 1 5 and 10 Requires RAID activation key iButton Requires DDR2 400 registered ECC DIMM for RAID cache Supports RAID BBU Battery Backup Unit Available as an upgrade option Note It may be possible to configure and enable both onboard SCSI RAID and SAS RAID However only one RAID s...

Страница 15: ...ts with x4 throughput One hot plug 133 MHz 64 bit PCI X slot Two non hot plug 100 MHz 64 bit PCI X slots Note The PCI hot plug function allows the removal of a standard PCI adapter from the system without stopping the software or powering down the unit Graphic interface ATI Radeon 7000 video controller with 16MB SDRAM Baseboard Management Controller Integrated Acer BMC module IPMI Intelligent Plat...

Страница 16: ... Red Hat Enterprise Linux 4 0 EM64T SUSE Linux Enterprise Server 9 0 SUSE Linux Enterprise Server 9 0 EM64T ASM Acer Server Manager 2 Easy Build includes SCSI RAID Configuration Utility 2 Power supply Two 220 volts 1470 watt hot swap 1 1 redundant power supply modules System fan Two hot swap redundant system fan modules Two redundant 1 1 fans in each system fan module 1 Reserved for remote managem...

Страница 17: ...to allow access to the external drive bays serial and USB connectors LED indicators and the power reset and system ID buttons A summary of the indicators and components behind the bezel is given in the succeeding section For details on how to remove the front bezel see Removing the front bezel on page 39 Item Icon Component Item Icon Component A HDD hard disk drive activity indicator D Status faul...

Страница 18: ...mponent Item Icon Component A DVD drive bay G Hot swap system fan assembly eject button B 5 25 inch drive bays H Hot swap system fan modules C VGA monitor port I Hot swap system fan assembly indicator D NMI button J Hot plug HDDs E USB 2 0 ports K Hot plug HDD activity indicator F Control panel L Hot plug HDD carrier latch ...

Страница 19: ... LCD and additional server management features Both control panels contain switches and LED status indicators Button control panel Item Icon Component Item Icon Component A HDD hard disk drive activity indicator E System ID indicator B LAN1 and LAN2 status indicator F System ID button C Status fault indicator G Power button D Power indicator H Reset button ...

Страница 20: ...m Icon Component A LCD display G Power indicator B Scroll up button H Power button C Scroll down button I Status fault indicator D Back button J LAN1 and LAN2 status indicator E Select button K HDD hard disk drive activity indicator F System ID indicator L Reset button ...

Страница 21: ...power on and off System ID button Press to turn the system ID LED on and off Scroll up button With an LCD control panel use these navigation buttons to do the following Navigate through the menu options Select an option in the menu and confirm your selection Scroll down button Back button Select button Hot plug HDD carrier latch Press to release the hot plug HDD carrier lever Hot swap system fan a...

Страница 22: ...ED states on the front panel Item LED indicator Color Status Description A HDD activity indicator Green on HDD is being initialized Green blinking HDD is active Amber on HDD or HDD slot failure Amber slow blinking 1 Hz A predictive HDD or HDD slot failure or rebuild is in process Amber fast blinking 2 5 Hz HDD rebuild is interrupted or rebuild on empty slot ...

Страница 23: ...cal power supply blower voltage or temperature failure Amber blinking Non critical condition Redundant power supply or blower failure Non critical blower voltage and temperature failure D Power indicator Green off Power off System is not powered on Green on Power on System has power applied to it Green off S4 S5 System in ACPI S4 or S5 state power off Green blinking S1 System in ACPI S1 state slee...

Страница 24: ...on Fan failure Amber off Fan normal operation G Hot plug HDD activity indicator Amber flashing HDD is active Amber Green alternate flashing HDD is powered on and rebuilding RAID HDD is powered on and has a fault condition Amber flashing HDD is not powered on and has a fault condition Unlit No HDD is installed HDD is initiated but has no current activity Item LED indicator Color Status Description ...

Страница 25: ...t plug PCI Express x8 slot with x4 throughput B4 Hot plug PCI Express x8 slot with x4 throughput B5 Hot plug PCI Express x8 slot with x4 throughput B6 PCI X 100MHz slot B7 PCI X 100MHz slot H1 H2 Hot swap power supply module status indicators C External SCSI connector optional I1 I2 Hot swap power supply module DC input power connectors D Fibre channel module slot optional J Sytem ID button E VGA ...

Страница 26: ... indicator Green on System has power applied to it A2 Fault indicator Amber on Power rail failure Power supply is in a latched state Amber off Power supply module failure 3 3 VSB is lost System is not powered on A3 DC OK indicator Green on DC power cord is plugged into an active DC power source B System ID indicator Blue on System identification is active Blue off System identification is disabled...

Страница 27: ...etwork link is detected Green off No network connection Green blinking Network connection in place Speed Green Amber off 10 Mbps connection Green on 100 Mbps connection Amber on 1000 Mbps connection Item LED indicator Function Color Description ...

Страница 28: ...1 System tour 18 Internal components Item Component Item Component A DVD drive bay D Plastic PCI slot divider and PCI bus slots B CPU air baffle E Memory board C Memory board air baffle F Mainboard ...

Страница 29: ...It should look like the figure shown below Item Description Item Description A Server management port RJ 45 R Memory board slot B B Integrated SCSI hardware RAID activation key iButton connector S DC power connectors C PCI X 100MHz Slot 7 T Power distribution board PDB signal connector ...

Страница 30: ...t plug PCI Express x8 Slot 1 Z SCSI connector channel A connects to the SCSI backplane board J Gigabit LAN 1 top LAN 2 bottom AA VRM 9 1 processor cache VRM connector K Dual USB 2 0 ports BB VRM 10 2 connector CPU 3 L Serial top VGA port bottom CC Integrated SCSI hardware RAID BBU connector M Memory board slot A DD SCSI connector channel B for internal or external SCSI connector N RTC battery EE I...

Страница 31: ... drives and enclosure monitoring and management SCSI backplane board SCSI model Item Description Item Description A Front panel board connector D Power cable connector to DVD and 5 25 drives B Power distribution board connector E Hot swap system fan module connectors two on reverse side C SCSI data cable connector F Hot plug HDD connectors two on reverse side ...

Страница 32: ... Item Description A Front panel board connector D Power cable connector to DVD and 5 25 drives B Power distribution board connector E Hot swap system fan module connectors two on reverse side C SAS data cable connector F Hot plug HDD connectors five on reverse side ...

Страница 33: ... a memory board Item Description Item Description A Mirror mode indicator F Memory board handle B RAID mode indicator G DIMM 1B error indicator C Hot plug attention indicator H DIMM 1A error indicator D Attention button I DIMM 2B error indicator E Power indicator J DIMM 2A error indicator ...

Страница 34: ...D mode indicator Green on System uses RAID memory configuration Green off System is not in a RAID configuration Hot plug attention indicator Amber on Memory hot plug transition event Amber off Normal operation Power indicator Green on Power is detected The memory board is powered on Green off Power is not detected on all boards Green flashing Memory board is in hot plug event DIMM 1A 1B 2A and 2B ...

Страница 35: ...2 default 2 3 Password enabled Password disabled cleared JA42 BIOS write protect 1 2 default 2 3 BIOS unprotected BIOS write protected J4A3 BIOS recovery 1 2 default 2 3 Normal boot BIOS recovery J4A4 BIOS clear CMOS NVRAM 1 2 default 2 3 BIOS clear CMOS Forced CMOS clear ...

Страница 36: ...1 System tour 26 ...

Страница 37: ...2 System setup ...

Страница 38: ...This chapter gives you instructions on how to set up the system Procedures on how to connect peripherals are also explained ...

Страница 39: ...t free Stable surface free from vibration Well ventilated and away from sources of heat Secluded from electromagnetic fields produced by electrical devices such as air conditioners radio and TV transmitters etc Checking the package contents Check the following items from the package Acer Altos R910 system Acer EasyBUILDTM Acer Altos R910 accessory box If any of the above items are damaged or missi...

Страница 40: ... Do not connect the system to an incorrect voltage source Refer to the illustration below for specific connection instructions on the peripherals you want to connect to the system Note Consult the operating system manual for information on how to configure the network setup 220 V 220 V ...

Страница 41: ...or more information on how to use the System Options menu see System options menu on page 104 Note If the system does not turn on or boot after pressing the power button go to the next section for the possible causes of the boot failure The POST messages indicate if the system is running well or not If the POST finds any problems the system will emit a beep code followed by an error message displa...

Страница 42: ...y connected internal power cables Check the internal cable connections If you are not confident to perform this step ask a qualified technician to assist you Warning Make sure all power cords are disconnected from the electrical outlet before performing this task The ARMC 3 or BMC module is not installed in the server or not properly seated Check the ARMC 3 or BMC module connection Make sure the A...

Страница 43: ...es to avoid smudges or fingerprints 4 Gently press the disc down to make sure that it is properly inserted Caution While pressing the disc be careful not to bend the disc tray Make sure that the disc is properly inserted before closing the disc tray Improper insertion may damage both the disc and the CD ROM drive 5 Gently press the drive Stop Eject button again to close the disc tray 6 The Acer Ea...

Страница 44: ...the Windows taskbar point to Shut Down select Shut down from the drop down window then click on OK You can then turn off all peripherals connected to your server If you are using another OS refer to the OS documentation for instructions on how to shut down the OS If you cannot shut down the server press the power button for at least four seconds Quickly pressing the button may put the server in a ...

Страница 45: ...3 System upgrade ...

Страница 46: ...This chapter discusses the precautionary measures and installation procedures you need to know to upgrade the system ...

Страница 47: ... metal part of the server before handling components If a wrist strap is not available maintain contact with the server throughout any procedure requiring ESD protection Pre installation instructions Perform the steps below before you open the server or before your remove or replace any component 1 Turn off the system and all the peripherals connected to it 2 Unplug all cables from the power outle...

Страница 48: ... are a qualified service technician Post installation instructions Perform the steps below after installing a server component 1 See to it that all components are installed according to the described step by step instructions 2 Reinstall all hardware structure or cable that have been previously removed 3 Reinstall the top cover 4 Reinstall the front bezel 5 Connect the necessary cables 6 Turn on t...

Страница 49: ...Pre installation instructions on page 37 You need to open the server before you can install additional components The front bezel and top cover are removable to allow access to the system s internal components Refer to the following sections for instructions Removing the front bezel Grasp the front bezel at outer edge and pull straight out ...

Страница 50: ...r 1 Observe the ESD precautions and pre installation instructions described on page 37 2 Loosen the two captive screws located on the faceplate of the chassis A See illustration on page 41 3 Slide the top cover toward the back of the chassis until the tabs on the cover disengage with the slots on the chassis ...

Страница 51: ...e the ESD precautions and pre installation instructions described on page 37 2 Place the top cover on the chassis so that the tabs on the cover align with the slots on the chassis A 3 Slide the top cover toward the front of the chassis until it is fully closed 4 Tighten the captive screws on the faceplate of the chassis B ...

Страница 52: ...ng and installing a processor cache VRM Removing and installing a DVD drive To remove the CPU air baffle 1 Observe the ESD precautions and pre installation instructions described on page 37 2 Insert your fingers into the holes on the top of the baffle A 3 Pull the baffle up and back to disengage the baffle from the two sheet metal tabs on the front of the baffle 4 Lift the baffle from the chassis ...

Страница 53: ...affle just below the SCSI backplane board One tab is located on each side of the chassis 3 Lower the rear of the baffle into place making sure the guides on each side of the air baffle will correctly engage in the left and right chassis slots 4 Push down the air baffle to the two locations where the word Memory is printed on the air baffle 5 Observe the post installation instructions described on ...

Страница 54: ...ace to remove and install an optional processor core VRM To remove the center brace 1 Observe the ESD precautions and pre installation instructions described on page 37 2 Slide the chassis at each side of the chassis to the unlock position A 3 Lift the center brace from the chassis B ...

Страница 55: ...utions and pre installation instructions described on page 37 2 Slide the center brace into position in the chassis A 3 Slide the latches at each side of the chassis to the locked position B 4 Observe the post installation instructions described on page 38 ...

Страница 56: ...ving and installing a memory board Removing and installing a PCI card To remove the memory board air baffle 1 Observe the ESD precautions and pre installation instructions described on page 37 2 Insert your fingers into the two holes on the top of the memory board air baffle then push the tab A 3 Lift the memory board air baffle from the server B ...

Страница 57: ...installation instructions described on page 37 2 Insert the memory board air baffle into the memory board slot with arrow on the tab pointing to the right The memory air baffle will lock into the memory board slot 3 Observe the post installation instructions described on page 38 ...

Страница 58: ... Hot pluggable components are the components that can be removed and replaced while the system is powered on For this server model it refers to the following Hard disk drives System fan assembly Power supply Memory board PCI cards with OS hot plug interface ...

Страница 59: ... you are replacing a failed HDD determine which drive has failed by checking the drive status LED For more information on how to determine the drive status refer to Front panel LED indicators on page 12 Removing a HDD 1 Observe the ESD precautions described on page 37 2 If you are removing a failed HDD determine which drive has failed by checking the drive status LED 3 Press the green HDD carrier ...

Страница 60: ...2 Remove the four screws that secure the air baffle to the HDD carrier A 3 Remove the air baffle from the HDD carrier B 4 Save the air baffle and screws for later use 5 Install a hard disk on the HDD carrier then secure it with the four screws A that came with the HDD carrier B 6 With the lever still extended slide the HDD carrier all the way into the drive bay ...

Страница 61: ...embly has an amber LED to indicate a failed fan condition If the amber LED is on the fan assembly needs to be replaced The LED remains off during normal operation Removing the system fan assembly Caution System fan assembly hot swap operations should be performed only if a failure occurs in the system fan assembly 1 Observe the ESD precautions described on page 37 2 Locate the fan assembly you are...

Страница 62: ...e proper system cooling the replacement of a failed system fan module should be completed within one minute 1 If a system fan assembly is installed in the fan bay perform steps 1 to 3 of the Removing the system fan assembly section 2 Slide the new fan into the fan bay A 3 Push the handle closed until it clicks into place B ...

Страница 63: ...the risk of personal injury from electric shock hazards do not open the power supply modules There are no serviceable parts inside the module Caution Electrostatic discharge can damage electronic components Make sure that you are properly grounded before handling a power supply module Caution Due to chassis airflow disruption a power supply bay should never be vacant for more than two minutes when...

Страница 64: ...pply handle A 4 Open the handle on the power supply B 5 Pull the power supply from the chassis and set it on a clean static free surface C 6 Install a filler panel Installing a power supply Caution To ensure proper system cooling the replacement of failed power supply shoule be completed within two minutes 1 Observe the ESD precautions described on page 37 2 Remove the filler panel from the empty ...

Страница 65: ...installed in the server Each memory board has four DIMM slots that support two DDR2 channels with two DIMMs per channel The memory boards support both single rank and double rank registered ECC DIMMs The memory boards can be configured in a redundant or non redundant configuration Memory boards configured using RAID or mirroring are in redundant configuration If a memory board that is configured i...

Страница 66: ...ystem memory configuration The activity is transparent to the OS For instructions on how to hot replace the memory board see Removing a hot plug memory board on page 57 Memory hot add You can increase the memory capacity of the system while the OS is active and if it is in a RAID or mirror configuration If your server is in a RAID configuration you can remove only one memory board at a time to upg...

Страница 67: ...r the hot plug attention LED stops flashing make sure the power LED for the memory board is also off Caution Do not attempt to remove any memory board while any of the LEDs are either on or blinking If the attention LEDs do not turn off your configuration may not support hot plug memory board activity For instructions on non hot plug memory board maintenance see Cold removal of memory board and Co...

Страница 68: ... Observe the ESD precautions described on page 37 2 Locate an empty memory board slot 3 If necessary remove the memory board air baffle Perform instructions described in Removing a memory board air baffle on page 46 4 Add or replace memory DIMMs as needed For instructions see Installing DIMMs on page 79 and Removing DIMMs on page 81 5 Ensure the handle on the memory board is in the open position 6...

Страница 69: ...tion PCI card Caution Only PCI add in cards in PCI slots 1 through 5 are hot pluggable If you are installing or removing a PCI card from PCI slot 6 or 7 see page 81 for more information Cards can be hot plugged in PCI slots 1 through 5 You can remove and replace a PCI card with OS hot plug interface Removing hot plug PCI card To remove a hot plug PCI card with OS hot plug interface 1 Observe the E...

Страница 70: ... mainboard 4 Rotate the slot retention latch on the rear of the card slot upward 5 Pull up the slot cover 6 Remove the PCI add in board from its protective packaging 7 Align the card in the empty slot 8 Insert the card into the selected slot Make sure that the card is properly seated 9 Rotate the retention latch downward 10 Connect any required cable to the card 11 When using the hot plug PCI card...

Страница 71: ...the system to be powered down before you can remove or replace them The cold pluggable components installed in the server include DVD drive 5 25 inch drive Processor Processor cache VRMs Processor core VRMs Memory board DIMM modules PCI card Fibre channel module ARMC 3 or BMC module SAS RAID adapter ...

Страница 72: ...om the SATA to IDE converter board on the rear of the media device A 3 Press the blue release latch on the media device carrier B 4 Slide the media device from the front opening in the faceplate of the system C Installing the DVD drive 1 Observe the ESD precautions and pre installation instructions described on page 37 2 If necessary remove the old DVD drive See previous section ...

Страница 73: ...move the new drive from its protective packaging 6 Attach the SATA to IDE converter board to the media device 7 Install a new media device into the carrier 8 Slide the carrier into the front opening in the chassis 9 Plug the SATA and power cables into the converter board 10 Observe the post installation instructions described on page 38 ...

Страница 74: ...a 5 25 inch drive 1 Observe the ESD precautions and pre installation instructions described on page 37 2 Push the tabs on both sides of the carrier filler panel A 3 Hold the tabs in while pulling the carrier filler panel from the bay B 4 Remove the screws that attach the slide rails to the filler panel 5 Attach the slide rails to the device then secure it with screws you removed earlier 6 Attach t...

Страница 75: ...core Intel Xeon processors 7100 sequence with up to 16 MB L3 cache dual core Intel Xeon processor 7000 sequence 64 bit Intel Xeon processor MP with 1 MB L2 cache CPU upgrading guidelines When installing CPUs the following must be observed Use only Acer qualified CPUs Each CPU socket include a CPU and heat sink combination CPUs should have identical FSB cache and speed CPUs must be installed in seq...

Страница 76: ...e requirements Removing a CPU The system may have from one to four CPUs installed on the mainboard If you are replacing a CPU on the system the heat sink must be removed Important Before removing a CPU from the mainboard make sure to create a backup file of all important data 1 Observe the ESD precautions and pre installation instructions described on page 37 Warning The heat sink becomes very hot...

Страница 77: ... Lift the heat sink to remove it 6 Place the heat sink upside down on a flat surface Note Wipe off the thermal grease from both the heat sink and processor using an alcohol pad 7 Pull the CPU socket retainer lever to the fully open upright position ...

Страница 78: ...ket Store it in an anti static bag Installing a CPU 1 Perform steps 1 to 3 of the Removing a CPU section 2 If a heat sink is installed remove it 3 Pull the CPU socket retainer lever to a fully open position 4 Remove the CPU from its protective packaging ...

Страница 79: ... the processor aligning the four screws in the heat sink with the screw sockets in the chassis 9 Tighten the screws approximately one full turn at a time until each is evenly tightened Do not fully tighten one screw at a time 10 Install the processor VRMs and processor core VRMs as necessary To determine requirements see Processor VRM requirements on page 70 11 Reinstall the CPU air baffle See Ins...

Страница 80: ...of the chassis top cover for the locations of these VRMs Contact your local Acer representative for specific VRM requirements As an overview the following generic VRM rules apply Note The processor cache VRM is required only if the CPUs installed in sockets 3 and 4 supports L3 cache No of processors Processor VRM requirement One None Two None Three låÉ Å ÅÜÉ VKN soj låÉ ÅçêÉ NMKO soj Four låÉ Å ÅÜ...

Страница 81: ...ed on page 38 Installing a processor cache VRM Caution The processor cache VRM connector is slotted to ensure proper installation Make sure that you are inserting the correct VRM to the connector Forcing the wrong VRM into a connector can damage the VRM and or connector 1 Observe the ESD precautions and pre installation instructions described on page 37 2 If necessary remove the CPU air baffle Per...

Страница 82: ...or core VRMs are located under the center brace 1 Observe the ESD precautions and pre installation instructions described on page 37 2 Remove the memory boards or memory air baffles from DIMM slots C and D See Cold Removal of Memory Board on page 75 and Removing a memory board air baffle on page 46 3 Remove the fourth processor core VRM Warning The processor 4 VRM baffle must be installed to maint...

Страница 83: ... 2 Pull the cover out at an angle B 4 Press the holding clips on both sides of the VRM connector A 5 Gently pull the VRM upward to remove it from the socket B 6 Observe the post installation instructions described on page 38 Processor 3 VRM Processor 4 VRM ...

Страница 84: ... slots C and D See Cold Removal of Memory Board on page 75 and Removing a memory board air baffle on page 46 3 Verify that the connector of the VRM matches the type installed on the mainboard 4 Press the holding clips on both sides of the VRM connector A 5 Slide the VRM under the center brace and position it on its socket 6 Insert the VRM into the correct VRM connector and press down firmly B 7 Pr...

Страница 85: ...mory board or a memory board air baffle Important Refer to the memory board installation order table on page 172 when installing and removing memory boards Removing a memory board Caution Damage to the system occurs if power is not removed from the system prior to removal or installation of memory boards 1 Observe the ESD precautions and pre installation instructions described on page 37 2 Press t...

Страница 86: ...d on page 38 Installing a memory board 1 Observe the ESD precautions and pre installation instructions described on page 37 2 Locate an empty memory board slot 3 If necessary remove the memory board air baffle Perform the instructions described in Removing a memory board air baffle on page 46 4 Add or replace memory DIMMs as needed For instructions see Installing and Removing DIMMs 5 Make sure the...

Страница 87: ... two groups Each groups is referred to as a bank You must install the correct type of memory in each bank Each slot supports 512 MB 1 GB 2 GB and 4GB DDR2 400 PC2 3200 ECC registered 240 pin memory modules The maximum memory capacity is 64 GB DIMM module installation guidelines The following rules apply when adding DIMMs to the memory boards DIMMs must be populated in pairs referred to as a bank T...

Страница 88: ...g Functionality issues may be encountered if mixed memory types are installed on the memory board The system does not support combination of single channel with dual channel memory Use only DDR2 DIMMs Other DIMMs will not fit into the socket Attempts to force a non DDR2 DIMM into a socket will damage and or the socket or the DIMM Hold DIMMs only by the edges Do not touch the components or gold edg...

Страница 89: ...ation instructions described on page 37 2 Remove the memory board For instructions see Hot removal of a memory board on page 57 or Cold removal of a memory board on page 75 depending on your server configuration 3 Remove the memory board DIMM cover from the memory board 1 Pull out the latch on the memory board DIMM cover A 2 Press the left and right DIMM cover tabs B 3 Press the retainer tab on th...

Страница 90: ...MM and insert it again 8 Install the memory board DIMM cover on the memory board 1 Align the DIMM cover tabs with the top of the memory board A 2 Press the retainer tab inward B 3 Press the DIMM cover down until it clicks into place 9 Install the memory board For instructions see Hot insertion of a Memory Board on page 58 or Cold Insertion of a Memory Board on page 76 depending on your server conf...

Страница 91: ...ard For instructions see Hot insertion of a Memory Board on page 58 or Cold Insertion of a Memory Board on page 76 depending on your server configuration 4 Observe the post installation instructions described on page 38 To reconfigure the system memory The system automatically detects the amount of memory installed Run the BIOS setup to view the new value for total system memory and make a note of...

Страница 92: ...e 60 3 Observe the post installation instructions described on page 38 Fibre channel module The fibre channel module is a network adapter that provides high performance connectivity to servers or other clustered storage devices Removing the fibre channel module 1 Observe the ESD precautions and pre installation instructions described on page 37 2 Disconnect any cables attached to the fibre channel...

Страница 93: ...channel module 1 Observe the ESD precautions and pre installation instructions described on page 37 2 Remove the memory boards or memory air baffles from DIMM slots C and D See Cold Removal of Memory Board on page 75 and Removing a memory board air baffle on page 46 3 Rotate the slot retention latch on the rear of the fibre channel module slot upward A 4 Pull up the slot cover B 5 Remove the fibre...

Страница 94: ...ARMC 3 optional or BMC module provides server management firmware and functionality for the system Removing the ARMC 3 or BMC module 1 Observe the ESD precautions and pre installation instructions described on page 37 2 Remove the memory boards or memory air baffles from DIMM slots C and D See Cold Removal of Memory Board on page 75 and Removing a memory board air baffle on page 46 3 Hold the modu...

Страница 95: ...the memory boards or memory air baffles from DIMM slots C and D See Cold Removal of Memory Board on page 75 and Removing a memory board air baffle on page 46 3 Insert the standoff into the hole in the ARMC 3 or BMC module connector A The standoff installs on the bottom side of the module 4 Attach the module to the connector and snap the standoff into the matching hole on the mainboard B 5 Observe ...

Страница 96: ...o configure the hardware RAID components on the server RAID adapter see SAS hardware RAID components on page 94 Removing the SAS RAID adapter 1 Observe the ESD precautions and pre installation instructions described on page 37 2 Disconnect any cables attached to the SAS RAID adapter A 3 Rotate the slot retention latch on the rear of the card slot upward B 4 Pull up the adapter to remove it C 5 Sto...

Страница 97: ...t 3 4 or 5 remove the card For instructions on removing a PCI card see page 81 3 Remove the SAS RAID adapter from its protective packaging 4 If you want to install a RAID activation key RAID cache RAID BBU on the adapter see page 94 for instructions 5 Attach the SAS data cable to the adapter A 6 Rotate the slot retention latch on the rear of the card slot upward B 7 Pull up the slot cover C 8 Alig...

Страница 98: ...stored After power is restored data can be safely written to drives maintaining the integrity of the disk array Note It may be possible to configure and enable both onboard SCSI RAID and SAS RAID However only one RAID solution may use the RAID BBU as a backup power source for configuration data RAID activation key Removing the RAID activation key 1 Observe the ESD precautions and pre installation ...

Страница 99: ... the memory boards or memory air baffles from DIMM slots C and D See Cold Removal of Memory Board on page 75 and Removing a memory board air baffle on page 46 3 If a PCI card is installed in PCI X Slot 7 remove the card For instructions on removing a PCI card see page 81 4 Remove the RAID activation key from its protective packaging 5 Align then insert the activation key into the RAID activation k...

Страница 100: ...2 Remove the memory boards or memory air baffles from DIMM slots C and D See Cold Removal of Memory Board on page 75 and Removing a memory board air baffle on page 46 3 Press the holding clips on both sides of the slot outward to release the RAID cache A 4 Gently pull the RAID cache upward to remove it from the slot B 5 Close the clips 6 Replace the memory boards and memory air baffles 7 Observe t...

Страница 101: ...ry DDR 2 slot on the mainboard 4 Open the clips on the slot 5 Align then insert the RAID cache into the slot A 6 Press the holding clips inward to lock the RAID cache in place B Note RAID activation key and RAID cache is required to activate integrated hardware RAID For instructions on installing RAID activation key see page 89 7 Observe the post installation instructions described on page 38 RAID...

Страница 102: ...a memory board air baffle on page 46 3 Disconnect the battery cable from the mainboard A and detach it from its chassis holder B 4 Remove the battery holder from the chassis 5 Open the battery holder by pinching the top and bottom covers of the holder A then detach the cable inside the battery pack B 6 Replace the memory boards and memory air baffles ...

Страница 103: ...emory boards or memory air baffles from DIMM slots C and D See Cold Removal of Memory Board on page 75 and Removing a memory board air baffle on page 46 3 Open the battery holder by pinching the top and bottom covers of the holder A 4 Connect the cable inside the battery pack B 5 Secure the battery cable to its chassis holder A 6 Attach the cable to the RAID BBU connector on the mainboard B ...

Страница 104: ...tions Functionality for SAS hardware RAID is enabled by using the following components on the server RAID adapter RAID activation key iButton RAID cache RAID BBU RAID activation key Removing the RAID activation key 1 Observe the ESD precautions and pre installation instructions described on page 37 2 Remove the server RAID adapter See Removing the SAS RAID adapter on page 86 3 Insert the tip of a ...

Страница 105: ...ey 1 Observe the ESD precautions and pre installation instructions described on page 37 2 Remove the server RAID adapter See Removing the SAS RAID adapter on page 86 3 Remove the RAID activation key from its protective packaging 4 Align then insert the activation key into the RAID activation key connector on the server RAID adapter 5 Observe the post installation instructions described on page 38 ...

Страница 106: ...slot outward to release the RAID cache A 4 Gently pull the RAID cache upward to remove it from the slot B 5 Close the clips 6 Observe the post installation instructions described on page 38 Installing the RAID cache 1 Observe the ESD precautions and pre installation instructions described on page 37 2 Remove the server RAID adapter See Removing the SAS RAID adapter on page 86 3 Open the clips on t...

Страница 107: ... adapter drops below specifications the RAID BBU maintains the contents of the DIMM by keeping the DIMM in self refresh mode until power is restored After power is restored data can be safely written to drives maintaining the integrity of the disk array Removing the RAID BBU 1 Observe the ESD precautions and pre installation instructions described on page 37 2 If a memory board is installed in mem...

Страница 108: ...3 System upgrade 98 3 Disconnect the battery cable from the server RAID adapter 4 Remove the battery holder from the chassis ...

Страница 109: ...he RAID BBU 1 Observe the ESD precautions and pre installation instructions described on page 37 2 If a memory board is installed in memory board slot D connector remove the board For instructions on removing a memory board see page 75 3 Open the battery holder by pinching the top and bottom covers of the holder A 4 Connect the cable inside the battery pack B 5 Secure the battery cable to its chas...

Страница 110: ...of the battery into the matching slots on the chassis 7 Attach the cable to the RAID BBU connector on the server RAID adapter 8 Push the battery to the left to latch the battery into place 9 Observe the post installation instructions described on page 38 ...

Страница 111: ...4 BIOS setup ...

Страница 112: ...This chapter gives information about the system BIOS and discusses how to configure the system by changing the settings of the BIOS parameters ...

Страница 113: ...ed there is no need to run this utility BIOS setup loads the configuration values in a battery backed nonvolatile memory called CMOS RAM This memory area is not part of the system RAM which allows configuration data to be retained when power is turned off Before you run BIOS setup make sure that you have saved all open files The system reboots immediately after you close the setup ...

Страница 114: ...enu The System options menu the BIOS version copyright information and the following options are displayed Continue Booting Boot Manager Boot Maintenance Manager BIOS Setup Utility Error Manager Note the following reminders when moving around the System options screen Use the Up and Down arrow keys to highlight an option Use the Enter key to select an option Press F9 to load the default configurat...

Страница 115: ...nu Continue Booting Select Continue Booting option to boot from the device specified as first boot option by the Boot Manager The Continue Booting option is selected by default and will occur automatically if a preset timeout expires ...

Страница 116: ... Manager option lets you set the device priority during system bootup The server will attempt to boot from the first device on the list If the first device is not available it will continue down the list until it reaches an available device ...

Страница 117: ...bles The Boot Maintenance Manager include the following options Boot Options Select this option to modify the system boot order and add or delete boot options Driver Options Select this option to modify the boot driver options Set Time Out Value Select this option to modify the automatic boot time out value Reset System Select this option to reboot the server ...

Страница 118: ...4 BIOS setup 108 BIOS Setup Utility Select BIOS Setup Utility option to configure the server BIOS settings Refer to Using the BIOS menus on page 112 for more information ...

Страница 119: ...109 Error Manager Error Manager lets you view POST errors detected by the system ...

Страница 120: ...n for assistance When redefining the communication ports to prevent any conflicts When changing the password or making other changes to the security settings Entering BIOS setup Power on the server to start the system POST process During bootup press F2 to enter the BIOS setup screen Note You must press F2 while the system is booting This key does not work during any other time There are several t...

Страница 121: ...ts Grayed out items have fixed settings and are not user configurable Use the Enter key to display a submenu screen Note When a parameter is preceeded by a it means that a submenu screen is available Press F1 for General Help on using the BIOS setup Press F9 to load the default configuration Press F10 to save changes and close the BIOS setup Press Esc to close the BIOS setup In the descriptive tab...

Страница 122: ...re not user configurable The System Date and System Time parameters lets you define the sytem s time and date settings The real time clock keeps the system date and time After setting the date and time you do not need to enter them every time you turn on the system As long as the internal battery remains good and connected the clock continues to keep the date and time accurately even when the powe...

Страница 123: ...Sets the time following the hour minute second format Valid values for hour minute and second are Hour 00 to 23 Minute 00 to 59 Second 00 to 59 Hide Diagnostic Messages During Boot When this parameter is enabled it will not display diagnostic messages during startup Enabled Disabled POST Error Pause If enabled the system will pause if an error is found during POST Enabled Disabled Parameter Descri...

Страница 124: ... speed Processor Retest When an error message associated with the processor occurs during POST you can enable this parameter to eliminate the error message Disabled Enabled Boot Processor Number Indicates the processor from which the system will first attempt to boot up Processor Information Press Enter to access the Processor Information submenu Hyper Threading Technology Enables or disables the ...

Страница 125: ...to always return to 0 Note This parameter is hidden if the processor does not support this function Enabled Disabled Hardware Prefetcher Enables or disables the processor Hardware Prefetch feature Disabled Enabled Adj Cache Line Prefetch Enables or disables the processor Adjacent Cache Line Prefetch feature Disabled Enabled Enhanced Halt State If enabled the processor power consumption will be low...

Страница 126: ...Processor Information The screen below appears when you select the Processor 1 2 3 or 4 Information menu The Processor Information submenu displays the CPU settings such as type cache size and other CPU related settings ...

Страница 127: ...memory The memory size is automatically detected by BIOS during the POST If you install additional mamory the system automatically adjusts this parameter to display the new memory size Effective Memory Indicates the total effective memory installed in the server Memory Boards Installed Indicates the total amount of memory boards installed in the server Current Configuration Displays the current me...

Страница 128: ...he memory boards in the server Configure Memory RAS and Performance Press Enter to access the Configure Memory RAS and Performance submenu View and Configure Memory Board A B C or D Press Enter to access the View and Configure Memory Board submenu Parameter Description Option Hardware Memory Test If enabled memory will be tested using hardware based engines on each memory board Enabled Disabled Pa...

Страница 129: ...ring occurs Refer to To configure memory sparing on page 182 for more details 15 1 2 3 4 5 6 7 8 9 10 11 12 13 14 RAID Upgrade Gap Size of reserved gap on each memory board for RAID memory capacity addition Disabled 512MB 1024MB 1536MB 2048MB 2560MB 3072MB 3584MB 4096MB Desired Memory Configuration Select a new memory configuration option Max Performance Max Compatibility Mirror RAID View Configur...

Страница 130: ...re Memory RAS and Performance menu Max Effective Size Indicates the maximum possible size of memory Maximum effective memory size results when no spares are configured The actual effective size will be calculated on the next system boot Min Effective Size Indicates the minimum possible size of memory Minimum effective memory size results when the largest DIMMs are used as spare The actual effectiv...

Страница 131: ...ther the selected configuration supports sparing Hot Replace Indicates whether the selected configuration allow memory to be replaced while the system is running Hot Add Indicates whether the selected configuration allow memory to be added while the system is running Board Interleave Indicates the board interleave for a chosen configuration In mixed interleave BIOS configures the best possible int...

Страница 132: ...y boards in the server Parameter Description Option Board Status Indicates the memory board status The possible status include Not Installed Healthy Failed or Disabled Healthy Not Installed Failed or Disabled Retest Board Memory Enables or disables the retest of all DIMMs on the current memory board When this parameter is set to Enabled the DIMMs will be re enabled after passing the test Disabled ...

Страница 133: ...disables the BIOS to set aside the largest memory rank to server as spare Refer to To configure memory sparing on page 182 for more details When correctable errors on a bad rank surpasses the sparing threshold it is replaced by a spare rank Disabled Enabled DIMM Label 1A 1B 2A or 2B status table Indicates the DIMM and DIMM slot status Not Installed Installed Installed Partial or Failed Parameter D...

Страница 134: ...nu lets you examine and set IDE controller related parameters Parameter Description Option Enable Serial ATA Enables or disables all channels of the Serial ATA controller Enabled Disabled Primary Master Indicates the controller that is set as primary master ...

Страница 135: ...e controller Parameter Description Option Enable On board SCSI Enables or disables the onboard SCSI controller Note This parameter is grayed out if ROMB is enabled Enabled Disabled RAID Activation Key Indicates if the RAID activation key is installed or not Installed Not Installed ...

Страница 136: ...ble On board NIC Enables or disables both channels of the embedded LAN If Disabled both channels of the embedded LAN are turned off and the device is inaccessible to the OS Enabled Disabled Enable On board NIC ROM Enables or disables the ROM for the onboard LAN Enabled Disabled NIC 1 or 2 MAC Address Indicates the media access control of the system s LAN controller ...

Страница 137: ...127 Video The Video submenu allows you to enable or disable the onboard video controller ...

Страница 138: ...4 BIOS setup 128 USB The USB submenu allows you to enable or disable the onboard USB controller ...

Страница 139: ...ngs for the system s serial port Parameter Description Option COM1 Enable Enables or disables the onboard serial port COM 1 Enabled Disabled Address Set the base I O address for the COM 1 port 3F8 2F8 3E8 2E8 IRQ Set the interrupt request line for the COM 1 port 4 3 ...

Страница 140: ...etup 130 PCI The PCI submenu lets you enable or disable the ROM scan of a device installed in the selected PCI slot It also enables or disables posting of a 16 bit legacy ROM from the plug in fiber channel card ...

Страница 141: ...vents that occur in the system eg system temperature changes fan stops over temperature over voltage fan failures etc Parameter Description Option Console Redirection Press Enter to access the Console Redirection submenu Flow Control Press Enter to access the FRU Information submenu SEL Logging Press Enter to access the SEL Logging submenu FRB Information Press Enter to access the FRB Information ...

Страница 142: ...ameters for server management tasks over the serial port Press Enter to access the COM1 Console Redirection submenu WOL Resume from S5 Allows the system to be switched on by means of network signals Enabled Disabled Reset on Fatal Error Enables system reboot if a fatal error occurs Disabled Enabled Parameter Description Option ...

Страница 143: ...133 FRU Information The FRU Information submenu lets you view the field replaceable unit parameters ...

Страница 144: ...ging The SEL Logging submenu lets you examine and set the system event log options To clear the system event log enable the Clear Log option The option executes as soon as Save Restore Exit is peformed then resets to Disabled ...

Страница 145: ...135 FRB Information The FRB Information submenu lets you examine and set the fault resilient boot options ...

Страница 146: ...led Installed User Password Secures the system against unauthorized use Once you set this password you have to type it whenever you boot the system User password is available only when an Administrator password is set Not Installed Installed Set Administrator Password Press Enter to change the Administrator password Set User Password Press Enter to change the User password Password on Boot Select ...

Страница 147: ...o change the Administrator User password 1 Use the up down keys to highlight either change password parameters Change Administrator Password or Change User Password then press Enter 2 Type the original password then press Enter 3 Type a new password then press Enter 4 Retype the password to verify the first entry then press Enter again To remove the User password 1 Use the up down keys to highligh...

Страница 148: ...Saves changes made in the BIOS setup Discard Changes Discards all changes made in the BIOS setup Restore Defaults Loads the default settings for all BIOS setup parameters Setup defaults are quite demanding in terms of resources consumption If you are using low speed memory chips or other kinds of low performance components and you choose to load these settings the system might not function properl...

Страница 149: ... that are provided in the Readme file distributed with the BIOS image file before attempting a BIOS upgrade The release notes contain critical information regarding jumper settings specific fixes or other information to complete the upgrade To upgrade the BIOS Follow the instructions in the Readme file that came with the BIOS upgrade When the update completes remove the bootable media from which y...

Страница 150: ...4 BIOS setup 140 ...

Страница 151: ...5 Troubleshooting ...

Страница 152: ...This chapter provides possible solutions for specific problems If you cannot correct the problem contact your local Acer representative or authorized dealer for assistance ...

Страница 153: ...bleshooting attempt first to perform reset the system using one of the methods below Problems following initial system installation Problems that occur at initial system startup are usually caused by an incorrect installation or configuration Hardware failure is a less frequent cause If the problem you are experiencing is with a specific software application see There is problem with the applicati...

Страница 154: ...rrect If applicable ensure that there are no conflicts for example two expansion boards sharing the same interrupt Are all peripheral devices installed correctly If the system has a hard disk drive is it properly formatted or configured Are all device drivers properly installed Are the configuration settings made in BIOS setup correct Is the operating system properly loaded Refer to the operating ...

Страница 155: ...r maximum ranges see the documentation supplied with your video display monitor 4 If the operating system normally loads from the hard disk drive make sure there is no disc in the optical drive 5 If the power indicator does light attempt to boot from a disc 6 Turn on the system If the power indicator does not light see Power indicator does not light on page 146 Verifying proper operation of key sy...

Страница 156: ... and memory modules comply with the system requirements Make sure the memory modules have been populated according to the system requirements Remove and reseat the memory board Remove and reseat the memory modules Make sure the CPU complies with the system requirements Make sure the CPU is populated according to the system requirements Remove and reseat the CPU Make sure the chassis standoffs are ...

Страница 157: ...ns are not bent Make sure the CPU is properly seated HDD activity indicator does not light Do the following Make sure the drive is not disabled in the BIOS setup utility Make sure the drive s power and data cables are connected correctly Make sure the drive is compatible Make sure you have not exceeded the power budget for the server If using SCSI drives make sure that each SCSI ID number is uniqu...

Страница 158: ...k that drive is properly configured Check that onboard IDE controller is enabled in the BIOS setup ODD tray cannot be ejected Insert the tip of a paperclip into the small hole on the ODD drive Slowly pull the tray out from the drive until the tray is fully extended then remove the disc ODD drive cannot read a disc Do the following Make sure you are using the correct type of disc Make sure the disc...

Страница 159: ...ure the RAID card is installed correctly Bootable CD drive is not detected Make sure the Boot settings in the BIOS setup utility is configured to allow the CD drive to be the first bootable device New memory modules installed are not detected Do the following Make sure the memory modules are properly seated on the memory board s DIMM slots Make sure the memory modules comply with the system requir...

Страница 160: ...ems with the network Network status indicator does not light Do the following Check the cabling and network equipment to make sure that all cables are properly connected Reinstall the network drivers Try another port or hub on the switch Diagnostics pass but the connection fails Make sure the network cable is securely attached Make sure you specify the correct frame type in the NET CFG file The co...

Страница 161: ...settings There is problem with the application software Do the following Verify that the software is properly configured for the system Refer to the software installation and operation documentation for instructions on setting up and using the software Try a different version of the software to see if the problem is with the copy you are using Make sure all cables are properly connected If other s...

Страница 162: ...o the system requirements Remove and reseat the memory boards Remove and reseat the memory modules Make sure the CPU complies with the system requirements Make sure the CPU is populated according to the system requirements If you are using a video controller board do the following 1 Verify that the video works using the onboard video controller 2 Verify that the video controller board is fully sea...

Страница 163: ...ollowing Is the power indicator lit If not see Power indicator does not light on page 146 Are any other front panel LEDs lit Have any of the fan motors stopped Use the server management subsystem to check the fan status Have your fans speeded up in response to an overheating situation Have your fans speeded up in response to a fan that has failed Is the fan s power connector properly connected to ...

Страница 164: ...5 Troubleshooting 154 ...

Страница 165: ...Appendix A Acer Altos R910 rack installation guide ...

Страница 166: ...This appendix shows you how to set up the Altos R910 server in a rack mount configuration ...

Страница 167: ...ne or more systems are fully extended out of the rack assembly You must also consider the weight of any other devices installed in the rack assembly The equipment rack must be installed according to the manufacturer s instructions Main DC power disconnect You are responsible for installing an DC power disconnect for the entire rack unit This main disconnect must be readily accessible and it must b...

Страница 168: ...emperature Reduced airflow The amount of airflow required for the safe operation of the equipment should not be compromised when installing the system in a rack Mechanical loading Exercise care when mounting the system in a rack to avoid any accidents Circuit overloading Appropriate consideration should be given when connecting the supply circuit to the system to avoid any circuit overload The sys...

Страница 169: ...e Altos R910 server system should be mounted into a rack cabinet A rack rail and CMA cable management arm kit is available for installing system to a rack cabinet The figure below shows the Altos R910 server in a rack mount position ...

Страница 170: ...oles with closer spacing to the center of the next pair is equivalent to 1U Note The unit of measurement used in this guide is U 1U 1 75 inches or 44 45 mm The total sum of the heights of all components in the rack measured in U cannot exceed the height of the rack For more information refer to the documentation that came with the system rack When installing components you must start your measurem...

Страница 171: ...re that two or more people help in installing the server To install the system into a four post rack 1 Remove the inner rails from the mounting rails 1 Extend the inner rail from the mounting rail until the rail release latch clicks 2 Depress the release latch A and slip the inner rail out B ...

Страница 172: ... use screws that came with the rack mount kit when attaching the inner rails to both sides of the server If your system already has screws attached please remove them Note Using screws other than those supplied in this rack mount kit to attach the rails will void the warranty Acer cannot be held responsible for any damage for incorrect installation 1 Align the screw holes of the inner rail to the ...

Страница 173: ...ing hole pattern on page 160 for more information 2 Align and insert the mounting rail into the rack posts mounting holes A 3 Make certain the proper mounting holes on the rack post are selected 4 Use two metal screws to secure the front and rear mounting rail to the rack B 5 Do the same thing to the other mounting rail ...

Страница 174: ...Appendix A Acer Altos R910 rack installation guide 164 6 Fully extend the mounting rails on the rack ...

Страница 175: ... into the rack 1 Carefully align the inner rails attached to the server with the fully extended mounting rails on the rack 2 Press the release latch on both sides of the server A 3 Insert the inner rails into the mounting rails then push the server into the rack until you hear a click sound B 4 Secure the server to the rack using the two front panel thumbscrews C ...

Страница 176: ...ends keeping the cables untangled and attached to the system 1 Insert the smaller CMA extension into the rear of the left inner rail A1 2 Insert the larger CMA extension into the rear of left mounting rail A2 3 Insert the CMA extension connector into the rear of the right mounting rail B1 4 Insert the CMA arm connector into the blue plastic cutout on the CMA extension connector B2 5 Attach the cab...

Страница 177: ...167 6 Connect the power peripheral and networking cables into their appropriate ports Refer to Connecting peripherals on page 30 for detailed instructions 7 Route all cables through the cable clips ...

Страница 178: ...Appendix A Acer Altos R910 rack installation guide 168 ...

Страница 179: ...Appendix B Memory configuration options ...

Страница 180: ...ides details on how to configure the system memory boards in either a redundant or non redundant configuration Recommended memory board and DIMM installation order and DDR2 DIMM population order tables are also included ...

Страница 181: ...l channel DIMMs When using dual channel memory mode use the same type and size DDR2 DIMM modules and follow the DIMM module population order on page 173 to ensure that you get dual channel memory performance The memory boards can be configured in a redundant or non redundant configuration Memory boards configured using RAID or mirroring are in redundant configuration If a memory board that is conf...

Страница 182: ...der Normal configuration Memory mirroring configuration Memory RAID configuration A 1 Set 1 Note Requires installation of four memory boards with equal memory capacity B 2 C 3 Set 2 Note Requires installation of two or four sets of memory boards paired as sets of two Each memory board in a set must have same amount of memory board installed D 4 Bank 1 Bank 2 DIMM 1A DIMM 1B DIMM 2A DIMM 2B 512 MB ...

Страница 183: ... MB 2 x 512 MB 2 x 512 MB 2 x 512 MB 4 GB 2 x 1 GB 2 x 1 GB 4 GB 2 x 1 GB 2 x 1 GB 2 x 1 GB 2 x 1 GB 8 GB 2 x 2 GB 2 x 2 GB 8 GB 2 x 2 GB 2 x 2 GB 2 x 2 GB 2 x 2 GB 16 GB 2 x 4 GB 2 x 4 GB 16 GB 2 x 4 GB 2 x 4 GB 2 x 4 GB 2 x 4 GB 32 GB Memory board A Memory board B Memory board C Memory board D Total Memory 1A 1B 2A 2B 1A 1B 2A 2B 1A 1B 2A 2B 1A 1B 2A 2B 2 x 512 MB 2 x 512 MB 2 x 512 MB 2 x 512 M...

Страница 184: ...otal Memory 1A 1B 2A 2B 1A 1B 2A 2B 1A 1B 2A 2B 1A 1B 2A 2B Physical memory Detected by OS 2 x 512 MB Sparing 2 x 512 MB 2 GB 1 GB 2 x 1 GB Sparing 2 x 1 GB 4 GB 2 GB 2 x 2 GB Sparing 2 x 2 GB 8 GB 4 GB 2 x 4 GB Sparing 8 GB 4 GB 2 x 4 GB Sparing 2 x 4 GB 16 GB 12 GB Memory board A Memory board B Memory board C Memory board D Total Memory 1A 1B 2A 2B 1A 1B 2A 2B 1A 1B 2A 2B 1A 1B 2A 2B Physical me...

Страница 185: ...B Sparing 2 x 1 GB 16 GB 8 GB 2 x 2 GB Sparing 2 x 2GB 2 x 2 GB Sparing 2 x 2GB 2 x 2 GB Sparing 2 x 2 GB 2 x 2 GB Sparing 2 x 2 GB 32 GB 16 GB 2 x 4 GB Sparing 2 x 4 GB Sparing 2 x 4 GB Sparing 2 x 4 GB Sparing 32 GB 16 GB 2 x 4 GB Sparing 2 x 4 GB 2 x 4 GB Sparing 2 x 4 GB 2 x 4 GB Sparing 2 x 4 GB 2 x 4 GB Sparing 2 x 4 GB 64 GB 32 GB Memory board A Memory board B Memory board C Memory board D ...

Страница 186: ...GB Mirror 2 x 2 GB Mirror 32 GB 16 GB 2 x 4 GB 2 x 4 GB Mirror 2 x 4 GB 2 x 4 GB Mirror 32 GB 16 GB 2 x 4 GB 2 x 4 GB 2 x 4 GB Mirror 2 x 4 GB Mirror 2 x 4 GB 2 x 4 GB 2 x 4 GB Mirror 2 x 4 GB Mirror 64 GB 32 GB Memory board A Memory board B Memory board C Memory board D Total Memory 1A 1B 2A 2B 1A 1B 2A 2B 1A 1B 2A 2B 1A 1B 2A 2B Physical memory Detected by OS 2 x 512 MB 2 x 512 MB 2 x 512 MB 2 x...

Страница 187: ...is configured in a redundant mode has a DIMM or memory board fault the memory board and or DIMM containing the fault can be hot removed or hot replaced while the system is powered on Hot replace means you can replace a memory board with another memory board of identical size This operation is supported in memory RAID and memory mirroring modes Hot add means you can add a memory board to a previous...

Страница 188: ...y 1 Do any of the following Run BIOS setup See Entering BIOS setup on page 110 or a During system bootup enter the System Options Menu See System options menu on page 104 b Use the up and down arrow keys to select BIOS Setup Utility then press Enter The BIOS main menu displays on the monitor 2 Use the up and down arrow keys to select the Memory menu then press Enter The Memory menu appears 3 Use t...

Страница 189: ...nfiguration Possible indicates Yes If the option indicates No you may need to install more memory to meet the requirements of the selected configuration 6 Press F10 to save changes and exit 7 Press Y to confirm The server reboots to activate the changes ...

Страница 190: ...de allows sparing configuration but does not support any memory board hot plug operations To configure memory to maximum performance 1 Do either option below Run BIOS setup See Entering BIOS setup on page 110 or a During system bootup enter the System Options Menu See System options menu on page 104 b Use the up and down arrow keys to select BIOS Setup Utility then press Enter The BIOS main menu d...

Страница 191: ...onfiguration Details Make sure Configuration Possible indicates Yes If the option indicates No you may need to install more memory to meet the requirements of the selected configuration 6 Press F10 to save changes and exit 7 Press Y to confirm The server reboots to activate the changes ...

Страница 192: ...re rank At the completion of the copy the failing rank is disabled and the spare rank is used in its place The BIOS reports the failing rank with a SEL system event log event updates the DIMM error LED on the memory board and sends memory RAS reliability availability and serviceability commands to the BMC baseboard management controller to update the system memory state The DIMMs with the failed r...

Страница 193: ...ry Configuration to either Max Performance or Maximum Compatibility 5 Select View Configuration Details Make sure Configuration Possible indicates Yes If the option indicates No you may need to install more memory to meet the requirements of the selected configuration Make sure that Sparing indicates Yes 6 Return to the Memory menu option and set the Sparing Threshold value from 1 through 15 7 Sel...

Страница 194: ...emory board When the failed memory board location is hot replace the BIOS rebuilds the RAID by reconstructing the data that was on the previously failed memory board and writes the data to the newly installed board When the rebuild is complete the system is once again in redundant mode The BIOS sets the memory board RAID LED to indicate that the memory board is operating in the memory RAID mode To...

Страница 195: ...The Configure Memory RAS and Performance menu appears 4 Set the Desired Memory Configuration to RAID 5 Select View Configuration Details Make sure Configuration Possible indicates Yes If the option indicates No you may need to install more memory to meet the requirements of the selected configuration 6 Press F10 to save changes and exit 7 Press Y to confirm The server reboots to activate the chang...

Страница 196: ...st is issued to both boards For memory reads the read request is issued to the primary memory board In the event of a detected uncorrectable error the primary and secondary images switches with each other and the failed image cannot become the primary image again until the failed DIMMs have been replaced and the image re built The first redundant group consists of memory board A mirrored with memo...

Страница 197: ...elect Configure Memory RAS and Performance then press Enter The Configure Memory RAS and Performance menu appears 4 Set the Desired Memory Configuration to Mirror 5 Select View Configuration Details Make sure Configuration Possible indicates Yes If the option indicates No you may need to install more memory to meet the requirements of the selected configuration 6 Press F10 to save changes and exit...

Страница 198: ...Appendix B Memory configuration options 188 ...

Страница 199: ...Appendix C RAID configuration utilities ...

Страница 200: ...This appendix gives an overview of the different RAID configuration utilities supported by your server ...

Страница 201: ...068 SAS controller The system may be equipped with a SCSI or SAS RAID configuration utility depending on system configuration You can use these utilities for configuring the internal hard disks Caution Creating a RAID volume erases all data previously saved in the hard drives Make sure that you backup important files before starting the configuration process ...

Страница 202: ... current adapter settings appear 2 Change the setting of Set Factory Defaults from No to Yes then click Submit 3 Press Ctrl Alt De l to reboot the server Creating and initialing a RAID volume 1 Launch the Configuration menu 2 Select Configuration Wizard 3 Select Add Configuration default and click Next 4 Select Custom Configuration default and click Next 5 Select the drives that you want to add in...

Страница 203: ...ick Yes 12 Press Ctrl Alt Del to reboot the system Assigning a hot spare disk 1 Launch the Configuration menu 2 Select a free disk marked as Ready and listed under Physical Drives 3 Select Make Hotspare and click Go 4 Click Home to return to the Configuration menu The disk will be marked as Hotspare in pink and listed under Physical Drives ...

Страница 204: ...appear 2 Change the setting of Set Factory Defaults from No to Yes then click Submit 3 Press Ctrl Alt Del to reboot the server Creating and initialing a RAID volume 1 Launch the Configuration menu 2 Select Configuration Wizard 3 Select Add Configuration default and click Next 4 Select Custom Configuration default and click Next 5 Select the drives that you want to add into the array with the Ctrl ...

Страница 205: ...Del to reboot the system Assigning a hot spare disk 1 Launch the Configuration menu 2 Select a free disk marked as Ready and listed under Physical Drives 3 Select Make Hotspare and click Go 4 Click Home to return to the Configuration menu The disk will be marked as Hotspare in pink and listed under Physical Drives ...

Страница 206: ...Appendix C RAID configuration utilities 196 ...

Страница 207: ...ug ARMC 3 or BMC module 84 fibre channel module 82 memory board 75 PCI card 81 SAS RAID adapter 86 cold plug memory board installing 76 removing 75 cold pluggable components 61 configuring memory maximum compatibility 178 maximum performance 180 memory mirroring 186 memory RAID 184 memory sparing 182 configuring the system OS 33 CPU installing 68 removing 66 CPU air baffle installing 43 removing 4...

Страница 208: ...sparing 182 N non hot plug PCI card installing 82 removing 81 O opening the system 39 installing center brace 45 installing CPU air baffle 43 installing memory board air baffle 47 installing the front bezel 40 installing the top cover 41 removing center brace 44 removing CPU air baffle 42 removing memory board air baffle 46 removing the front bezel 39 removing the top cover 40 P peripherals 30 pow...

Страница 209: ...ckplane board 21 system fan assembly installing 52 removing 51 system features 3 system jumpers 25 system memory reconfiguring 81 system options menu 104 BIOS setup utility 108 boot maintenance manager 107 boot manager 106 continue booting 105 error manager 109 system tour 1 system upgrade 35 ESD precautions 37 installation precautions 37 post installation instructions 38 preinstallation instructi...

Страница 210: ...200 U upgrading the BIOS 139 ...

Отзывы: