background image

11

I N S TA L L AT I O N ,  O P ER AT I O N S  A N D  M A I N T EN A N C E  M A N UA L


07


07 Horizontal bus bars 
and ground bar

Bus bars systems may be configured in three or 
four poles. See 1.7.2. Section - Horizontal neutral.

The horizontal bus bars are divided into lengths in 
accordance with the length of the MCC section. 
Sections in the same shipping split will be 
connected at the factory. The shipping splits must 
be connected together during installation using 
the bus splice links provided on the right-hand side 
of each split.

The splice link bolts must be tightened to the 
specified torque. The bus splice links are accessible 
through a barrier in the vertical wireway via a 
removable transparent window. See Table 6.1.1.1. 
Main bus splice links recommended torque 
provided in this manual.

NOTE: It is necessary to routinely inspect splice link 
connections. Check the torque indication via the 
transparent shield inside the vertical wireway of 
each section.

Main bus amperages include: 800A, 1200A, 1600A, 
2000A and 2500A (non-ventilated), and, 3200A and 
4000A (ventilated) configurations. Bus bracing is 

available up to a maximum of 100kA@ 480V and 
65kA @ 600V.

Horizontal bus is available in tin-plated copper and 
silver-plated copper.

Horizontal neutral

A neutral bus is available as an option. It will be 
located above “A Phase” at the top of the MCC, 
rated 2,000A maximum.

Horizontal ground bar

A continuous, sectionalized, copper ground bus as 
standard is provided at the bottom front or 
optional at the top front of all sections, rated for 
4000A. It´s available in tin-plated copper, silver- 
plated copper and bare-copper finish.

The ground bus is provided with a series of regular 
10 mm (0.39 in) holes for attaching ground lugs and 
other conductors.

Ground the MCC ground bus using equipment 
grounding conductors sized according to NEC 
250-95, or by bonding to the raceway enclosing 
the main supply conductors according to NEC 
250-92(B).

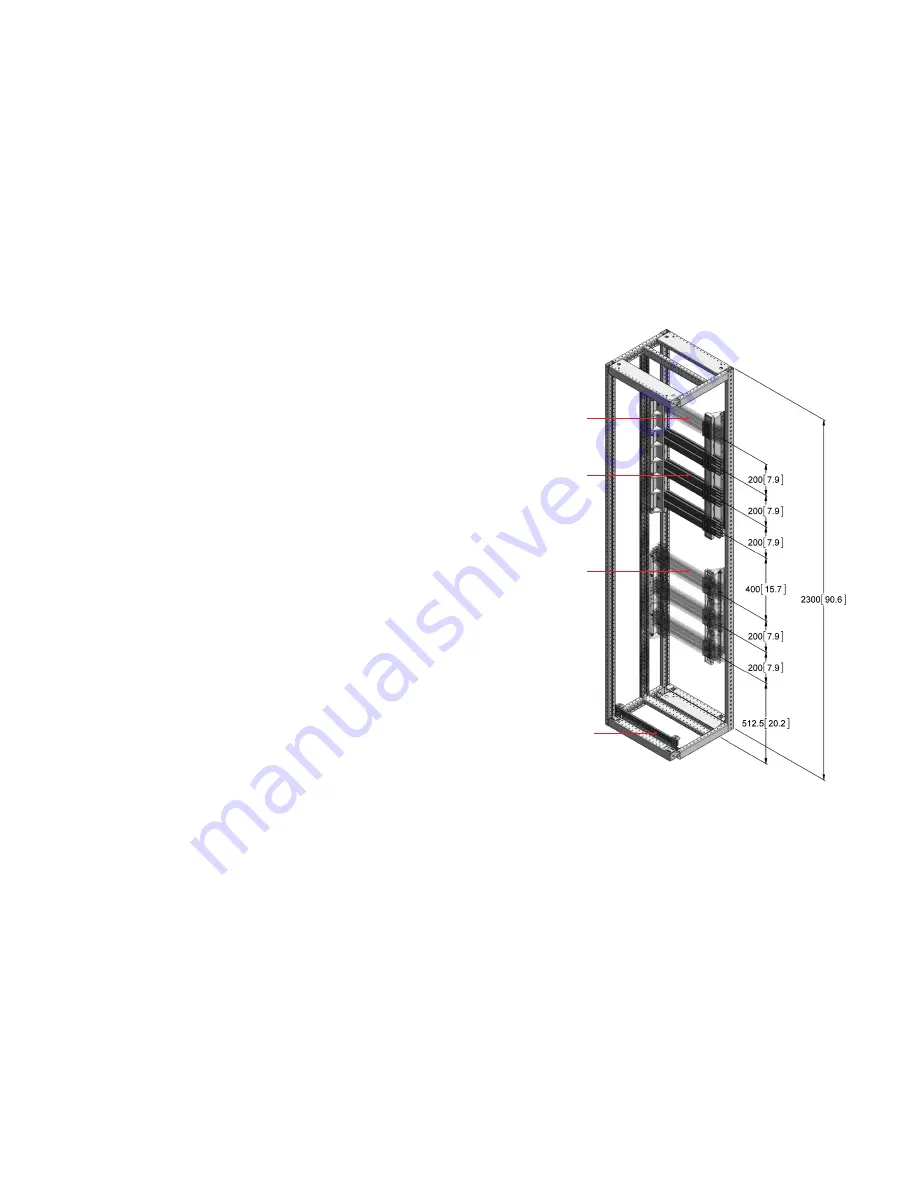
See Fig. 7 (Horizontal bus bars and ground bar).

Main 
horizontal 
bus set

Second 
horizontal 
bus set 
(when 
required)

Horizontal 
ground bar

Horizontal 
neutral 
bus 
(Optional)

Содержание MNS-MCC

Страница 1: ... MNS MCC Low voltage motor control center INSTALLATION OPER ATIONS AND MAINTENANCE MANUAL MNS MCC Low voltage motor control center ...

Страница 2: ......

Страница 3: ...ONTENTS Table of contents 04 05 Important user information 06 16 General information and system description 17 20 Packaging and handling 21 36 Installation 36 38 Operation 38 43 Maintenance 44 48 Tightening torques ...

Страница 4: ... related to MCC installation operation and maintenance Keep this manual available for the installation operation and maintenance of this equipment After installing the equipment file these instructions with other instruction books drawings and descriptive data for this equipment Using these instructions will facilitate proper equipment maintenance and prolong its useful life Install the MCC within...

Страница 5: ...y will be jeopardized by the service method or tools selected Should further information be required or specific problems arise that are not sufficiently covered refer the matter to an ABB service representative The purchaser installer or ultimate user is responsible for ensuring that warning signs are attached and all access doors and operating handles are securely locked when the gear is left un...

Страница 6: ...n may be defeated with the use of a tool or prevent the door from being opened if the handle is padlocked in the OFF position General information and system description Withdrawable units feature a multi position handle that controls the disconnecting means as well as a mechanical interlock preventing the unit from being withdrawn from the MCC unless the operating handle is in the Move position an...

Страница 7: ...d voltage 8 kV Rated frequency up to 60 Hz Rated Current Main Bus Bars Rated current up to 4000 A Rated peak withstand current 149 5 kA Rated short time withstand cr up to 100 kA 480V or 65KA 600V Distribution Bars Rated current 800A or 1600 A Rated peak withstand current 149 5 kA Rated short time withstand cr up to 100 kA 1600 A Bussing Mechanical characteristics Dimensions Recommended height mm ...

Страница 8: ...re sections The MCC may accept cable entry fromthe top bottom or both Lifting angles are provided to allow lifting by crane See Crane Handling There is an additional 50mm 1 97in added to the total height by them 01 MCC Configuration Top cover Lifting angles Horizontal Neutral Bar Option Main Horizontal Bus Bar 2nd Horizontal bus bars set Where needed Vertical wireway door Bottom plate Optional Mai...

Страница 9: ...r or on the unit door for sections without a wireway that displays the approval agency marking such as UL CSA or NOM Fig 3 shows a typical label Unit nameplate and label Each unit may have up to two nameplates located on the door left and right pull handles These nameplates may include customer specific information for the specific unit load There will also be a label inside the door of each unit ...

Страница 10: ...ents The main horizontal bus bar is installed in the bus bar compartment located at the rear of the MCC The main horizontal bus may be supplied in various configurations depending on the current rating This main bus runs the width of each section The bus in each section is designed to allow splicing with the bus of the adjacent sections to create a continuous horizontal bus the length of the lineu...

Страница 11: ...n Main bus amperages include 800A 1200A 1600A 2000A and 2500A non ventilated and 3200A and 4000A ventilated configurations Bus bracing is available up to a maximum of 100kA 480V and 65kA 600V Horizontal bus is available in tin plated copper and silver plated copper Horizontal neutral A neutral bus is available as an option It will be located above A Phase at the top of the MCC rated 2 000A maximum...

Страница 12: ...uipped with measuring operating or indicating instruments These instruments may be installed inside the units or usually on the front of the unit door Section and unit numbering Each MCC section is sequentially numbered when the general arrangement drawings are prepared The left most section is usually 1 the next section to the right is 2 etc This numbering scheme ensures the correct sequencing of...

Страница 13: ...circuit protective device is in the OFF position On main incoming fixed units a barrier is provided behind the unit door to prevent unintended contact with live parts MCC s equipped with main lugs only also are provided with a barrier behind the door to prevent unintended contact with live parts Modular fixed units Incoming main circuit breakers and incoming main lug only units may be Modular Fixe...

Страница 14: ...aches the embedded vertical bus 12 Withdrawable unit A reinforcement non insulated bussing system could be added to the back of the multi function wall to increase its rating to 1600A 100kA at 600V Wireways Vertical wireway The vertical wireway is provided in all sections that house removable units The wireway is located on the right side of the section extending the full height of the structure I...

Страница 15: ...20 7 2007 guide without any current limiting main device Multifunction wall provides fault free zone with finger proof touch protection Bus shutters are not required MCC units are removed and replaced without opening the door No tools required for unit removal Control wires and communication cables with disconnecting terminal blocks do not require manual disconnecting and reinstallation for unit r...

Страница 16: ...entry so now only is available the space over the vertical wire way for the entry The withdrawable modules for the arc resistant offer have some changes in order to comply with the arc resistant characteristics these have the lateral window for released the pressure build up into the units the reinforcement for the door lock and the arc housing cover to cover the contact holder to avoid any possib...

Страница 17: ...tomer requires and requests special packaging MCC as standard are shipped in shipping splits of up to three sections The width of shipping splits depends on the type of equipment installed and the width of the individual sections Packaging and handling Table 2 Maximum approximate weight Section Type Maximum Approximate Weight in Kg Lbs Incoming ACB 1200A 330 727 Incoming ACB 1600A 350 772 Incoming...

Страница 18: ...ssary packing materials to safely store the MCC See 2 3 4 Section Temporary Storage of this manual Unloading and moving MCC components Unload MCC sections or shipping splits either by crane or fork lift and place them on a flat surface When moving the sections or shipping splits keep them vertical at all times MCC sections and shipping splits usually have a high center of gravity To improve stabil...

Страница 19: ...rt with pallet jack warning 19 Rope angle 120 As per the following standards DIN 83325 for Hamp DIN 83330 for Perlon DIN 15060 for Steel Table 3 Guide values for permissible rope Rope Diameter Permissible load of a four rope arrangement 120º lifting angle Hemp rope Perlon ropes Steel ropes mm Kg lbs Kg lbs Kg lbs 8 890 1958 10 180 396 400 880 1440 3168 12 280 616 600 1320 2100 4620 14 350 770 820 ...

Страница 20: ...oor The temperature should be between 23 F 5 C and 104 F 40 C The air should be dry 50 maximum humidity Before energizing the space heaters remove all packing materials from the MCC Using a separate power supply turn on the space heaters by the thermostat adjusting them between 35 C 95 F and 40 C 104 F during the storage to prevent condensation Do not omit the use of appropriate personal protectiv...

Страница 21: ...ications Indoor location protected from moisture and dramatic temperature changes for longest equipment life install the MCC in an enclosed room with temperature and humidity control and filtered forced air ventilation Level the site preferably including a base frame that is either embedded in the concrete floor or rests on a false floor on supports Installation Proper openings in the floor wall a...

Страница 22: ...ns and the surrounding walls For a Non ventilated section back to back it must have at least 100 mm 4 in between the sections It s not advisable to place units in contact with each other s For a Ventilated section it must have at least 80 mm 3 2 in between the back of the sections and the surrounding walls to have adequate ventilation of the units For a Ventilated section back to back it must have...

Страница 23: ...sections may be added between existing sections If the sequential order designated during manufacturing is altered on site by adding sections to an existing lineup the main bussing must match and the related drawings updated When adding removing or rearranging sections do not exceed the maximum amperage available on the horizontal busing Installing and connecting shipping splits a Position the shi...

Страница 24: ...each shipping split Access the splice links by removing the transparent barrier at the rear of the vertical wireway If the Main Bus is insulated you must remove the insulation boots after remove the transparent barrier The maximum gap between the left and right busbar should be 0 21 in 5 3 mm Loosen the bolts holding the splice link s in place and slide the link s to the right to straddle the hori...

Страница 25: ...ion boots for all of the horizontal bus splices the flexible boot is wrapped around the splice connection and is secured with plastic tights Slide the cover it is used to segregate the splice kits for the main busbar joints and the C profiles of the back of the structure this are located on the C profiles right in the area to separate the C profile and the splice kits On a MCC Arc Resistant the co...

Страница 26: ...you may need to clean the contact surfaces by sanding lightly with a fine grain aluminum oxide paper Splicing ground bus bar The horizontal ground bus must be spliced between adjacent sections Splice links are also provided on the right hand side of each shipping section and may be loosened and bridged to the adjacent section The ground bus bar is designed to use one single bar across the sections...

Страница 27: ...stance must be a minimum of 0 001 Ω to ensure a good residual energy drain Note Do not use abrasive cleaners on the bus joints Failure to follow this instruction can result in high resistance connections Additional connections to the central ground system and the MCC ground bus can be made at any point on the perforated ground bus Ground cables should not be run in conduit and should take the most...

Страница 28: ...nection Unit Socket Part Unit Carry Handle Heavy Units Only PVC Boot Line side stabs Unit shelf Guide Rails Fixing Studs Bottom Plate Fixing Studs Guide rails Guide Rails Fixing Screw Bottom plate support shelf attachment screw Bottom Plate s Rollers Unit s interlocking Wheel Cover Unit s interlocking Wheel Locking slots Power Cable Connect Unit Socket part Control Terminal Block Support Control T...

Страница 29: ...eight 300 mm 11 8 in compartments to a single 36E height compartment follow this procedure Disassembly Pull out the three withdrawable units See Remove Insert Withdrawable Units section Disconnect power and control cables Take outthe two upper control terminal block supports fig 45 with their control terminal blocks fig 44 The lower support may remain unchanged or if necessary can be relocated and...

Страница 30: ...h the left guide rail and the rollers and covers have to be mounted items 22 20 of fig 43 Mount one control terminal block support item 16 with one or two 12 pole terminal blocks above each of the newly installed compartment bottom plates on the right hand side in the cable compartment item 13 If only one 12 pole terminal block per support is required it must be mounted in the upper part of the cu...

Страница 31: ...f wire size type and stranding for the type of power terminations lugs or terminals Use correct lugs in all applications Crimp compression lugs with the manufacturer recommended tools Properly connect all line and load cables to avoid a bolted fault and equipment damage Use the MCC electrical schematics provided to verify field wiring connection points Determine the phase of each cable before maki...

Страница 32: ...rming cables for termination within the MCC This reduces the risk of damage to equipment or weakening of the cable insulation The cable manufacturer s instructions should be followed in determining the minimum bending radius of the cables This will vary with the size and type of cable involved Cable connections to withdrawable units Warning Failure to support cables can cause potentially hazardous...

Страница 33: ... split through the horizontal wireway in the top and bottom of each section To make connections between shipping splits a pull apart terminal block usually will be provided Locate and uncoil removable shipping split terminals refer to MCC connection drawings provided in the Quality Dossier Once the wiring is uncoiled locate the terminals according to the number marked on them Connect the removable...

Страница 34: ...ndensation See the Temporary Storage section of this manual for more information Storing unit outside the MCC If you remove units from the MCC for any reason you must protect them by covering or wrapping them in plastic and marking them with their location so they can be returned to the proper location in proper lineup If you relocate the location of a unit within the MCC ensure that the unit is m...

Страница 35: ...connection verify the tightness of all control and power terminals within the units Insert all necessary fuses in the main and auxiliary circuits verifying that they match the apparatus list and the circuit diagram Set the main circuit protective device feeding the MCC to its lowest value Set the units protective devices to the specified values If present verify that current transformers are prope...

Страница 36: ...it in its cubicle without interrupting power to the MCC main bus This is possible through the combined action of the operating handle position and unit physical position Rotary operating handle This handle has five positions ON TRIP OFF TEST and MOVE Unit physical positions Withdrawable units have four 4 physical positions ENGAGED Unit is full inserted and connected to power ISOLATED Unit is moved...

Страница 37: ...will be 30mm drawn out of the cubicle and is locked Cannot be inserted nor removed Withdrawn Withdrawn Unit can be removed outside the MCC A safety mechanical latch must be defeated TRIP Engaged Tripped Unit s main breaker tripped after a fault The trip can be reset by moving the handle to the OFF position TEST Lockable with up to 3 padlocks Engaged Test Unit s main disconnect is OFF Unit s contro...

Страница 38: ...on If provided You can put the unit in the TEST mode without physically moving the withdrawable unit by turning the operating handle to the TEST position For safety you can lock the operating handle in the OFF positions using up to three padlocks When withdrawable units are not being used move the operating handle to the OFF position Opening the door The rotary operating handle mechanism prevents ...

Страница 39: ... specific maintenance instructions for the installed devices Maintenance Lock out Tag out The MCC provides the ability to padlock the operating handle of a unit in the OFF position to prevent changing the status or position of a unit Up to three padlocks can be used Follow your local authority having jurisdiction and or facility s procedures for properly locking out tagging out equipment during ma...

Страница 40: ...pprox 30 mm 1 2 in and stop in the ISOLATED position The operating handle will spring return to the OFF position The unit is now locked in place and cannot move either inward or outward with the operating handle in the OFF position In this ISOLATED position all power and control contacts connected via the control or power terminals are disengaged and the unit is electrically isolated See fig 63 2 ...

Страница 41: ... wiring power or control line or load If the handle does not return to the OFF position see the Troubleshoot Withdrawable Unit Interlock section of this manual 3 Rotate the operating handle again to the MOVE position and push firmly and sharply until the unit reaches the ENGAGED position You need to generate some momentum when pushing to overcome the friction as the power plugs engage The handle r...

Страница 42: ... in 002 0 001 Test for contact float The power contacts are contained in a black plastic housing for incoming and outgoing power connections These contacts must move freely from side to side indicating that they are properly installed Verify that contacts are movable and properly snapped into position in the withdrawable unit rear wall or contact apparatus housing Using the proper tool for each co...

Страница 43: ...r for each installation It is similar to other NEC marking requirements such as voltage voltage hazard labels and circuits Flash protection markings however must be based on application information and calculations from the installation site This information helps to identify the presence of a potential flash hazard and provide guidance in determining necessary personal protective equipment PPE to...

Страница 44: ...ents of the MCC Note For equipment connections and mountings see the manufacturer s technical data sheets Table 5 Tightening torque Main Bus Splice Links Recommended Torque Component Description Size Recommended Torque Nm Main Horizontal Bus Splice Links M12 70 Horizontal Ground Splice Links M8 22 4 Neutral Horizontal Bus Splice Links M12 70 Withdrawable Unit s Terminal block Component Description...

Страница 45: ... M8 5 5 6 5 OT800 M8 5 5 6 5 Contactor AF26 M4 1 7 2 AF40 M6 4 6 5 AF80 M6 4 6 5 AF140 M5 3 2 3 8 AF265 M5 3 2 3 8 AF460 M5 3 2 3 8 AF750 M6 4 6 5 Overload Relays EF19 M4 1 7 2 EF45 M4 1 7 2 EF96 M5 3 2 3 8 EF146 M5 3 2 3 8 EF205 M5 3 2 3 8 EF370 M5 3 2 3 8 EF750 M6 3 2 3 8 VFD ACS 880 R1 M5 3 2 3 8 R2 M5 3 2 3 8 R3 M6 4 6 5 R4 M6 4 6 5 R5 M6 4 6 5 R6 M8 5 5 6 5 R7 M8 5 5 6 5 R8 M8 5 5 6 5 R9 M8 5...

Страница 46: ...0 M8 5 5 6 5 Contactor AF26 M4 1 7 2 AF40 M6 3 2 3 8 AF80 M6 3 2 3 8 AF140 M5 3 2 3 8 AF265 M5 3 2 3 8 AF460 M5 3 2 3 8 AF750 M6 3 2 3 8 Overload Relays EF19 M4 1 7 2 EF45 M4 1 7 2 EF96 M5 3 2 3 8 EF146 M5 3 2 3 8 EF205 M5 3 2 3 8 EF370 M5 3 2 3 8 EF750 M6 3 2 3 8 VFD ACS 880 R1 M5 3 2 3 8 R2 M5 3 2 3 8 R3 M6 3 2 3 8 R4 M6 3 2 3 8 R5 M6 3 2 3 8 R6 M8 5 5 6 5 R7 M8 5 5 6 5 R8 M8 5 5 6 5 R9 M8 5 5 6...

Страница 47: ...minal screw 1 4 1 7 AF40 Terminal screw 3 4 4 AF80 Terminal screw 3 4 4 AF140 M8 15 3 18 0 AF265 M10 23 8 28 0 AF460 M10 36 42 4 AF750 M6 6 1 AF750 M12 38 3 45 Transformers T Series Terminal screw 1 5 1 8 Overload Relays EF19 Terminal screw 0 9 1 EF45 Terminal screw 2 2 3 EF96 Terminal screw 5 1 6 EF146 Terminal screw 5 1 6 EF205 M5 15 3 18 EF370 M5 36 42 4 EF750 Terminal screw 0 9 1 Control And A...

Страница 48: ...t Connection set Hex Allen Socket M6 8 10 Power Terminals Component Description Type Size Torque Nm Nominal Torque Nm Max VFD ACS 880 R1 Terminal screw 1 3 1 5 R2 Terminal screw 1 3 1 5 R3 Terminal screw 1 3 1 5 R4 Terminal screw 3 4 4 R5 Terminal screw 12 8 15 R6 Terminal screw 34 40 R7 Terminal screw 34 40 R8 Terminal screw 34 40 R9 Terminal screw 34 40 Softstarters PSE18 M8 5 1 6 PSE45 M8 5 1 6...

Страница 49: ...4 7 6 M8 3 8 1 10 Hex head screw grade 8 8 Aluminum Sheet Pozidrive screw M3 3 0 9 1 M4 3 1 7 2 Hex socket head cap M5 3 3 8 4 5 M6 3 4 7 5 5 M8 3 4 7 5 5 M8 5 8 1 9 5 Mechanical connections thread rolling screws in PLASTICS Plastic Type Size Torque Nm Nominal Torque Nm Max TORX pan Head M4 1 7 2 M5 3 8 4 5 M6 4 7 5 5 M7 M8 3 3 5 M9 3 3 5 Type Size Torque Nm Nominal Torque Nm Max Hex Allen Socket ...

Страница 50: ...50 MNS MCC LOW VOLTAGE MOTOR CONTROL CENTER ...

Страница 51: ......

Страница 52: ... correct it makes no representations or warranties of any kind express or implied about the completeness accuracy reliability suitability or availability with respect to the information products services or related graphics contained in the document for any purpose Any reliance placed on such information is therefore strictly at your own risk ABB reserves the right to discontinue any product or se...

Отзывы: