background image


ProcessMaster FEP610, HygienicMaster FEH610

 | OI/FEP610/FEH610-EN Rev. B  53


7.5.4


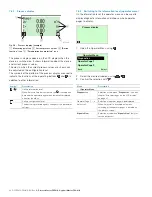
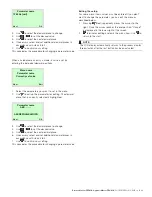
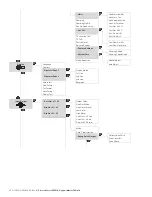
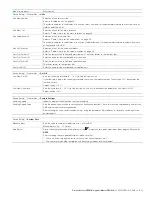
Menu: Device Setup  


Menu / parameter 

Description 

Device Setup 

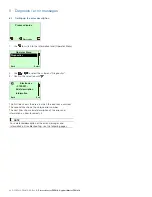
...Access Control 

Selection of submenu "

...Access Control

" using 

...Sensor 

Selection of submenu "

...Sensor

" using 

...Transmitter 

Selection of submenu "

...Transmitter

" using 


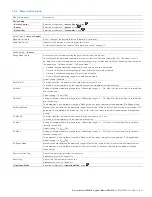
Device Setup

 / ...Access Control


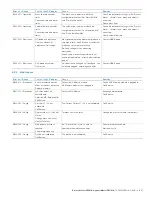
Standard Password


Entry / change of the password for the "Standard" access level. 

Read Only Switch


Indicator of the position of the write protection switch. 

For further information, see chapter "Write protection switch" on page 31. 


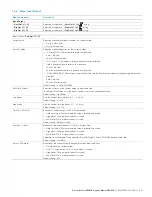
Device Setup / 

...Sensor


Range Mode Config


Activation of the second measuring range for the mass and volume flow. 

The setting can be performed separately for the mass flow rate (Qm) and volume flow (Qv). This means that it is 

possible to switch quickly between two measuring ranges (e.g. Qm Max and Qm Max2). Switching is performed via 

the parameters "Qm Range Mode", "Qv Range Mode". 

—  Disabled: Second measuring range for mass and volume flow rate deactivated. 

—  Qm and Qv: Second measuring range for mass and volume flow rate activated. 

—  Qm only: Second measuring range for mass flow activated. 

—  Qv only: Second measuring range for volume flow activated. 

Default setting: Disabled 

Qm Max DN


The value specifies the lower massflow rate a flow velocity of 10 m/s.  

The value is set automatically via the selected nominal size multiplied with the density set. 

Qm Max 1


Setting of the upper measuring range value 1 (Measuring range = 0 ... Qm Max 1) for the mass flow for forward flow 

and reverse flow.  

Default setting: 1 x Q

max

DN 

Qm Max 2


Setting of the upper measuring range value 2 (Measuring range = 0 ... Qm Max 2) for the mass flow for forward flow 

and reverse flow.  

This parameter is only available if the value "Max2 active" has been selected for the parameter "Qm Range Mode". 

Qm Range Mode


Manual switchover between the measuring ranges (Max1 active / Max2 active) for the mass flow measurement. This 

parameter is only available if the value Qm only or Qm and Qv has been selected for the parameter "Range Mode 

Config". 

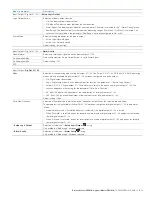
Qv Max DN


The value specifies the lower volume flowrate rate a flow velocity of 10 m/s. 

The value is set automatically via the selected nominal size. 

Qv Max 1


Setting of the upper measuring range value 1 (Measuring range = 0 ... Qv Max 1) for the volume flow for forward 

flow and reverse flow. 

Default setting: 1 x Q

max

DN 

Qv Max 2


Setting of the upper measuring range value 2 (Measuring range = 0 ... Qv Max 2) for the volume flow for forward 

flow and reverse flow.   

This parameter is only available if the value "Max2 active" has been selected for the parameter "Qv Range Mode". 

Default setting: 1 x Q

max

DN 

Qv Range Mode


Manual switchover between the measuring ranges (Max1 active / Max2 active) for the volume flow measurement. 

This parameter is only available if the value Qv only or Qm and Qv has been selected for the parameter Range 

Mode Config". 

Sensor Location Tag 

Entry of the measuring point tag for the sensor. 

Alphanumeric, max. 20 characters 

Sensor Tag


Entry of the TAG number of the sensor. 

Alphanumeric, max. 20 characters. 

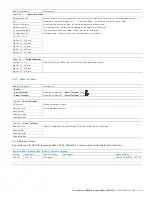
...Operating Mode 

Selection of submenu "

...Operating Mode

" using 


Содержание HygienicMaster FEH610

Страница 1: ...Operating Instruction OI FEP610 FEH610 EN Rev B ProcessMaster FEP610 HygienicMaster FEH610 Electromagnetic flowmeter Measurement made easy ...

Страница 2: ... www abb com flow Alternatively simply scan this code Hersteller ABB Automation Products GmbH Measurement Analytics Dransfelder Str 2 37079 Göttingen Germany Tel 49 551 905 0 Fax 49 551 905 777 Kundencenter Service Tel 49 180 5 222 580 Mail automation service de abb com ABB Inc Measurement Analytics 125 E County Line Road Warminster PA 18974 USA Tel 1 215 674 6000 Fax 1 215 674 7183 ABB Engineerin...

Страница 3: ...iner 20 5 4 5 Sensor type HygienicMaster 20 5 4 6 Grounding for devices with protective plates 20 5 4 7 Grounding with conductive PTFE grounding plate20 5 4 8 Installation and grounding in pipelines with cathodic corrosion protection 21 5 5 Electrical connections 22 5 5 1 Connecting the power supply 22 5 5 2 Installing the connecting cables 22 5 5 3 Connection using a cable conduit 23 5 5 4 Connec...

Страница 4: ...Dismounting 77 11 2 Disposal 77 11 3 Information on ROHS Directive 2011 65 EC 77 12 Specifications 78 12 1 Permitted pipe vibration 78 12 2 ProcessMaster Temperature data 78 12 2 1 Maximum permissible cleaning temperature 78 12 2 2 Ambient temperature as a function of measuring medium temperature 79 12 3 ProcessMaster Material loads for process connections 80 12 4 HygienicMaster Temperature data 8...

Страница 5: ...nel The signal word NOTE can also refer to material damage 1 3 Intended use This device is intended for the following uses To transmit fluid pulpy or pasty measurement media with electrical conductivity For volume flow measurement under operating conditions For mass flow measurement based on a fixed density to be programmed The device has been designed for use exclusively within the technical limi...

Страница 6: ...10 40 ASME CL 150 300 JIS 10K Nominal diameter DN 3 2000 1 10 80 Process connection Flange1 according to DIN ASME JIS Process connection material Steel cast iron stainless steel Liner material Hard rubber DN 15 2000 soft rubber DN 50 2000 PTFE DN 10 600 PFA DN 3 200 ETFE DN 25 600 Electrode material Stainless steel Hastelloy B Hastelloy C platinum iridium tantalum titanium IP rating Integral mount...

Страница 7: ...1 Weld stubs1 Tri Clamp in acc with DIN 326761 Tri Clamp in acc with ASME BPE1 External thread in acc with ISO 228 DIN 2999 DN 3 100 1 10 4 DN 3 100 1 10 4 PN 10 40 DN 3 100 1 10 4 PN 10 40 DN 3 100 1 10 4 PN 10 40 DN 3 100 1 10 4 PN 10 16 DN 3 100 1 10 4 PN 10 DN 3 25 1 10 1 PN 16 Process connection material Stainless steel Liner material PFA vakuum tight Electrode material CrNi steel 1 4571 AISI...

Страница 8: ...ximum 50 m 164 ft remote mount design only Power supply 100 240 V AC 15 10 24 48 V DC 10 10 Outputs Current output 4 20 mA active Digital output 1 passive configurable as pulse frequency or switch output Digital output 2 passive configurable as pulse or switch output Local display Configurable graphical display option Approvals Further approvals At www abb com flow or on request Change from one to...

Страница 9: ...it moves through a magnetic field Fig 3 Electromagnetic flowmeter schematic 1 Magnet coil 2 Measuring tube in electrode plane 3 Signal electrode v D B U 1 v D qv 4 2 qv U 1 U1 Signal voltage B Magnetic induction D Electrode spacing v Average flow velocity qv Volume flow This principle is applied to a conductive fluid in the measuring tube through which a magnetic field is generated perpendicular t...

Страница 10: ...mware version s Sensor calibration data t Excitation frequency Remote mount design Fig 5 Name plate remote mount design example A Flowmeter sensor B Transmitter 1 Type designation 2 CE mark 3 Nominal diameter Process connection pressure rating 4 Meter tube material 5 Medium temperature range 6 Ambient temperature range 7 Calibration value QmaxDN 8 Follow operating instructions symbol 9 Hot surface...

Страница 11: ...r to Pressure Equipment Directive 97 23 EC Pressure equipment subject to PED Below the CE mark the number of the designated authority to confirm that the device meets the requirements of Pressure Equipment Directive is specified The respective fluid group in accordance with the Pressure Equipment Directive is indicated under PED Example Fluid group 1 hazardous fluids gaseous Pressure equipment out...

Страница 12: ...rying straps must be used to transport flange designs smaller than DN 450 Wrap the straps around both process connections when lifting the device Chains should not be used since these may damage the housing Flange devices DN 450 Fig 8 Transport instructions DN 450 Using a forklift to transport flange device can bend the housing Flange devices must not be lifted by the center of the housing when us...

Страница 13: ...tion as necessary When installing the transmitter in a control cabinet make sure adequate cooling is provided In case of a remote mounted transmitter make sure that the sensor and the transmitter have been assigned correctly Compatible devices have the same end numbers on the name plate e g flowmeter sensor X001 belongs to transmitter Y001 or flowmeter sensor X002 belongs to transmitter Y002 5 1 2...

Страница 14: ...Forward flow is the factory setting as shown in Fig 11 5 1 6 Elektrode axis Fig 12 Orientation of the electrode axis 1 Elektrode axis The electrode axis should be horizontal if at all possible or no more than 45 from horizontal 5 1 7 Mounting position Fig 13 Mounting position A Vertical installation for measuring abrasive fluids preferably with flow in upward direction B In case of horizontal inst...

Страница 15: ...ow profile as long as standing eddies do not extend into the metering section such as may occur after double elbows in the event of tangential inflow or where half open gate valves are located upstream of the flowmeter sensor In such cases measures must be put in place to normalize the flow profile A Do not install fittings manifolds valves etc directly in front of the flowmeter sensor B Inlet and...

Страница 16: ... For strongly contaminated measuring media a bypass connection according to the figure is recommended so that operation of the system can continue to run without interruption during the mechanical cleaning 5 1 12 Installation in the vicinity of pumps Fig 18 Vibration damping 1 Pump 2 Damping device 3 Shut off device Strong vibrations in the pipeline must be damped using flexible damping devices Th...

Страница 17: ... hole Please observe the following points A Do not install the device horizontally with the terminal box or transmitter housing pointing downward B The mounting bracket option is not 3A compliant C Please ensure that the leakage hole of the process connection is located at the deepest point of the installed device Prefer vertical installation With horizontal installation make sure the sensor is se...

Страница 18: ...e into the piping 4 Use the appropriate screws for the holes in accordance with chapter Torque information on page 87 5 Slightly grease the threaded nuts 6 Tighten the nuts in a crosswise manner as shown in the figure Observe the tightening torques in accordance with chapter Torque information on page 87 First tighten the nuts to approx 50 of the maximum torque then to 80 and finally a third time ...

Страница 19: ... flowmeter sensor For measurement related reasons the potentials in the station ground and in the pipeline should be identical NOTE If the flowmeter sensor is installed in plastic or earthenware pipelines or in pipelines with an insulating lining transient current may flow through the grounding electrode in special cases In the long term this may destroy the sensor since the grounding electrode wi...

Страница 20: ...ding ring is not necessary 1 Install the flowmeter sensor with grounding ring in the pipeline 2 Connect the terminal lug for the grounding ring and ground connection on the flowmeter sensor with the grounding strap 3 Use a copper wire min 2 5 mm 14 AWG to link the ground connection to a suitable grounding point 5 4 5 Sensor type HygienicMaster Fig 28 1 Process connection adapter Ground the stainle...

Страница 21: ...sulating ring 4 Grounding plate 5 Insulating pipe 6 Flange 7 Lining 8 Insulation 9 Flowmeter sensor Install grounding rings on each side of the flowmeter sensor Insulate the grounding rings from the pipe flanges and connect them to the flowmeter sensor and to functional earth Insulate the screw bolts for the flange connections when mounting The insulation plates and the insulation pipe are not inc...

Страница 22: ...0 and must be dimensioned in accordance with the current consumption of the flowmeter measuring system The cables must comply with IEC 227 and or IEC 245 The circuit breaker should be located near the transmitter and marked as being associated with the device Connect the transmitter and sensor to functional earth 5 5 2 Installing the connecting cables Observe the following points when routing sign...

Страница 23: ...16 4 ft The supplied cable fulfills all submersion requirements The sensor is type tested in accordance with EN 60529 Test conditions 14 days at a flooding height of 5 m 16 4 ft Connection NOTE Potential adverse effect on IP rating IP 68 The IP rating IP 68 of the sensor may be adversely affected as a result of damage to the signal cable The sheathing of the signal cable must not be damaged 1 Use ...

Страница 24: ...te the installation before potting in order to avoid moisture penetration Before starting check all the connections for correct fitting and stability Do not overfill the terminal box Keep the potting compound away from the O ring and the gasket groove see Fig 35 Prevent the two component potting compound from penetrating the cable conduit if an NPT 1 2 installation is used Procedure Fig 35 1 Packi...

Страница 25: ...minal Function comments 31 32 Active current output The current output is active mode The source to drive the 20 mA loop is in built in the transmitter 41 42 Passive digital output DO1 The output can be configured as a pulse output frequency output or switch output on site 51 52 Passive digital output DO2 The output can be configured as a pulse output frequency output or switch output on site Func...

Страница 26: ...output Fig 38 Connection example I internal E external RB load A Passive digital output 41 42 51 52 as pulse or frequency output B Passive digital output 51 52 as binary output NOTE Terminals 42 52 have the same ground potential Digital outputs 41 42 and 51 52 are not electrically isolated from each other If you are using a mechanical counter we recommend setting a pulse width of 30 ms and a maxim...

Страница 27: ...alues in accordance with the information on the name plate Observe the voltage drop for large cable lengths and small conductor cross sections The voltage at the terminals of the device may not fall below the minimum value required in accordance with the information on the name plate The power supply is connected to terminal L phase N neutral or 1 2 and PE as stated on the name plate A circuit bre...

Страница 28: ...ine violet 3 1S Shield for E1 4 E2 Signal line blue 5 2S Shield for E2 6 M2 Magnet coil red 7 M1 Magnet coil brown 8 Not connected yellow Not connected orange 9 SE Shield Transmitter side Fig 41 Signal Cable Part No D173D031U01 Dimensions in mm inch Pos Terminal Function comments Color 1 3 Measurement potential green 2 E1 Signal line violet 3 1S Shield for E1 4 E2 Signal line blue 5 2S Shield for ...

Страница 29: ...n connecting Close unused cable entries using suitable plugs NOTE Observe the power supply limit values in accordance with the information on the name plate Observe the voltage drop for large cable lengths and small conductor cross sections The voltage at the terminals of the device may not fall below the minimum value required in accordance with the information on the name plate The power supply ...

Страница 30: ...rse effect on the housing protection class Follow the instructions in chapter Opening and closing the terminal box on page 18 to open and close the housing safely Observe the following points Lead the signal cable into the housing as shown Connect the cables in accordance with the electrical connection diagram If present connect the cable shielding to the earthing clamp provided Use wire end ferru...

Страница 31: ...against unintended startup 6 2 Write protection switch service LED and local operating interface Fig 44 1 Write protection switch 2 Service LED 3 Local operatinginterface Write protection switch If write protection is active the parameterization of the device cannot be changed via the local operating interface or the local display Turning the write protection switch clockwise deactivates the write...

Страница 32: ...r side of the transmitter cartridge The SensorMemory is labeled with an order number and an end number The end number is shown on the nameplate of the corresponding flowmeter sensor These numbers must be identical 6 4 Parameterization of the device The ProcessMaster FEP610 HygienicMaster FEH610 can be commissioned and operated via the integrated LCD indicator option see chapter Parameterization vi...

Страница 33: ...nformation on operating the software is available in the relevant operating instructions and the DTM online help 6 4 2 Parameterization via the local operating interface A PC notebook and the USB interface cable are required to configure the device via the device s local operating interface In conjunction with the HART DTM and the software ABB AssetVision available at www abb com flow all paramete...

Страница 34: ...Off Low Flow Cut Off 1 EPD Alarm Off 6 6 Switching on the power supply Switch on the power supply The LCD display shows the following display during the startup process System Startup Processing The process display is displayed after the startup process 6 7 Parameterization via the Easy Setup menu function Settings for the most common parameters are summarized in the Easy Setup menu This menu prov...

Страница 35: ... to call up the edit mode 14 Use to select the desired upper range value 15 Confirm the selection with The device is factory calibrated to the flow range end value QmaxDN unless other customer information is available The ideal flow range end values are approximately 2 3 m s 0 2 0 3 x QmaxDN The possible flow range end values are shown in the table in chapter Measuring range table on page 37 Easy ...

Страница 36: ...alarm mode 33 Confirm the selection with Easy Setup Low Alarm 3 500 mA Next Edit 34 Use to call up the edit mode 35 Use to set the alarm current for Low Alarm 36 Confirm the selection with Easy Setup High Alarm 21 800 mA Next Edit 37 Use to call up the edit mode 38 Use to set the alarm current for High Alarm 39 Confirm the selection with Zero point adjustment of the flowmeter NOTE Prior to startin...

Страница 37: ...m3 h 4755 US gal min 2160 m3 h 9510 US gal min 250 10 36 m3 h 159 US gal min 1800 m3 h 7925 US gal min 3600 m3 h 15850 US gal min 300 12 48 m3 h 211 US gal min 2400 m3 h 10567 US gal min 4800 m3 h 21134 US gal min 350 14 66 m3 h 291 US gal min 3300 m3 h 14529 US gal min 6600 m3 h 29059 US gal min 400 16 90 m3 h 396 US gal min 4500 m3 h 19813 US gal min 9000 m3 h 39626 US gal min 450 18 120 m3 h 52...

Страница 38: ... for menu navigation 2 Menu name display 3 Menu number display 4 Marker for indicating relative position within the menu 5 Display showing the current functions of the and operating buttons The LCD indicator has capacitive operating buttons These enable you to control the device through the closed housing cover NOTE The transmitter automatically calibrates the capacitive buttons on a regular basis...

Страница 39: ...ent process values There are two menu levels under the process display Information level Operator Menu The information level contains the parameters and information that are relevant for the operator The device configuration cannot be changed on this level Configuration level Configuration The configuration level contains all the parameters required for device commissioning and configuration The d...

Страница 40: ...rator pages are automatically displayed one after the other Call up configuration level The device is protected against changes of the parameter settings 7 3 2 Switching to the information level operator menu On the information level the operator menu can be used to display diagnostic information and choose which operator pages to display Process display 1 Open the Operator Menu using Operator Men...

Страница 41: ...ing conditions Sensor Error alarm of the flowmeter sensor Electronics Error alarm of the electronics Configuration Error alarm due to device configuration NOTE For a detailed description of errors and troubleshooting instructions please see chapter Diagnosis error messages on page 64 7 3 4 Switching to the configuration level parameterization The device parameters can be displayed and changed on t...

Страница 42: ...on level 6 Select a menu using 7 Confirm the selection with 7 3 5 Selecting and changing parameters Entry from table When an entry is made from a table a value is selected from a list of parameter values Menu name Parameter name Currently set value Next Edit 1 Select the parameters you want to set in the menu 2 Use to call up the list of available parameter values The parameter value that is curre...

Страница 43: ...ly selected is highlighted Parameter name ABC ABCDEFGHIJKLMOPQ Next OK 3 Use to select the decimal place to change 4 Use to set the desired value 5 Use to select the next decimal place 6 If necessary select and set additional decimal places in accordance with steps 3 to 4 7 Use to confirm your setting This concludes the procedure for changing a parameter value Exiting the setup For some menu items...

Страница 44: ...ible in it Easy Setup Language Unit Volumeflow Qv Qv Max 1 Unit Vol Totalizer Pulses per Unit Pulse Width Damping Dig Out 41 42 Mode Curr Out at Alarm Low Alarm High Alarm System Zero Device Info Sensor QmaxDN Type Meter Size Transmitter Qm Max DN Qv Max DN Mains Frequency Exitation Freq Coil Current Regul Set Point Curr DC feedback reg Sensor ID Sensor Serial No Sensor Run Hours Se Calibration Se...

Страница 45: ...rt HW Frontend Ver Tx Calibration Bootloader FEB Ver Curr Out FW Ver Manufacturer Curr Out FW CRC Street City TX Span Phone TX Zero First Cal Date Last Cal Date First Cal Location Last Cal Location Device Setup Access Control Standard Password Read Only Switch Sensor Range Mode Config Transmitter Qm Max DN Qm Max 1 Qm Max 2 Qm Range Mode Qv Max DN Qv Max 1 Qv Max 2 Qv Range Mode Sensor Location Ta...

Страница 46: ...eresis Feature Settings Verifying Capab System Zero Verifying Capab Code Noise Reduction Manual Adjust Display Language Auto Adjust Contrast Operator Page 1 Display Mode 1st Line Operator Page 2 2nd Line 3rd Line Autoscroll Bargraph Flow Format Tot Format Date Format Display Test Input Output Curr Out 31 32 Output Value Curr Out Mode Dig Out 41 42 Curr Out at Alarm Low Alarm Dig Out 51 52 High Ala...

Страница 47: ...ut Of Specification Qm Massflow Min Qm Massflow Max Qv Volumeflow Min Qv Volumeflow Max Diagnostics Maintenance control Preset Maint cycle Maint Remain Time Diagnosis Control Start New Cycle Diagnosis Values Empty Pipe Detector Empty Pipe Detector Adjust EP Noise Check Manual Adjust EP F Threshold Fingerprints Detector EP Value Diagnosis Interval Start Noise Check Power Spectrum Inhouse Temperatur...

Страница 48: ...g Out 41 42 State Dig Out 41 42 Freq Dig Out 41 42 Pulse Dig Out 51 52 State Dig Out 51 52 Pulse Curr Out 31 32 Dig Out 41 42 Freq Dig Out 41 42 State Dig Out 51 52 State Totalizer Reset Totalizer All Totalizer Preset Totalizer Massflow Fwd Massflow Rev Volumeflow Fwd Volumeflow Rev Massflow Fwd Massflow Rev Volumeflow Fwd Volumeflow Rev Change from one to two columns ...

Страница 49: ...rial gallons per hour igal d 94 Imperial gallons per day bbl s 112 Oil barrels per second bbl min 113 Oil barrels per minute bbl h 114 Oil barrels per hour bbl d 115 Oil barrels per day bls s 130 Brew barrels per second bls min 131 Brew barrels per minute bls h 132 Brew barrels per hour bls d 133 Brew barrels per day xx yy 254 User defined unit Table 2 Units for the mass flow Selection Code Descri...

Страница 50: ...It affects the instantaneous value in the display and at the current output Default setting 1 second Dig Out 41 42 Mode Selection of the operating mode for digital output 41 42 Off Digital output 41 42 deactivated Logic Digital output 41 42 as a binary output e g as an alarm output Pulse Digital output 41 42 as a pulse output In pulse mode pulses are output per unit e g 1 pulse per m3 Frequency Di...

Страница 51: ...e selected nominal size Mains Frequency Mains frequency for the supply power Exitation Freq Frequency used to operate the magnet coils of the flowmeter sensor Coil Current Regul For service information purposes only Set Point Curr Current used to operate the magnet coils of the flowmeter sensor DC feedback reg For service information purposes only Sensor ID ID number of the sensor Sensor Serial No...

Страница 52: ... Phone Manufacturer s address phone number Device Info Transmitter Transmitter Version FW Device Ver Version and item number of device software package FW Device Part Nr FW Frontend Ver Version and checksum CRC of frontend board FEB software FW Frontend CRC HW Frontend Ver Hardware version of frontend board FEB Bootloader FEB Ver Version of frontend board FEB bootloader Curr Out FW Ver Current out...

Страница 53: ...nge 0 Qm Max 1 for the mass flow for forward flow and reverse flow Default setting 1 x QmaxDN Qm Max 2 Setting of the upper measuring range value 2 Measuring range 0 Qm Max 2 for the mass flow for forward flow and reverse flow This parameter is only available if the value Max2 active has been selected for the parameter Qm Range Mode Qm Range Mode Manual switchover between the measuring ranges Max1...

Страница 54: ...t output Default setting 1 second Damping On Off Switches the damping on or off Density Fixed Value If the flow is measured and indicated in mass flow units a fixed density must be taken into account for the calculations To convert the flow rate to mass flow units a density value from 0 01 5 0 g cm3 can be entered Cut Off Selection of submenu Cut Off using TX Location TAG Entry of the measuring po...

Страница 55: ...t Qv Unit N Enter the name for the user defined volumeflow unit Device Setup Transmitter Cut Off Low Flow Cut Off Sets the switching threshold 0 10 for the low flow cut off If the flow rate is below the switching threshold there is no flow measurement The setting of 0 deactivates the low flow cut off Default setting 1 0 Low Flow Hysteresis Sets the hysteresis 0 50 for the low flow cut off as it is...

Страница 56: ... to display the corresponding process variables Default setting X XX Tot Format Date Format Set the display format for the date Default setting YYYY MM DD Display Test Start the test of the LCD display with The display test lasts approx 10 seconds Various patterns are shown on the LCD display to check the display Display Operator Page 1 n Display Mode Configure each operator page The following var...

Страница 57: ... status of the current output in error condition The output Low Alarm or High Alarm current is set in the subsequent menu Default setting High Alarm Low Alarm Sets the current for Low Alarm 3 5 3 6 mA Default setting 3 5 mA High Alarm Sets the current for High Alarm 21 22 6 mA Default setting 21 8 mA Curr Out 20 5mA Behavior of current output if 20 5 mA is exceeded Hold Last Value The last measure...

Страница 58: ...up Freq Output Selection of submenu Setup Freq Output using Only available if ModeFrequency has been selected Setup Logic Output Selection of submenu Setup Logic Output using Only available if ModeLogic has been selected Alarm Config Selection of submenu Alarm Config using Only available when Logic is selected in Mode and Alarm Signal is selected from the Setup Logic Output Logic Output Action men...

Страница 59: ...igital output 51 52 has been configured as a pulse output Off Digital output deactivated Logic Digital output functions as binary output for function see parameter Setup Logic Output Follow DO 41 42 Digital output 51 52 operates according to the pulses from digital output 41 42 The function depends on the setting for the parameter Outp Flow Direction 90 Shift 90 phase shifted output of the same pu...

Страница 60: ...cess Alarm Diagnostic history Shows the alarm history list Clear Alarm History Reset of the alarm history Group Masking Selection of submenu Group Masking using Alarm Limits Selection of submenu Alarm Limits using Process Alarm Group Masking Maintenance Required Alarm messages are divided into groups If masking is activated for a group On no alarm is issued For further information see chapter Diag...

Страница 61: ...seconds Default setting 5s Diagnostics Diagnosis Control Empty Pipe Detector Empty Pipe Detector Activate the Empty Pipe Detector function only for sizes DN 10 An entirely full measuring tube is essential for an accurate measurement The Empty Pipe Detector function detects an empty measuring pipe In the case of an alarm the current output assumes the status that was defined in the Input Output Cur...

Страница 62: ...m s device can be detected at an early stage Corrective actions can be taken Tx Factory 1m s Tx Factory 10m s Start Tx Customer FP Create the manual fingerprint for the transmitter using Tx Customer CMR The manual fingerprint is created on site prior to verification of the transmitter Use the parameter Start Tx Customer FP to create the the manual fingerprint Tx Customer 1m s Tx Customer 10m s Dia...

Страница 63: ...lse Diagnostics Output Readings Curr Out 31 32 Display the current values and statuses of the listed inputs and outputs Dig Out 41 42 Freq Dig Out 41 42 State Dig Out 51 52 State 7 5 9 Menu Totalizer Menu parameter Description Totalizer Reset Totalizer Selection of submenu Reset Totalizer using Preset Totalizer Selection of submenu Preset Totalizer using Totalizer Reset Totalizer All Totalizer Res...

Страница 64: ...enu Operator Menu Diagnostics Back Select 2 Use to select the submenu Diagnostics 3 Confirm the selection with Electronics F123 321 Brief description Information Back Exit The first line shows the area in which the error has occurred The second line shows the unique error number The next lines show a brief description of the error and information on how to remedy it NOTE For a detailed description...

Страница 65: ...tion has detected a transmitter error Call service F095 036 Electronics Coil isolation alarm Call service Defective coil incorrect wiring shortcut M1 M2 vs GND Flooded sensor Call service F094 022 Electronics Safety Alarm Curr Out 31 32 SIL function detects error Call Service The Current Output μController detects SIL relevant errors Call service F093 032 Electronics Electrode short cuircit Check ...

Страница 66: ...ne or more Totalizers The option card Digital Input is configured to ResetTotalizer and this event is triggered Check Digital Input terminals and configuration C072 003 Config Simulation is on Simulated values Switch off Simulation Mode The simulation of a process value or an output is active Switch off simulation mode C070 027 Config An alarm is simulated Switch off alarm simulation The simulatio...

Страница 67: ...um is not evenly distributed e g directly after injection points Contact ABB Service S040 031 Electronics Coil impedance alarm Call service Coil Inductance changed coil damaged coil isolation damaged outer magnetic fields Contact ABB Service 8 2 4 Maintenance Error no Range Text on the LCD display Cause Remedy M038 010 Electronics Sensor memory defective Mem or connect defective Replace memory Def...

Страница 68: ...t value no change Current value no change No F095 036 Electronics Coil isolation alarm Call service Current value no change Current value no change No F094 022 Electronics Safety Alarm Curr Out 31 32 SIL function detects error Call Service Current value no change Current value no change No F093 032 Electronics Electrode short cuircit Check wiring of sensor electrode Call service 0 Hz 0 No F092 033...

Страница 69: ...s Logic Alarm Signal EPD 0 0 Menu Group Masking S062 039 Operation Sensor temp limits alarm Change limits or change fluid temperature Current value no change No response Current value no change Current value no change Menu Group Masking S052 017 Operation Curr Out 31 32 is saturated CO process value out of range Adapt Qmax Alarm as configured in menu Curr Out 20 5mA Current value no change Current...

Страница 70: ...asking M037 015 Electronics NV chips defect on Motherboard Defective MB Replace MB Call Service M032 023 Config Curr Out 31 32 not calibrated Call Service M028 008 Config Display value is 1600 h at Qmax Change mass Unit or vol Unit for Totalizer M026 005 Config Maintenance interval is reached Perform maintenance M024 009 Config Device not calibrated Call Service High Alarm or Low Alarm depending o...

Страница 71: ...on the leak tightness the wear corrosion 9 2 Flowmeter sensor The flowmeter sensor is largely maintenance free The following items should be checked annually Ambient conditions air circulation humidity Seal integrity of the process connections Cable entry points cover gaskets and cover screws Operational reliability of the power supply feed the lightning protection and the grounding The flowmeter ...

Страница 72: ...iring individual components use original spare parts NOTE Spare parts can be ordered from ABB Service Please contact Customer Center Service acc to page 2 for nearest service location 10 2 Fuse replacement NOTE If the O ring gasket is seated incorrectly or damaged this may have an adverse effect on the housing protection class Follow the instructions in chapter Opening and closing the terminal box...

Страница 73: ...he terminal box on page 18 to open and close the housing safely The LCD indicator can be replaced in the event of a malfunction Component Order number LCD indicator HMI Applicable for integral and remote mount design 3KQZ407125U0100 Replace the LCD indicator as follows 1 Switch off the power supply 2 Unscrew remove the cover 3 Loosen the screws for the LCD indicator only on integral mount design 4...

Страница 74: ...100 Replace the transmitter electronic as follows 1 Switch off the power supply 2 Unscrew remove the cover 3 Remove the LCD indicator Ensure that the cable harness is not damaged 4 Loosen the fixing screw 3x for the transmitter electronic 5 Remove the faulty transmitter electronic 6 Pull the connector out of the sensor cable harness Ensure that the cable harness is not damaged 7 Pull out the Senso...

Страница 75: ...bration data is provided The SensorMemory module is located in the terminal box of the new sensor Plug this SensorMemory module in the transmitter Refer to chapter Replacing the transmitter on page 74 for SensorMemory installation Replace the sensor as follows 1 Switch off the power supply 2 Unscrew the cover 3 Disconnect the signal cable if necessary remove the potting compound 4 Install the new ...

Страница 76: ...e 32 NOTE Check and make sure that the parameter settings are correct 1 The SensorMemory is a pluggable data memory It is located on the rear side of the transmitter electronic 10 7 Returning devices Use the original packaging or a secure transport container of an appropriate type if you need to return the device for repair or recalibration purposes Fill out the return form see the Appendix and in...

Страница 77: ...formation in chapter Returning devices on page 76 11 2 Disposal This product and its packaging are manufactured from materials that can be recycled by specialist recycling companies Bear the following points in mind when disposing of them This product is not subject to WEEE Directive 2002 96 EC or relevant national laws e g ElektroG in Germany The product must be surrendered to a specialist recycl...

Страница 78: ...he device is dependent on a number of different factors These factors include the measuring medium temperature Tmedium the ambient temperature Tamb the operating pressure Pmedium the liner material and the approvals for the explosion protection 12 2 1 Maximum permissible cleaning temperature CIP medium Liner material Cleaning temperature Steam PTFE PFA 150 C 302 F Cleaning fluid PTFE PFA 140 C 284...

Страница 79: ... 10 C 14 F 130 C 266 F ETFE Stainless steel 20 C 4 F 60 C 140 F 25 C 13 F 85 C 185 F 20 C 4 F 30 C 86 F 25 C 13 F 130 C 266 F 1 For China production site only 2 The maximum measuring medium temperature is reduced to 80 C 176 F for design level B sensors with a hard rubber liner Remote mount design Liner material Flange material Ambient temperature range Tamb Measuring medium temperature range Tmed...

Страница 80: ...el B sensor Liner material Nominal diameter Pmedium mbar abs Tmedium 1 Hard rubber DN 40 600 1 1 2 24 600 80 C 176 F PTFE DN 25 600 1 24 270 400 500 20 C 68 F 100 C 212 F 130 C 266 F 1 For CIP SIP cleaning higher temperatures are permitted for limited time periods refer to the chapter Maximum permissible cleaning temperature on page 78 2 For China production site only Liner approvals on request pl...

Страница 81: ... 60 70 80 90 100 110 30 22 10 14 10 50 30 122 50 122 70 158 90 194 110 230 130 266 150 302 170 C 338 F PN 40 PN 25 PN 16 PN 10 PN 63 PN 100 145 290 435 580 725 870 1015 1160 1305 1450 1595 0 Tmedium Pmedium bar Pmedium psi G10590 CL300 CL150 30 22 10 14 10 50 30 86 50 122 70 158 90 194 110 230 130 266 150 302 170 C 338 F 0 10 20 30 40 50 60 70 80 90 100 110 0 145 290 435 580 725 870 1015 1160 1305...

Страница 82: ... Pmedium bar Pmedium psi G11337 30 22 10 14 0 32 10 50 30 86 50 122 70 158 90 194 110 230 130 266 150 302 180 C 356 F 350 300 250 200 150 100 50 0 5076 4351 3625 2900 2175 1450 725 0 CL2500 CL1500 CL900 CL600 Tmedium Pmedium bar Pmedium psi G11335 40 35 30 25 20 15 10 5 0 580 508 435 363 290 218 145 73 0 PN40 PN25 CL150 PN16 PN10 10 14 0 32 10 50 20 68 30 86 40 104 50 122 60 140 70 158 90 194 80 1...

Страница 83: ...ure The specified cleaning temperature may be applied for a maximum of 60 minutes Maximum permissible temperature shock Maximum temperature shock temperature difference in C Any Temperature gradient C min Any Change from two to one column 12 4 2 Ambient temperature as a function of measuring medium temperature Process connection Ambient temperature range Tamb Measuring medium temperature range Tme...

Страница 84: ...g temperature on page 83 Liner approvals on request please contact ABB Overview Material load Process connection DN Pmedium max Tmedium Wafer type DN 3 50 1 10 2 40 bar 580 psi 25 130 C 13 266 F DN 65 100 2 1 2 4 16 bar 232 psi Welded spuds DIN 2463 ISO 1127 DIN 11850 DN 3 40 1 10 1 1 2 40 bar 580 psi 25 130 C 13 266 F DN 50 DN 80 2 3 16 bar 232 psi DN 65 DN 100 2 1 2 4 10 bar 145 psi Welded spuds...

Страница 85: ...onal Dimensions in the Datasheet Change from two to one column G10215 0 5 10 15 20 25 30 35 40 45 30 10 10 30 50 70 90 110 130 150 170 190 C 22 14 50 86 122 158 194 230 266 302 338 374 F 0 72 5 145 0 217 5 290 0 362 5 435 0 507 5 580 0 652 5 PN 40 PN 25 PN 16 PN 10 Tmedium Pmedium bar Pmedium psi G10216 CL 300 CL 150 0 5 10 15 20 25 30 35 40 45 50 55 30 10 10 30 50 70 90 110 130 150 170 190 C 22 1...

Страница 86: ...yp Serial no Reason for the return description of the defect Was this device used in conjunction with substances which pose a threat or risk to health Yes No If yes which type of contamination please place an X next to the applicable items Biological Corrosive irritating Combustible highly extremely combustible Toxic Explosiv Other toxic substances Radioactive Which substances have come into conta...

Страница 87: ...JIS 10K 4 1 1 88 20 75 20 75 DN 25 1 PN40 13 32 8 6 13 32 8 6 13 32 8 6 PN63 100 32 09 31 42 53 85 53 85 53 85 53 85 CL150 5 04 2 84 23 98 23 98 23 98 23 98 CL300 17 31 16 42 65 98 38 91 65 98 38 91 CL600 22 11 22 11 JIS 10K 8 46 5 56 26 94 26 94 26 94 26 94 DN 32 1 1 4 PN40 27 5 15 01 45 08 45 08 45 08 45 08 PN63 100 42 85 41 45 74 19 70 07 74 19 70 07 CL150 4 59 1 98 29 44 29 44 29 44 29 44 CL30...

Страница 88: ... 147 1 JIS 10K 20 7 12 22 49 68 78 19 49 68 78 19 DN 125 5 PN16 29 12 18 39 61 4 64 14 61 4 64 14 PN40 108 5 75 81 123 7 109 6 123 7 109 6 PN63 180 3 164 7 242 6 178 2 242 6 178 2 CL150 24 96 11 05 98 05 98 05 98 05 98 05 CL300 81 64 139 4 139 4 139 4 139 4 139 4 CL600 244 1 244 1 DN 150 6 PN16 46 99 23 7 81 23 85 08 81 23 85 08 PN40 143 5 100 5 162 5 133 5 162 5 133 5 PN63 288 7 269 3 371 3 243 4...

Страница 89: ...9 350 5 477 1 286 477 1 286 CL150 212 5 116 237 3 230 4 237 3 230 4 CL300 686 3 411 8 786 8 363 1 786 8 363 1 DN 600 24 PN10 224 7 164 8 238 7 149 1 238 7 149 1 PN16 515 1 399 9 496 7 365 3 496 7 365 3 PN25 826 2 600 3 750 7 539 2 750 7 539 2 CL150 356 6 202 8 451 6 305 8 451 6 305 8 CL300 1188 719 1376 587 4 1376 587 4 DN 700 28 PN10 267 7 204 9 On request On request 267 7 204 9 PN16 455 7 353 2 ...

Страница 90: ...request DN 1100 44 CL150 749 1 682 6 741 3 345 9 CL300 2607 On request On request On request DN 1200 48 PN 6 363 5 On request PN10 705 9 On request PN16 1464 On request CL150 815 3 731 6 CL300 3300 On request DN 1350 54 CL150 1036 983 7 CL300 5624 On request DN 1400 56 PN 6 515 On request PN10 956 3 On request PN16 1558 On request DN 1500 60 CL150 1284 1166 CL300 6139 On request DN 1600 64 PN 6 57...

Страница 91: ...CL150 36 12 36 12 CL300 73 99 73 99 JIS 10K 56 06 56 06 DN 50 1 1 2 PN40 71 45 71 45 CL150 66 22 66 22 CL300 38 46 38 46 JIS 10K 71 45 71 45 DN 65 2 1 2 PN16 37 02 39 1 PN40 43 03 44 62 CL150 89 93 89 93 CL300 61 21 61 21 JIS 10K 37 02 39 1 DN 80 3 PN40 51 9 53 59 CL150 104 6 104 6 CL300 75 54 75 54 JIS 10K 45 07 47 16 DN 100 4 PN16 49 68 78 19 PN40 78 24 78 19 CL150 76 2 76 2 CL300 102 6 102 6 JI...

Страница 92: ... 263 CL300 463 9 259 4 DN 400 16 PN10 120 1 113 9 PN16 191 4 153 8 PN25 404 246 7 CL150 229 3 222 8 CL300 635 8 328 1 DN 450 18 CL150 267 3 192 3 CL300 660 9 300 DN 500 20 PN10 153 9 103 5 PN16 312 1 224 8 PN25 477 1 286 CL150 237 3 230 4 CL300 786 8 363 1 DN 600 24 PN10 238 7 149 1 PN16 496 7 365 3 PN25 750 7 539 2 CL150 451 6 305 8 CL300 1376 587 4 2 Flange material steel 3 Flange material stain...

Страница 93: ...n Unit Vol Totalizer m3 l ml hl g kg t Liter l Pulses per Unit 1 10000 1 Pulse Width 0 1 2000 ms 100 ms Damping 0 02 60 s 1 Operating mode digital output 41 42 Off binary output pulse output frequency output Digital output 41 42 as pulse output for forward flow and reverse flow Operating mode digital output 51 52 Off binary output pulse output follows digital output 41 42 90 or 180 phase shift Dig...

Страница 94: ...Notes 94 OI FEP610 FEH610 EN Rev B ProcessMaster FEP610 HygienicMaster FEH610 Notes ...

Страница 95: ...Notes ProcessMaster FEP610 HygienicMaster FEH610 OI FEP610 FEH610 EN Rev B 95 Notes ...

Страница 96: ...ong New District Shanghai 201319 P R China Tel 86 0 21 6105 6666 Fax 86 0 21 6105 6677 Mail china instrumentation cn abb com www abb com flow Note We reserve the right to make technical changes or modify the contents of this document without prior notice With regard to purchase orders the agreed particulars shall prevail ABB does not accept any responsibility whatsoever for potential errors or pos...

Отзывы: