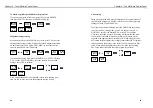
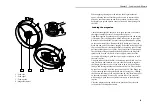
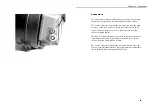
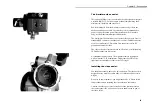
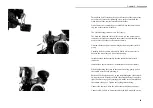
AAton A-Minima Скачать руководство пользователя страница 25

A-Minima Power Base

When used in conjunction with the A-minima camera body, the
Aaton small power base extends the camera functions.without com-
promising its size, weight. and ease of use.

The power base is multi functional: as a tripod intermediary plate, it
accepts a standard 15mm or 19mm sliding bridgeplate for building
the camera system for studio work. This configuration can accept
Arri, Chrosziel or other manufacturer's mattebox, follow-focus and
support equipment designed for bridgeplate use. 

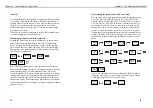
A lighter configuration is also possible using the two 15mm Aaton
screw-in front rods attached to the power base by means of two 3/8"
threaded inserts located at the font of the base. 

This configuration can also accept Arri, Chrosziel or other manufac-
turer's mattebox follow-focus and support equipment  

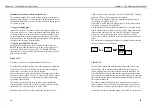
The power base is also an electrical (fused) junction box between a
remote 12 volts power source, the camera body and various acces-
sories such as a zoom control or lens capping shutter.

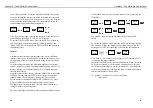
Using its BNC connector, the power base allows you to automatical-
ly synchronize the camera to a source signal such as one delivered
by a computer/video monitor.

Finally a remote ON/OFF capability is offered when connecting an
Aaton wooden handgrip to the power base Lemo 2 socket.

Chapter 5 - Accessories

49

Содержание A-Minima

Страница 1: ...u s e r s g u i d e...

Страница 2: ...1 presentation...

Страница 3: ...ernal 12V battery TBD and stop frame with built in intervalometer Nikon or PL mount Incident lightmeter dome showing T stop and diff T stop HMI frequency and monitor scan rates on the camera LCD dis p...

Страница 4: ...e up sprocket door 5 Feed sprocket door 6 Feed sprocket 7 Take up sprocket 8 Magazine locking mechanism 1 2 3 4 5 6 7 9 10 8 1 Magazine release lever 2 Lightmeter dome 3 Backlight LCD display 4 Batter...

Страница 5: ...mo 5 timecode socket 6 Lemo 6 accessories socket 7 Magazine release lever 8 Magazine hinge 6 3 4 5 7 1 Diopter locking knob 2 PL lens port locking ring 3 A minima fixed viewing screen 4 camera 172 8 m...

Страница 6: ...ton power base connection 3 power base locating hole 4 Magazine hinge 5 Magazine release lever 6 Hand strap holder 6 5 4 1 2 3 6 1 Diopter locking knob 2 Magazine latch 3 3 8 16 insert 4 camera run sw...

Страница 7: ...2 control panel...

Страница 8: ...or validate a parameter within a particular menu Allows you to cancel a parameter or move a step backward while setting a parameter Wakes up the camera if left alone the camera display will automatic...

Страница 9: ...2 The A Minima Control Panel 17 Camera run The running function of the camera motor is accomplished electron ically and can be accessed in two ways From the body Starting with the camera software vers...

Страница 10: ...you can choose from You can also make your selection of any 0 001 incremented crystal speed between 1 000 and 50 000 fps When setting the camera to a specific speed not being part of the preset ones A...

Страница 11: ...inima Control Panel 21 To delete a specific speed added to the preset list If you want to deleted it from your preset list choose DELETE then press YES The camera will default to 1 000 fps Magazine fo...

Страница 12: ...e code as the film pass through the gate between exposures Timecode can be quickly initialized from the camera internal clock or can be inputted from an external device Initializing the camera from it...

Страница 13: ...preferred method is by means of the OriginCplus wich inputs timecode in ASCII form It is also possible for the camera to receive information in SMPTE form directly from a SMPTE device such as a TC aud...

Страница 14: ...he camera will run at 1fps the camera display showing a NO TV SYNC message To exit the VIDEO SYNC menu press the BLUE key for three sec ond The display will show the battery voltage followed by the EX...

Страница 15: ...FF with the UP or DOWN key Press YES to validate Note When pressing any keys of the control panel the backlight will be turned on for 30s disregarding the display light setting Also to prevent excessi...

Страница 16: ...nd a NO EXT SYNC message is displayed Please contact your Aaton representative or rental house for further information concerning cables wiring Camera master to control another A Minima speed and shut...

Страница 17: ...3 magazine...

Страница 18: ...ne counter clockwise The film is being delivered by Kodak already rolled onto one of the spool The film is spooled emulsion out With its wind clockwise the perforation should be towards you The magazi...

Страница 19: ...careful not to spread apart the two flexible flanges Install the loaded spool onto the mag feed spindle with its wind clockwise Press evenly on each side of the core and while doing so push the semi...

Страница 20: ...ke up and feed sprockets Engage the film around the upper take up sprocket and close the sprocket door making sure that the film s perforations engage the sprocket teeth Engage the film around the low...

Страница 21: ...ing the exposed film spool After you exposed your full 200 ft roll you can disengage the maga zine from the camera and remove the daylight spool Remenber to never pry the spool out of the magazine but...

Страница 22: ...4 connectors...

Страница 23: ...e on off control and power output as well a s a connection for accessory such as a capping shutter The lemo 6 connector located at the bottom of the camera body pro vides remote on off power input and...

Страница 24: ...5 accessories...

Страница 25: ...the two 15mm Aaton screw in front rods attached to the power base by means of two 3 8 threaded inserts located at the font of the base This configuration can also accept Arri Chrosziel or other manuf...

Страница 26: ...era on off and external sync signals Next to it is the main 5 Amp fuse The Lemo 2 connector located between the two front rod inserts provides camera remote on off The BNC input connector located next...

Страница 27: ...his connector carries 12V ground and composite video The video assist also features a main on off switch a small running LED and manual lens iris control As standard from the factory The A minima came...

Страница 28: ...dia gram Carefully feed the camera wire and its Molex white connector in between the video lens and video front housing Install the video head assembly into the tubular holder located inside the came...

Страница 29: ...ds the rear of the A Minima While looking at the image on the monitor gently move the CCD head assembly until the viewing screen image is in focus and square to the monitor When this operation is achi...

Отзывы: