

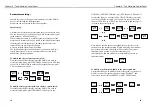


DOWN key, NEW SPEED blinks, press YES then use YES and NO
to select the digit you want to modify, UP or DOWN key to modify
it. After entering the last digit, you can add it to your preset speed
list, press YES to do so or NO if you do not wish to add this specif-
ic speed in the preset speed list.
Note: when a specific speed is not added to the preset list, a star
shows next to the displayed speed. Simply a warning. Not added or
part of the preset menu, this speed will be erased of the camera
internal memory as soon as you select another speed.
(Nevertheless, when powered down, A-Minima keeps it into its
internal memory)
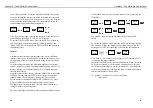
To modify a specific speed, added to the preset speed list:
A-minima allows you to modify or delete this speed. If you want to
modify it, access the speed menu, then choose "MODIFY" and
select a new speed from the PRESET or NEW SPEED menu.
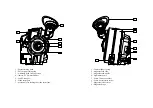
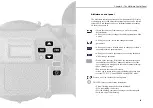
Chapter 2 - The A-Minima Control Panel
19
Parameters setting :
In order to view or to change a camera parameter, use the DOWN
key to scroll through the different menus.
Each menu can be accessed in the following order.
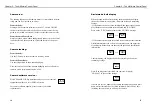
Speed setting
A-minima has a selection of preset speed that you can choose from.
You can also make your selection of any 0,001 incremented crystal
speed between 1.000 and 50.000 fps.
When setting the camera to a specific speed, not being part of the
preset ones, A-minima allows you to add or not this particular speed
to the factory selected speed list. The added speed can be later
removed from the preset speed selection.
A factory selected speed cannot be deleted.
The displayed messages can be different if you want to modify a
factory preset speed, or if you want to modify a specific speed,
added to the preset speed menu.
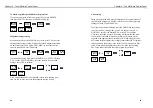
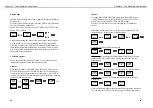
To modify and select a factory preset speed :
From the camera default display, press the DOWN key once to
access the speed menu, press YES, PRESET blinks, press YES, then
use the UP or DOWN key to go through the speed selection, press
YES to validate your choice.
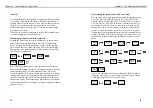
To modify a factory preset speed, and choose a specifc speed :
From the camera default display, press the DOWN key once to
access the speed menu, press YES, PRESET blinks, press the
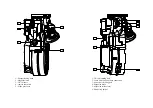
Chapter 2 - The A-Minima Control Panel
18
24.000
200 ft
33.333
200 ft
speed=
24.000
preset
new spd
24.000
33.333
add to
preset ?
added !
preset
new spd
add to
preset ?
33.260*
200ft
33.333
200 ft
25.000
200 ft
speed=
33.333
modify
delete
preset
new spd
33.333
25.000
24.000
200 ft
25.000
200 ft
speed=
24.000
preset
new spd
24.000
25.000
Содержание A-Minima
Страница 1: ...u s e r s g u i d e...
Страница 2: ...1 presentation...
Страница 7: ...2 control panel...
Страница 17: ...3 magazine...
Страница 22: ...4 connectors...
Страница 24: ...5 accessories...


